Spring Boot 整合 JUnit5
进行单元测试
SpringBoot 提供⼀系列测试⼯具集及注解⽅便我们进⾏测试。
Spring Test 与
JUnit等其他测试框架结合起来,提供了便捷高效的测试手段。而 Spring Boot
Test 是在 Spring Test 之上的再次封装,增加了切片测试,增强了 mock
能力。
spring-boot-test提供核⼼测试能⼒,spring-boot-test-autoconfigure提供测试的⼀些⾃动配置
我们只需要导⼊ spring-boot-starter-test 即可整合测试
1 2 3 4 5 <dependency > <groupId > org.springframework.boot</groupId > <artifactId > spring-boot-starter-test</artifactId > <scope > test</scope > </dependency >
Spring Boot Test 基于 spring-boot-starter-test
提供了丰富的测试工具,支持从单元测试 到端到端测试 的全流程覆盖。其测试体系可分为三大类:
单元测试:一般面向方法,编写一般业务代码时,聚焦代码逻辑进行的测试,测试单个组件(如方法、类)的行为,隔离外部依赖。
通过 Mockito
模拟外部依赖(如数据库、服务调用)。
依赖 JUnit 5 的 @Test 注解。
切片测试:一般面向难于测试的边界功能,介于单元测试和功能测试之间。测试特定组件或层,部分启动
Spring 容器,减少测试依赖。
比单元测试更接近真实场景,但只加载必要的组件。
通过 Spring Test 提供的切片注解(如
@WebMvcTest、@DataJpaTest)实现。
功能测试:测试完整业务流程,验证系统各组件的协同工作,同时也可以使用切面测试中的
mock 能力,推荐使用。
加载完整 Spring 容器,可能使用真实数据库或测试替身(Test
Double)。
通过 @SpringBootTest
spring-boot-starter-test默认提供了以下库供我们测试使⽤:
库 主要用途 典型场景
JUnit 5 基础测试框架
单元测试、参数化测试、生命周期管理
Mockito Mock 对象与行为验证
隔离外部依赖(如数据库、第三方服务)
AssertJ 流式断言(更易读的断言语法)
替代 JUnit 原生 assertEquals
Hamcrest 提供匹配器(Matcher)
复杂条件断言(如 allOf、hasItem)
JSONassert JSON 内容断言
REST API 返回的 JSON 数据验证
JsonPath JSON 路径表达式查询
提取和验证 JSON 中的特定字段(如 $.users[0].name)
核心注解详解
测试运行与 Spring 容器相关
@SpringBootTest @SpringBootTest 是 Spring Boot
提供的核心注解,适用于大多数集成测试。它的核心功能是启动完整的 Spring
上下文,模拟一个真实的应用程序环境,使得开发者可以在接近生产的环境下对应用进行测试。
当在测试类中标注 @SpringBootTest
注解时,在运行测试阶段,Spring Boot
会自动完整启动整个主程序。这意味着测试过程将包含 Spring Boot
应用的全部配置。例如,在一个包含数据库操作的 Spring Boot
应用中,使用@SpringBootTest注解后,测试过程会自动加载数据源配置,建立数据库连接,从而可以测试数据库相关的业务逻辑。
首先,测试类也必须在主程序所在的包及其子包,标注了@SpringBootTest注解意味着,该测试可以具备测试
Spring Boot 应用容器中的所有组件的功能
@SpringBootTest注解提供如下属性,用于灵活控制测试环境的启动方式。
classes :指定启动 Spring
应用上下文的主配置类,通常是 Spring Boot
应用的主类。若项目只有一个主类,该属性可省略,Spring Boot
会自动扫描;若存在多个候选主类,则必须显式指定,例如@SpringBootTest(classes = MyApplication.class)。
webEnvironment :定义 Web
测试环境,有四个可选值。
MOCK(默认值):使用 Spring MockMVC 进行 Web 测试,不启动真实的
Servlet 容器,适合测试 Web 层逻辑,如控制器方法。
RANDOM_PORT:启动一个真实的 Servlet
容器,并分配一个随机的端口,可以通过@LocalServerPort注解获取该端口,用于测试需要真实网络交互的场景。
DEFINED_PORT:启动真实的 Servlet
容器,并使用server.port配置中定义的端口,若配置中未指定端口,启动会失败。
NONE:不加载 Web 应用上下文,适用于非 Web
应用的测试,如仅测试数据访问层代码。
1
2
3
4
5
6
7
8
9
10
11
12
@SpringBootTest public class MyApplicationTests { @Autowired private SomeService someService; @Test public void testServiceMethod () { assertNotNull(someService); } }
@WebMvcTest@WebMvcTest 是 Spring Boot
提供的一个强大注解,专门用于对 Spring MVC 控制器进行切片测试(Slice
Test)。它能够精准加载 Web 层(通常是 Controller
层)组件相关的配置,而不需要启动完整的应用上下文,适合测试请求到
Controller 的映射和验证等。
当你在测试类上标注 @WebMvcTest 注解时,Spring Boot
会自动执行以下操作:
仅加载 Web
层组件 :只加载与控制器(Controller)、控制器通知(ControllerAdvice)、过滤器(Filter)、WebMvcConfigurer、HandlerMethodArgumentResolver
相关的 Bean,其他组件(如 Service、Repository)不会被加载。自动配置 Mock 环境 :
自动配置 MockMvc Bean,用于模拟 HTTP
请求和验证响应。
自动应用 @ControllerAdvice
类,处理异常和返回统一格式。
自动配置 JSON 序列化和反序列化支持。
支持依赖注入 :可以通过 @Autowired 注入
MockMvc 或其他 Web 层相关 Bean。注意 :@WebMvcTest使用
MockMvc,不会启动 Servlet 容器
@WebMvcTest 注解主要有以下两个常用属性:
value/ controllers :指定要测试的控制器类
1
2
@WebMvcTest(UserController.class) public class UserControllerTest { ... }
如果省略该属性,Spring Boot 会尝试查找并加载所有的控制器
Bean。
includeFilters/ excludeFilters :通过
@ComponentScan.Filter 自定义包含或排除的 Bean
1
2
3
4
5
@WebMvcTest( controllers = UserController.class, includeFilters = @Filter(type = FilterType.ASSIGNABLE_TYPE, classes = CustomValidator.class) ) public class UserControllerTest { ... }
测试示例:以测试一个处理用户请求的控制器为例子
1
2
3
4
5
6
7
8
9
10
11
12
13
14
15
16
17
18
19
20
21
22
23
24
25
26
27
28
29
@WebMvcTest(UserController.class) public class UserControllerTest { @Autowired private MockMvc mockMvc; @MockBean private UserService userService; @Test public void testGetUserById () throws Exception { UserDTO user = new UserDTO (1L , "John Doe" , "john@example.com" ); Mockito.when (userService.getUserById(1L )).thenReturn(user); mockMvc.perform(MockMvcRequestBuilders.get("/api/users/1" )) .andExpect(status().isOk()) .andExpect(jsonPath("$.id" ).value(1L )) .andExpect(jsonPath("$.name" ).value("John Doe" )); Mockito.verify(userService, Mockito.times(1 )).getUserById(1L ); } }
@DataJpaTest
和@JdbcTest@DataJpaTest 是专门为 JPA 相关测试提供的注解,它自动配置
JPA 测试环境,专注于测试 JPA
仓库(Repository)层。它会配置一个内存数据库(如 H2),并只加载与 JPA
相关的 Bean。会自动配置
EntityManager、DataSource 等JPA
基础设施,而且支持通过 data.sql 或 schema.sql
初始化测试数据
假设我们有一个 UserRepository 接口
1
2
3
4
@Repository public interface UserRepository extends JpaRepository <User, Long> { Optional<User> findByEmail (String email) ; }
使用 @DataJpaTest 进行测试
1
2
3
4
5
6
7
8
9
10
11
12
13
14
15
16
17
18
19
20
21
@DataJpaTest public class UserRepositoryTest { @Autowired private UserRepository userRepository; @Test public void testFindByEmail () { User user = new User (); user.setEmail("test@example.com" ); userRepository.save(user); Optional<User> result = userRepository.findByEmail("test@example.com" ); assertTrue(result.isPresent()); assertEquals("test@example.com" , result.get().getEmail()); } }
而@JdbcTest专注于测试基于 JDBC
的数据访问层,提供更底层的数据库操作测试能力,一般用于测试传统 JDBC
模板(JdbcTemplate)操作,验证 SQL
查询语句的正确性,测试存储过程和自定义数据访问逻辑等,它也是默认使用 H2
内存数据库,会自动配置
DataSource、JdbcTemplate 等 JDBC
基础设施,但是不会加载 JPA 相关的 Bean
假设我们有一个使用 JdbcTemplate 的数据访问类
1
2
3
4
5
6
7
8
9
10
11
12
13
14
@Repository public class UserJdbcRepository { private final JdbcTemplate jdbcTemplate; @Autowired public UserJdbcRepository (JdbcTemplate jdbcTemplate) { this .jdbcTemplate = jdbcTemplate; } public int count () { return jdbcTemplate.queryForObject("SELECT COUNT(*) FROM users" , Integer.class); } }
使用 @JdbcTest 进行测试
1
2
3
4
5
6
7
8
9
10
11
12
13
14
15
16
17
18
19
20
21
22
@JdbcTest public class UserJdbcRepositoryTest { @Autowired private JdbcTemplate jdbcTemplate; @Autowired private UserJdbcRepository userJdbcRepository; @Test public void testCount () { jdbcTemplate.execute("CREATE TABLE users (id SERIAL, name VARCHAR(100))" ); jdbcTemplate.update("INSERT INTO users (name) VALUES ('John')" ); int count = userJdbcRepository.count(); assertEquals(1 , count); } }
@RestClientTest客户端与 REST API 的交互测试至关重要。@RestClientTest 是
Spring Boot 提供的一个专用注解,用于测试 REST 客户端组件(如
RestTemplate、WebClient 或
@RestClient),它能够创建一个轻量级测试环境,专注于验证客户端与外部服务的交互逻辑。
它不会加载完整的 Spring 应用上下文,并且通过
@AutoConfigureWebClient(registerRestTemplate = true)
自动配置 RestTemplate 或
WebClient,而且其中内部集成
MockRestServiceServer 或 WebTestClient
用于模拟 HTTP 响应
例如,定义 WebClient 客户端,然后编写测试用例
1
2
3
4
5
6
7
8
9
10
11
12
13
14
15
16
17
@Service public class MyWebClient { private final WebClient webClient; @Autowired public MyWebClient (WebClient.Builder builder) { this .webClient = builder.baseUrl("https://api.example.com" ).build(); } public Mono<User> getUserById (Long id) { return webClient.get() .uri("/users/{id}" , id) .retrieve() .bodyToMono(User.class); } }
1
2
3
4
5
6
7
8
9
10
11
12
13
14
15
16
17
18
19
20
21
22
23
24
25
26
27
28
29
30
@RestClientTest(MyWebClient.class) public class MyWebClientTest { @Autowired private MyWebClient client; @Autowired private WebTestClient webTestClient; @Test public void testGetUserById () { User expectedUser = new User (1L , "John Doe" ); webTestClient.mutate() .responseTimeout(Duration.ofSeconds(10 )) .build() .get().uri("/users/1" ) .exchange() .expectStatus().isOk() .expectBody(User.class).isEqualTo(expectedUser); StepVerifier.create(client.getUserById(1L )) .expectNextMatches(user -> user.getId().equals(1L ) && user.getName().equals("John Doe" )) .verifyComplete(); } }
@JsonTest@JsonTest 用于测试 JSON 序列化和反序列化过程。它会加载
JSON 相关的 Bean,如 ObjectMapper,并且根据项目依赖自动配置
JSON 处理库
测试对象序列化
1
2
3
4
5
6
7
8
9
10
11
12
13
14
15
16
17
18
19
20
@JsonTest public class UserSerializationTest { @Autowired private JacksonTester<User> json; @Test public void testSerializeUser () throws Exception { User user = new User (1L , "John Doe" , LocalDate.of(1990 , 1 , 1 )); JsonContent<User> result = json.write(user); assertThat(result).extractingJsonPathNumberValue("$.id" ).isEqualTo(1 ); assertThat(result).extractingJsonPathStringValue("$.name" ).isEqualTo("John Doe" ); assertThat(result).extractingJsonPathStringValue("$.birthDate" ).isEqualTo("1990-01-01" ); } }
测试 JSON 反序列化
1
2
3
4
5
6
7
8
9
10
11
12
13
14
15
16
17
18
19
20
21
22
23
24
25
26
@JsonTest public class UserDeserializationTest { @Autowired private JacksonTester<User> json; @Test public void testDeserializeUser () throws Exception { String jsonContent = """ { "id": 1, "name": "John Doe", "birthDate": "1990-01-01" } """ ; User user = json.parse(jsonContent).getObject(); assertEquals(1L , user.getId()); assertEquals("John Doe" , user.getName()); assertEquals(LocalDate.of(1990 , 1 , 1 ), user.getBirthDate()); } }
总结:
注解 所属库 作用
@SpringBootTestSpring Boot Test
启动完整 Spring 应用上下文,用于集成测试或端到端测试。可指定
webEnvironment(如 RANDOM_PORT)。
@WebMvcTestSpring Boot Test
仅加载 Spring MVC 组件(如 Controller),用于切片测试 Web 层。
@DataJpaTestSpring Boot Test
测试 JPA 数据访问层,自动配置内嵌数据库(如 H2)和 JPA 组件。
@JdbcTestSpring Boot Test
测试 JDBC 数据访问层,自动配置数据源和 JdbcTemplate。
@RestClientTestSpring Boot Test
测试 REST 客户端(如 RestTemplate),自动配置 HTTP 客户端。
@JsonTestSpring Boot Test
测试 JSON 序列化 / 反序列化,自动配置 Jackson 或 Gson。
Mock 与依赖注入相关
@MockBean 和
@SpyBean首先我们要知道 Spring Boot Test 中提到的 mock 是什么
Mock(模拟)是软件开发测试中的一种技术手段,指通过创建虚拟的对象来替代真实对象,以隔离测试目标、控制依赖行为。
在 Spring Boot 测试中,Mockito 作为主流 Mock 框架。它将 Mockito
创建的 Mock 对象注入 Spring 容器,替代原 Bean,而且测试结束后自动清理
Mock 对象,可以直接通过注解声明 Mock 需求
当测试某个 Service 或 Controller 时,若其依赖其他 Bean(如
DAO、外部服务),直接注入真实 Bean
会导致各种一连串的配置,而且无法控制。Mockito 可创建 Mock
对象替代真实 Bean ,使测试聚焦于目标逻辑。
这次再来讲 @MockBean
估计我不用说大家都知道是什么意思了
也就是说,@MockBean注解完全替换 Spring
容器中的真实 Bean 为 Mock 对象,实现隔离外部依赖
示例
1 2 3 4 5 6 7 8 9 10 11 12 13 14 15 16 17 18 19 20 21 22 23 24 25 26 @WebMvcTest(UserController.class) class UserControllerTest { @MockBean private UserService userService; @Autowired private MockMvc mockMvc; @Test void testGetUser () throws Exception { when (userService.getUser(1L )).thenReturn( new User (1L , "张三" , "admin" ) ); mockMvc.perform(get("/users/1" )) .andExpect(status().isOk()) .andExpect(jsonPath("$.name" ).value("张三" )); verify(userService, times(1 )).getUser(1L ); } }
而@SpyBean的作用正相反,它包装真实
Bean ,保留原有行为
工具 / 注解
作用范围
实现方式
典型场景
@MockBeanSpring 容器中的 Bean
替换 Bean
隔离 Service、Repository 等
@SpyBeanSpring 容器中的 Bean
包装 Bean
部分方法 Stub,保留其他真实逻辑
Mockito.mock()纯 Java 对象
手动创建 Mock
单元测试中隔离非 Spring 对象
Mockito.spy()纯 Java 对象
手动创建 Spy
单元测试中包装真实对象
@Mock + @InjectMocksJUnit 单元测试
结合 @ExtendWith(MockitoExtension.class)
纯单元测试,不启动 Spring 容器
@InjectMocks一句话,自动注入 Mock 对象到测试目标中
当@InjectMocks标注在某个类上时,Mockito
会创建该类的实例作为
“被测试对象”,然后自动扫描目标类的字段,若字段被@Mock/@MockBean/@Spy/@SpyBean标注,则将对应的
Mock 对象注入;
1
2
3
4
5
6
7
8
9
10
11
12
13
14
15
16
17
18
19
@SpringBootTest class OrderControllerTest { @InjectMocks private OrderController orderController; @MockBean private OrderService orderService; @Test void testCreateOrder () { when (orderService.createOrder(any(OrderDTO.class))) .thenReturn(new Order (1L , "20250621" , OrderStatus.SUCCESS)); } }
orderController 实例由 Mockito
创建,其内部依赖的orderService会被自动注入 Mock 对象;若目标类有多个构造器,Mockito 会优先注入参数最多的构造器(类似
Spring 的构造器注入策略)
注解
作用对象
核心功能
@InjectMocks被测试的目标类
自动将 Mock 对象注入到目标类中,创建目标类的实例
@MockBean(Spring)Spring 容器中的 Bean
在 Spring 容器中创建 Mock 对象,替代原 Bean
@SpyBean(Spring)Spring 容器中的 Bean
在 Spring 容器中创建 Spy 对象(部分 Mock,保留原 Bean
的真实方法调用)
首先,@AutoConfigureMockMvc 会自动配置 Spring MVC
的MockMvc实例,用于测试 Controller 层的 HTTP
请求处理逻辑,无需启动完整 Web 容器。当Web
层切片测试(如@WebMvcTest)或功能测试中,需模拟 HTTP
请求并验证响应结果需要使用。
1
2
3
4
5
6
7
8
9
10
11
12
13
14
@WebMvcTest(HomeController.class) @AutoConfigureMockMvc class HomeControllerTest { @Autowired private MockMvc mockMvc; @Test void testHomePage () throws Exception { mockMvc.perform(get("/" )) .andExpect(status().isOk()) .andExpect(content().string(containsString("欢迎" ))); } }
若 Controller 依赖的 Service
被@MockBean标注,@AutoConfigureMockMvc会自动将
Mock 对象注入到 Controller 中
而@ImportAutoConfiguration就是手动导入 Spring Boot
的自动配置类(AutoConfiguration),用于测试中按需加载特定配置,避免完整容器启动的开销。
总结
注解 所属库 作用
@MockBeanSpring Boot Test
替换 Spring 容器中的 Bean 为 Mock
对象(Mockito),用于隔离外部依赖。
@SpyBeanSpring Boot Test
创建真实 Bean 的 Spy 对象,监视其方法调用(Mockito)。
@AutoConfigureMockMvcSpring Boot Test
自动配置 MockMvc(Spring MVC 测试工具),用于模拟 HTTP 请求。
@ImportAutoConfigurationSpring Boot Test
手动导入特定的自动配置类,用于自定义测试环境。
测试配置与环境相关
@TestPropertySource 为测试类指定额外的属性配置,覆盖默认配置文件(如application.properties)。
1
2
3
4
5
6
7
8
@SpringBootTest @TestPropertySource(properties = { "spring.datasource.url=jdbc:h2:mem:testdb", // 内存数据库 "app.feature.enabled=false" // 禁用某个功能 }) class MyServiceTest { }
properties:直接指定键值对(优先级最高);locations:指定额外的属性文件路径(如classpath:test.properties)。
测试时属性加载顺序(从高到低):
@TestPropertySource 注解中指定的属性;
命令行参数(如--spring.profiles.active=test);
系统环境变量;
application-test.properties(若激活test
profile);
application.properties
@ActiveProfiles 指定测试时使用的 Spring
Profile,加载对应配置文件(如application-test.properties),用于区分不同环境的配置(开发
/ 测试 / 生产)
1
2
3
4
5
@SpringBootTest @ActiveProfiles("test") class MyRepositoryTest { }
两者可同时使用,@ActiveProfiles加载基础配置,@TestPropertySource进一步覆盖特定属性:
1
2
3
4
5
6
@SpringBootTest @ActiveProfiles("test") @TestPropertySource(properties = "app.special.value=test-only") class MyTest { }
替换应用的数据源为测试专用数据库,避免测试影响生产数据。一般是使用内嵌数据库(如
H2、HSQL)替代真实数据库时候使用该注解
1
2
3
4
5
@DataJpaTest @AutoConfigureTestDatabase(replace = Replace.ANY) class UserRepositoryTest { }
replace替换策略,可选值:
Replace.ANY(默认):替换任何已配置的数据源(包括显式配置的);Replace.NONE:不替换,使用现有配置(用于测试真实数据库);Replace.AUTO_CONFIGURED:仅替换自动配置的数据源。
@TestConfiguration 定义仅在测试环境生效的配置类,不影响主应用配置。一般是注册测试工具、Mock
服务
1
2
3
4
5
6
7
8
9
10
11
12
13
14
15
16
17
18
19
@SpringBootTest class MyServiceTest { @TestConfiguration static class TestConfig { @Bean public MyDependency mockDependency () { return Mockito.mock(MyDependency.class); } } @Autowired private MyService myService; @Test void testService () { } }
总结
注解 所属库 作用
@TestPropertySourceSpring Test
为测试指定额外的属性源(如
@TestPropertySource(properties = "app.port=8081"))。
@ActiveProfilesSpring Test
指定测试时激活的 Spring Profile(如
@ActiveProfiles("test"))。
@AutoConfigureTestDatabaseSpring Boot Test
自动配置测试数据库,可替换为内嵌数据库(如
@AutoConfigureTestDatabase(replace = Replace.ANY))。
@TestConfigurationSpring Test
定义测试专用的配置类,不会被主应用扫描。
JUnit 5 原生注解
在这里不再细讲
注解 作用
@Test标记测试方法。
@BeforeEach每个测试方法前执行(替代 JUnit 4 的 @Before)。
@AfterEach每个测试方法后执行(替代 JUnit 4 的 @After)。
@BeforeAll所有测试方法前执行一次(需静态方法,替代 JUnit 4 的
@BeforeClass)。
@AfterAll所有测试方法后执行一次(需静态方法,替代 JUnit 4 的
@AfterClass)。
@Disabled禁用测试方法 / 类(替代 JUnit 4 的 @Ignore)。
@DisplayName为测试类或方法指定显示名称。
@Tag表示单元测试类别,类似于JUnit4中的@Categories
@Timeout表示测试⽅法运⾏如果超过了指定时间将会返回错误
@MethodSource通过方法提供参数
@ParameterizedTest参数化测试,支持多种参数源(如
@ValueSource、@CsvSource)。
举一个相对完善的例子帮着大家回忆一下
1
2
3
4
5
6
7
8
9
10
11
12
13
14
15
16
17
18
19
20
21
22
23
24
25
26
27
28
29
30
31
32
33
34
35
36
37
38
39
40
41
42
43
44
45
46
47
48
49
50
51
52
53
54
55
56
57
58
59
60
61
62
63
64
65
66
67
68
69
70
71
72
73
74
75
76
77
78
79
80
81
82
83
84
85
86
87
88
89
90
91
92
93
94
95
96
97
98
99
100
101
102
103
104
105
106
107
108
109
110
111
112
113
114
115
116
117
118
119
120
121
122
123
124
125
126
127
128
129
130
131
132
133
134
135
136
137
138
139
140
141
142
143
144
145
146
147
148
149
150
151
152
153
154
155
156
157
158
159
160
161
162
import org.junit.jupiter.api.*;import org.springframework.beans.factory.annotation.Autowired;import org.springframework.boot.test.context.SpringBootTest;import org.springframework.boot.test.mock.mockito.MockBean;import java.util.Arrays;import java.util.List;import java.util.Optional;import static org.assertj.core.api.Assertions.*;import static org.mockito.Mockito.*;@SpringBootTest @DisplayName("用户服务测试套件") class UserServiceTest { @Autowired private UserService userService; @MockBean private UserRepository userRepository; private static List<User> testUsers; @BeforeAll static void setUpAll () { testUsers = Arrays.asList( new User (1L , "Alice" ), new User (2L , "Bob" ), new User (3L , "Charlie" ) ); System.out.println("=== 初始化测试数据 ===" ); } @BeforeEach void setUpEach () { reset(userRepository); System.out.println("--- 开始测试 ---" ); } @AfterEach void tearDownEach () { System.out.println("--- 测试结束 ---" ); } @AfterAll static void tearDownAll () { testUsers = null ; System.out.println("=== 清理测试数据 ===" ); } @Test @DisplayName("应通过 ID 查找用户") void shouldFindUserById () { when (userRepository.findById(1L )) .thenReturn(Optional.of(testUsers.get(0 ))); User result = userService.getUserById(1L ); assertThat(result.getName()).isEqualTo("Alice" ); verify(userRepository, times(1 )).findById(1L ); } @Disabled("待实现用户删除逻辑") @Test void shouldDeleteUser () { } @ParameterizedTest(name = "用户 ID {0} 应存在") @ValueSource(longs = {1L, 2L, 3L}) void shouldValidateUserId (Long userId) { when (userRepository.existsById(userId)).thenReturn(true ); boolean exists = userService.exists(userId); assertThat(exists).isTrue(); } @ParameterizedTest @MethodSource("provideUserNames") void shouldCreateUser (String name) { User newUser = new User (null , name); when (userRepository.save(any(User.class))) .thenAnswer(invocation -> { User saved = invocation.getArgument(0 ); saved.setId(99L ); return saved; }); User result = userService.createUser(newUser); assertThat(result.getId()).isNotNull(); assertThat(result.getName()).isEqualTo(name); } static Stream<String> provideUserNames () { return Stream.of("David" , "Emma" , "Frank" ); } @Test void shouldThrowExceptionWhenUserNotFound () { when (userRepository.findById(99L )).thenReturn(Optional.empty()); assertThatThrownBy(() -> userService.getUserById(99L )) .isInstanceOf(EntityNotFoundException.class) .hasMessage("User not found with ID: 99" ); } } class User { private Long id; private String name; } interface UserRepository { Optional<User> findById (Long id) ; boolean existsById (Long id) ; User save (User user) ; } class UserService { private final UserRepository userRepository; public UserService (UserRepository userRepository) { this .userRepository = userRepository; } public User getUserById (Long id) { return userRepository.findById(id) .orElseThrow(() -> new EntityNotFoundException ("User not found with ID: " + id)); } public boolean exists (Long id) { return userRepository.existsById(id); } public User createUser (User user) { return userRepository.save(user); } } class EntityNotFoundException extends RuntimeException { public EntityNotFoundException (String message) { super (message); } }
数据相关
@Sql 在写单元测试时,往往需要在数据库中准备对应的测试数据。
我们可以在测试用例中,通过代码的方式往数据库中插入数据。但这么做会使测试代码比较臃肿。
通过sql脚本去导入数据,再结合@Transational注解在每次测试结束后对数据进行回滚,是一种更好的方案。为此,spring为我们准备了很有用的注解@Sql。
@Sql注解可以执行SQL脚本,也可以执行SQL语句。它既可以加上类上面,也可以加在方法上面。默认情况下,方法上的@Sql注解会覆盖类上的@Sql注解,但可以通过@SqlMergeMode注解来修改此默认行为。
@Sql有下面的属性:
config:与注解@SqlConfig作用一样,用来配置“注释前缀”,“分隔符”等。executionPhase:决定SQL脚本或语句什么时候会执行,默认是BEFORE_TEST_METHOD。statements:配置要一起执行的SQL语句。scripts:配置SQL脚本路径。value:scripts的别名,它不能和scripts同时配置,但statements可以。
示例如下:
1
2
3
4
5
6
7
8
9
10
11
12
13
14
15
16
17
18
19
20
21
22
23
24
25
26
27
28
29
30
31
32
33
34
35
36
37
38
39
40
41
42
43
44
45
46
47
48
49
50
51
52
53
54
55
56
57
58
59
60
61
62
63
64
65
66
67
68
69
70
import org.junit.jupiter.api.Test;import org.springframework.beans.factory.annotation.Autowired;import org.springframework.boot.test.context.SpringBootTest;import org.springframework.test.annotation.Rollback;import org.springframework.test.jdbc.SQLAssert;import org.springframework.test.sql.annotation.Sql;import org.springframework.transaction.annotation.Transactional;import javax.sql.DataSource;import java.sql.Connection;import java.sql.Statement;@SpringBootTest @Transactional @Sql(scripts = "classpath:sql/init-db.sql") class UserRepositoryTest { @Autowired private DataSource dataSource; @Autowired private UserRepository userRepository; @Test @Sql(statements = { "INSERT INTO users(id, name, age) VALUES(4, 'David', 35)", "INSERT INTO users(id, name, age) VALUES(5, 'Emma', 28)" }) void testFindAllUsers () throws Exception { List<User> users = userRepository.findAll(); assertThat(users).hasSize(5 ); try (Connection conn = dataSource.getConnection(); Statement stmt = conn.createStatement()) { SQLAssert.assertSelectCount(stmt, "SELECT * FROM users" , 5 ); } } @Test @Sql( config = @SqlConfig(commentPrefix = "--"), // 自定义注释前缀 scripts = "classpath:sql/insert-test-user.sql", executionPhase = Sql.ExecutionPhase.AFTER_TEST_METHOD // 测试后执行 ) void testUserCount () { long count = userRepository.count(); assertThat(count).isEqualTo(3 ); } } class User { private Long id; private String name; private int age; } interface UserRepository { List<User> findAll () ; long count () ; }
init-db.sql(类级别执行的初始化脚本)
1 2 3 4 5 6 7 8 9 10 CREATE TABLE IF NOT EXISTS users ( id BIGINT PRIMARY KEY , name VARCHAR (50 ), age INT ); INSERT INTO users(id, name, age) VALUES (1 , 'Alice' , 25 );INSERT INTO users(id, name, age) VALUES (2 , 'Bob' , 30 );INSERT INTO users(id, name, age) VALUES (3 , 'Charlie' , 35 );
insert-test-user.sql(方法级别执行的脚本):
1 2 INSERT INTO users(id, name, age) VALUES (6 , 'Frank' , 40 );
@SqlConfig @SqlConfig 用于自定义 SQL
脚本的执行配置 ,解决不同 SQL
方言、注释格式、分隔符等差异问题。
@Sql注解也有一个config属性,作用与@SqlConfig相同,不同的是作用域只在对应的@Sql注解范围。它的优先级也大于类注解的@SqlConfig。
核心属性
属性 说明 示例
commentPrefixSQL 注释前缀(默认 --)
@SqlConfig(commentPrefix = "REM ")(适配 Oracle)
separatorSQL 语句分隔符(默认 ;)
@SqlConfig(separator = "/")(适配 Oracle
存储过程)
encoding脚本编码(默认 UTF-8)
@SqlConfig(encoding = "ISO-8859-1")
errorMode错误处理模式(默认 STOP,遇到错误停止执行)
@SqlConfig(errorMode = SqlConfig.ErrorMode.CONTINUE)(忽略错误继续执行)
transactionMode事务模式(默认 DEFAULT,使用测试的事务配置)
@SqlConfig(transactionMode = SqlConfig.TransactionMode.ISOLATED)
与@sql结合使用的示例
1
2
3
4
5
6
7
8
9
10
11
12
13
14
15
16
17
18
19
20
21
22
23
24
25
26
27
28
@SpringBootTest @Transactional class AdvancedSqlTest { @Autowired private DataSource dataSource; @Test @Sql( config = @SqlConfig( commentPrefix = "#", // 使用 # 作为注释前缀(类似 H2 数据库) separator = ";", // 语句分隔符 encoding = "UTF-8", // 编码格式 errorMode = SqlConfig.ErrorMode.STOP, // 遇到错误停止 transactionMode = SqlConfig.TransactionMode.ISOLATED // 独立事务 ), scripts = "classpath:sql/complex-script.sql" ) void testCustomSqlConfig () throws Exception { try (Connection conn = dataSource.getConnection()) { SQLAssert.assertSelectCount(conn.createStatement(), "SELECT * FROM special_users" , 5 ); } } }
方法级别优先 :方法上的 @Sql
会覆盖类上的 @Sql;@SqlConfig 继承@SqlConfig 会覆盖类上的
@SqlConfig,若无则继承类配置;合并模式 :通过 @SqlMergeMode
可修改默认的覆盖行为(如
@SqlMergeMode(SqlMergeMode.MergeMode.MERGE) 合并配置)
进行测试
单元测试
我们之前会使用@RunWith注解,去测试指定的类,不过在 JUnit
5 中,我们可以使用更加简洁和强大的注解来完成单元测试。
一般来说,每个测试方法只测试一个功能点,避免测试用例过于复杂。而且单元测试拥有Given-When-Then
模式
通常情况下,我们会在单元测试中,结合 Mock
,去做一些dao,service,controller层或者util层的测试,因为单元测试应独立于外部依赖(如数据库、服务调用),通常通过
Mock
对象实现。而且测试目标应聚焦于代码的业务逻辑,而非框架或基础设施。
例如
目标 :测试 UserService
的业务逻辑,隔离对 UserRepository 的依赖。
1
2
3
4
5
6
7
8
9
10
11
12
13
14
15
16
17
18
19
20
21
22
23
24
25
26
27
28
29
30
31
32
33
34
35
36
37
38
39
40
41
42
43
44
45
46
47
48
49
50
51
52
53
54
55
56
57
58
59
60
61
62
63
64
65
66
@ExtendWith(MockitoExtension.class) class UserServiceTest { @Mock private UserRepository userRepository; @InjectMocks private UserService userService; @Test void shouldGetUserById () { when (userRepository.findById(1L )) .thenReturn(Optional.of(new User (1L , "Alice" , "alice@example.com" ))); User result = userService.getUserById(1L ); assertEquals("Alice" , result.getName()); verify(userRepository, times(1 )).findById(1L ); } @Test void shouldThrowExceptionWhenUserNotFound () { when (userRepository.findById(99L )).thenReturn(Optional.empty()); Exception exception = assertThrows(EntityNotFoundException.class, () -> userService.getUserById(99L )); assertEquals("User not found with ID: 99" , exception.getMessage()); } } class User { private Long id; private String name; private String email; } interface UserRepository { Optional<User> findById (Long id) ; } class UserService { private final UserRepository userRepository; public UserService (UserRepository userRepository) { this .userRepository = userRepository; } public User getUserById (Long id) { return userRepository.findById(id) .orElseThrow(() -> new EntityNotFoundException ("User not found with ID: " + id)); } } class EntityNotFoundException extends RuntimeException { public EntityNotFoundException (String message) { super (message); } }
目标 :测试 UserController
的请求处理逻辑,隔离对 UserService 的依赖。
1
2
3
4
5
6
7
8
9
10
11
12
13
14
15
16
17
18
19
20
21
22
23
24
25
26
27
28
29
30
31
32
33
34
35
36
37
38
39
40
41
42
43
44
45
46
47
48
49
50
51
52
53
54
55
56
57
58
59
60
61
62
63
64
65
@WebMvcTest(UserController.class) class UserControllerTest { @Autowired private MockMvc mockMvc; @MockBean private UserService userService; @Test void shouldReturnUserById () throws Exception { User user = new User (1L , "Bob" , "bob@example.com" ); when (userService.getUserById(1L )).thenReturn(user); mockMvc.perform(get("/api/users/1" )) .andExpect(status().isOk()) .andExpect(jsonPath("$.name" ).value("Bob" )); } @Test void shouldCreateUser () throws Exception { String requestJson = """ { "name": "Charlie", "email": "charlie@example.com" } """ ; User savedUser = new User (2L , "Charlie" , "charlie@example.com" ); when (userService.createUser(any(User.class))).thenReturn(savedUser); mockMvc.perform(post("/api/users" ) .contentType(MediaType.APPLICATION_JSON) .content(requestJson)) .andExpect(status().isCreated()) .andExpect(jsonPath("$.id" ).value(2 )); } } @RestController @RequestMapping("/api/users") class UserController { private final UserService userService; public UserController (UserService userService) { this .userService = userService; } @GetMapping("/{id}") public User getUser (@PathVariable Long id) { return userService.getUserById(id); } @PostMapping @ResponseStatus(HttpStatus.CREATED) public User createUser (@RequestBody User user) { return userService.createUser(user); } }
这个其实和用 postman 等接口测试工具的效果是一样的
嵌套测试
JUnit 5
引入了嵌套测试的概念,允许将测试类分层组织,以更好地表达测试场景的层次结构。嵌套测试通过
@Nested 注解实现,适合测试复杂类或多个相关场景。
1
2
3
4
5
6
7
8
9
10
11
12
13
14
15
16
17
18
19
20
21
22
23
24
25
26
27
28
29
30
31
32
33
34
35
36
37
38
39
40
41
42
43
44
45
46
47
48
49
50
51
52
53
54
55
56
57
58
59
60
61
62
63
64
65
66
67
68
69
70
71
72
73
74
import org.junit.jupiter.api.BeforeEach;import org.junit.jupiter.api.DisplayName;import org.junit.jupiter.api.Nested;import org.junit.jupiter.api.Test;import org.mockito.InjectMocks;import org.mockito.Mock;import org.mockito.junit.jupiter.MockitoExtension;import org.junit.jupiter.api.extension.ExtendWith;import static org.mockito.Mockito.*;import static org.junit.jupiter.api.Assertions.*;@ExtendWith(MockitoExtension.class) @DisplayName("用户服务单元测试") class UserServiceTest { @Mock private UserRepository userRepository; @InjectMocks private UserService userService; @Nested @DisplayName("查找用户") class FindUserTests { @Test @DisplayName("通过ID查找用户 - 用户存在") void shouldFindUserByIdWhenUserExists () { User expectedUser = new User (1L , "Alice" ); when (userRepository.findById(1L )).thenReturn(Optional.of(expectedUser)); User result = userService.getUserById(1L ); assertEquals("Alice" , result.getName()); verify(userRepository, times(1 )).findById(1L ); } @Test @DisplayName("通过ID查找用户 - 用户不存在") void shouldThrowExceptionWhenUserNotFound () { when (userRepository.findById(99L )).thenReturn(Optional.empty()); assertThrows(EntityNotFoundException.class, () -> userService.getUserById(99L )); } } @Nested @DisplayName("创建用户") class CreateUserTests { @Test @DisplayName("创建用户成功") void shouldCreateUserSuccessfully () { User newUser = new User (null , "Bob" ); User savedUser = new User (2L , "Bob" ); when (userRepository.save(newUser)).thenReturn(savedUser); User result = userService.createUser(newUser); assertEquals(2L , result.getId()); assertEquals("Bob" , result.getName()); verify(userRepository, times(1 )).save(newUser); } } }
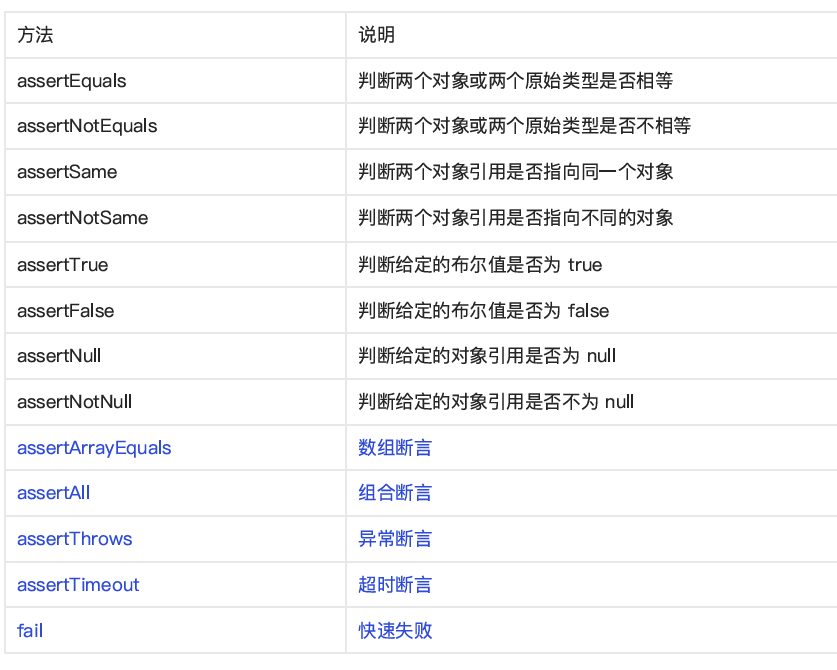
常见断言表如下
image-20250621133416241
功能测试
而功能测试其实跟大家口中常说的集成测试没啥区别,是介于单元测试和端到端测试之间的一种测试方式,它验证多个组件协同工作的正确性,比如
Service 层与 Repository 层的交互,或者 Controller 层与 Service
层的协作。
在这里,我们就涉及到加载部分 Spring
容器,只初始化测试所需的组件,结合 Mock 部分依赖。
示例,测试Service层
1
2
3
4
5
6
7
8
9
10
11
12
13
14
15
16
17
18
19
20
21
22
23
24
25
@SpringBootTest @Transactional class UserServiceIntegrationTest { @Autowired private UserService userService; @Autowired private UserRepository userRepository; @Test void shouldCreateUserAndSaveToDatabase () { UserDTO userDTO = new UserDTO ("Alice" , "alice@example.com" ); User savedUser = userService.createUser(userDTO); assertNotNull(savedUser.getId()); Optional<User> dbUser = userRepository.findById(savedUser.getId()); assertTrue(dbUser.isPresent()); assertEquals("Alice" , dbUser.get().getName()); } }
示例:Controller 层功能测试(模拟 HTTP)
1
2
3
4
5
6
7
8
9
10
11
12
13
14
15
16
17
18
19
20
21
22
23
@SpringBootTest @AutoConfigureMockMvc class UserControllerIntegrationTest { @Autowired private MockMvc mockMvc; @MockBean private EmailService emailService; @Test void shouldReturnUserWhenIdExists () throws Exception { when (emailService.isValid(anyString())).thenReturn(true ); mockMvc.perform(post("/api/users" ) .contentType(MediaType.APPLICATION_JSON) .content("{\"name\":\"Bob\",\"email\":\"bob@example.com\"}" )) .andExpect(status().isCreated()) .andExpect(jsonPath("$.name" ).value("Bob" )); } }
切片测试
切片测试是 Spring Boot
的特色功能,它允许开发者针对应用的某一“切片”(如 Web
层、数据层)进行精准测试,避免加载整个应用上下文,从而提升测试速度。
因为这里只是某一层,所以只初始化特定层的组件(如
Controller、Repository),然后非目标层的依赖会自动替换为 Mock 对象。
基本就用到了上面我讲的以下注解
注解 测试目标 自动配置项 典型场景
@WebMvcTestController 层
MockMvc、Web 相关组件测试 HTTP 接口映射和响应格式
@DataJpaTestJPA Repository 层
内存数据库、EntityManager、DataSource
测试数据库查询和持久化逻辑
@JdbcTestJDBC 操作层
DataSource、JdbcTemplate测试原生 SQL 或存储过程
@JsonTestJSON 序列化
Jackson/Gson 配置验证对象与 JSON 的转换逻辑
@RestClientTestREST 客户端
MockRestServiceServer测试 RestTemplate 或 WebClient
示例 1:Web 层切片测试 (@WebMvcTest)
1
2
3
4
5
6
7
8
9
10
11
12
13
14
15
16
17
@WebMvcTest(UserController.class) class UserControllerSliceTest { @Autowired private MockMvc mockMvc; @MockBean private UserService userService; @Test void shouldReturn404WhenUserNotFound () throws Exception { when (userService.getUserById(99L )).thenThrow(new UserNotFoundException ()); mockMvc.perform(get("/api/users/99" )) .andExpect(status().isNotFound()); } }
示例 2:JPA 层切片测试 (@DataJpaTest)
1
2
3
4
5
6
7
8
9
10
11
12
13
14
15
16
@DataJpaTest class UserRepositorySliceTest { @Autowired private UserRepository userRepository; @Test void shouldFindByEmailIgnoreCase () { userRepository.save(new User ("alice@example.com" , "Alice" )); Optional<User> user = userRepository.findByEmailIgnoreCase("ALICE@EXAMPLE.COM" ); assertTrue(user.isPresent()); } }