
自定义 starter
SpringBoot Starter 场景机制
Spring Boot Starter 是一种简化 Spring Boot 应用开发的机制,它可以通过引入一些预定义的依赖和配置,让我们快速地集成某些功能模块,而无需繁琐地编写代码和配置文件。应用者只需要在maven中引入 starter 依赖,Spring Boot 就能自动扫描到要加载的信息并启动相应的默认配置。
starter 让我们摆脱了各种依赖库的处理,需要配置各种信息的困扰。Spring Boot 会自动通过 classpath 路径下的类发现需要的 Bean,并注册进IOC容器。Spring Boot 提供了针对日常企业应用研发各种场景的 spring-boot-starter 依赖模块。所有这些依赖模块都遵循着约定成俗的默认配置,并允许我们调整这些配置,即遵循“约定大于配置”的理念。
Spring Boot 官方提供了很多常用的
Starter,例如spring-boot-starter-web、spring-boot-starter-data-jpa等,但有时候我们也需要根据自己的业务需求,创建一些自定义的Starter,以便在不同的项目中复用一些通用的功能或组件。
自定义starter的命名规则
Spring Boot 提供的 starter
以spring-boot-starter-xxx的方式命名的。官方建议自定义的starter使用xxx-spring-boot-starter命名规则。以区分Spring
Boot生态提供的 starter。
自定义 Starter 通常包含以下内容:
- 自动配置类(
@Configuration):定义好依赖的自动配置逻辑。 - 配置属性类(
@ConfigurationProperties):支持使用外部化配置参数来简化使用。 - 必要的依赖管理:将常用的第三方库一并引入,避免手动添加依赖。
Starter项目的结构
创建一个自定义的Starter项目和创建一个普通的Spring Boot项目没有太大区别,我们可以使用IDE或者 Spring Initializer 来快速生成一个基本的项目结构。一个典型的 Starter 项目结构如下:
1 | ergou-spring-boot-starter |
在创建一个自定义的 Starter 项目时,我们需要在 pom.xml
文件中添加一些必要的依赖。首先,我们需要添加spring-boot-starter作为基础依赖,它提供了
Spring Boot 核心功能和默认配置。其次,我们需要添加
spring-boot-configuration-processor
作为编译时依赖,它可以帮助我们生成属性类和配置元数据,并且设置为可选依赖,避免传递给其他项目。最后,我们需要添加我们要集成的功能模块相关的依赖。
示例演示:自定义一个简单的短信发送Starter
starter的依赖导入
1 | <groupId>com.example</groupId> |
Starter项目的属性类
在创建一个自定义的Starter项目时,我们需要编写一个属性类,用来定义我们要集成的功能模块所需的配置项,并且使用@ConfigurationProperties注解来指定配置文件中的前缀。
例如,在本例中,我们要使用短信发送服务,需要在属性类中做好如下配置
1 | package com.example.sms.properties; |
1 | /** |
Starter 项目的业务功能类
在创建一个自定义的Starter项目时,我们需要编写一个或多个业务功能类,用来实现我们要集成的功能模块的具体逻辑。例如,在本例中,我们要集成短信发送功能,所以我们需要定义一个短信发送的服务接口及其实现类,用来实现短信发送的业务流程。
1 | package com.example.sms.service; |
1 | /** |
Starter项目的自动配置类
在创建一个自定义的Starter项目时,我们需要编写一个自动配置类,用来根据属性类和业务功能类,创建相应的Bean对象,并且使用@EnableConfigurationProperties注解来启用属性类,使用@ConditionalOnClass注解来判断业务功能类是否存在,使用@ConditionalOnProperty注解来判断配置文件中是否有相应的配置项。
1 | package com.example.sms.autoconfigure; |
Starter项目的自动装配文件
在创建一个自定义的Starter项目时,我们需要在resources/META-INF目录下创建一个名为spring.factories的文件,用来指定我们的自动配置类,让Spring
Boot能够在启动时自动扫描并加载它。以下是一个示例
1 | # 这个文件必须放在src/main/resources/META-INF/目录下 |
在其他项目中使用这个starter
在完成了一个自定义的Starter项目后,我们可以将它打包成jar文件,并且发布到Maven仓库或者本地仓库,这样就可以在其他项目中引用它了。我们默认打包发布是发布在我们本地的maven仓库的,所以只能本地使用。如果想要将自己的服务公开出去,可以查找发布到maven中心仓库的方法。
大约流程如下
在需要使用你自定义starter的项目的pom.xml中添加依赖
1
2
3
4
5<dependency>
<groupId>com.example</groupId>
<artifactId>sms-spring-boot-starter</artifactId>
<version>1.0.0</version>
</dependency>然后,在其他项目的配置文件中添加如下配置项,这部分配置就是对应的是你编写的配置属性类部分
1
2
3
4
5
6
7
8
9sms:
enabled: true
provider: aliyun
access-key-id: your-access-key-id
access-key-secret: your-access-key-secret
sign-name: 你的签名
default-template-id: SMS_123456789
connect-timeout: 5000
read-timeout: 10000最后,在其他项目的代码中,我们可以通过注入 smsService 类来调用其功能
1
2
3
4
5
6
7
8
9
10
11
12
13
14
15
16
17
18
19
20
21
22
23
24
25
26
27
28
29
30
31
32
33
34
35
36
37
38
39
40
41
42
43
44
45
46
47
48
49
50
51
52
53
54package com.example.demo;
import com.example.sms.service.SmsService;
import org.springframework.beans.factory.annotation.Autowired;
import org.springframework.boot.SpringApplication;
import org.springframework.boot.autoconfigure.SpringBootApplication;
import org.springframework.web.bind.annotation.GetMapping;
import org.springframework.web.bind.annotation.RequestParam;
import org.springframework.web.bind.annotation.RestController;
import java.util.HashMap;
import java.util.Map;
public class DemoApplication {
// 自动注入SmsService,这个Bean是由我们的Starter自动创建的
private SmsService smsService;
public static void main(String[] args) {
SpringApplication.run(DemoApplication.class, args);
}
/**
* 发送验证码短信
*/
public String sendVerificationCode( String phone) {
Map<String, Object> params = new HashMap<>();
params.put("code", "123456");
params.put("minutes", "5");
// 使用默认模板发送
var result = smsService.sendSms(phone, params);
return result.isSuccess() ? "发送成功: " + result.getRequestId() : "发送失败: " + result.getMessage();
}
/**
* 发送自定义模板短信
*/
public String sendCustomMessage( String phone, String templateId) {
Map<String, Object> params = new HashMap<>();
params.put("name", "张三");
params.put("product", "云服务器");
var result = smsService.sendSms(phone, templateId, params);
return result.isSuccess() ? "发送成功: " + result.getRequestId() : "发送失败: " + result.getMessage();
}
}如果你想使用自己的SmsService实现,可以创建一个Bean:
1
2
3
4
5
6
7
8
9
10
11
12
13
14
15
public class CustomSmsService implements SmsService {
public SmsResult sendSms(String phone, String templateId, Map<String, Object> params) {
// 你的自定义实现
return new SmsResult(true, "使用自定义实现发送成功");
}
public SmsResult sendSms(String phone, Map<String, Object> params) {
// 你的自定义实现
return new SmsResult(true, "使用自定义实现发送成功");
}
}由于
@ConditionalOnMissingBean注解的存在,Starter 会检测到你已经有了SmsService的实现,就不会创建默认的SmsServiceImpl了。
Starter项目的原理
首先,Starter 项目也是一个 Spring Boot (Maven/Gradle 项目) 项目,其核心还是Spring Boot组件自动配置与集成的那些机制:
依赖聚合 将特定功能所需的所有依赖(如 Redis、MyBatis、RabbitMQ 等)整合到一个模块中,简化使用者的依赖管理。Starter 的依赖管理是通过 Maven 的依赖传递机制来实现的。每个 Starter 都是一个 Maven 项目,它在
pom.xml文件中定义了一系列的依赖项。当开发者在自己的项目中引入一个 Starter 时,Maven 会自动解析该 Starter 的依赖关系,并将这些依赖项添加到项目的依赖列表中。Spring Boot 提供了一个依赖管理模块
spring-boot-dependencies,它定义了所有 Spring Boot 相关依赖的版本号。这样,开发者在使用 Starter 时,无需手动指定依赖的版本号,而是直接使用spring-boot-dependencies中定义的版本。这保证了依赖版本的一致性,避免了版本冲突的问题。自动配置 Spring Boot 的自动配置机制是 Starter 能够发挥作用的关键。当 Spring Boot 应用程序启动时,它会通过一系列的条件注解(如
@Conditional)来判断是否需要加载某个自动配置类。这些条件注解会检查类路径中是否存在某些类、配置文件中是否存在某些属性等条件,从而决定是否启用某个功能。自动配置类通常位于
spring-boot-autoconfigure模块中,每个 Starter 都会通过@EnableAutoConfiguration注解来启用这些自动配置。开发者可以通过在application.properties或application.yml文件中配置相关的属性来覆盖默认的自动配置。条件注解
条件注解是 Spring Boot 自动配置的核心。Spring Boot 提供了一系列的条件注解,这些注解可以用来控制自动配置类的加载条件。以下是一些常用的条件注解:
@ConditionalOnClass:当类路径中存在指定的类时,才加载自动配置类。@ConditionalOnMissingBean:当容器中不存在指定的 Bean 时,才加载自动配置类。@ConditionalOnProperty:当配置文件中存在指定的属性时,才加载自动配置类。@ConditionalOnWebApplication:当项目是一个 Web 应用程序时,才加载自动配置类。
通过这些条件注解,Spring Boot 可以根据项目的实际情况动态地加载相关的自动配置类,从而实现“按需配置”的效果。
SPI 机制 通过 Java 的 SPI(Service Provider Interface)机制,在
META-INF/spring.factories中声明自动配置类,使 Spring Boot 能够发现并加载它们。
Starter 的加载流程如下
- SpringApplication 启动 Spring Boot
应用启动时,
SpringApplication类会自动扫描类路径下的spring.factories文件。 - 自动配置类加载 从
spring.factories中获取EnableAutoConfiguration对应的配置类列表,并加载到容器中。 - 条件评估 对每个自动配置类中的
@Conditional注解进行评估,决定是否生效。 - Bean 注册 生效的配置类会注册相应的 Bean 到 Spring 容器中。
- 属性绑定 通过
@ConfigurationProperties将配置文件中的值绑定到属性类。
Java 的 SPI 机制
在这里只是简单说一下,之后打算单开一篇文章说,因为放在前面的话会使得启动流程那篇太长了
Java 的 SPI(Service Provider Interface)是JDK内置的一种服务提供发现机制,允许第三方组件通过接口实现来扩展系统功能。它通过将接口定义与具体实现分离,实现了框架的可插拔性,是 Java 生态中众多组件(如 JDBC、SLF4J、Spring Boot 等)的核心扩展机制。
Java中SPI机制主要思想是将装配的控制权移到程序之外,在模块化设计中这个机制尤其重要,其核心思想就是解耦。
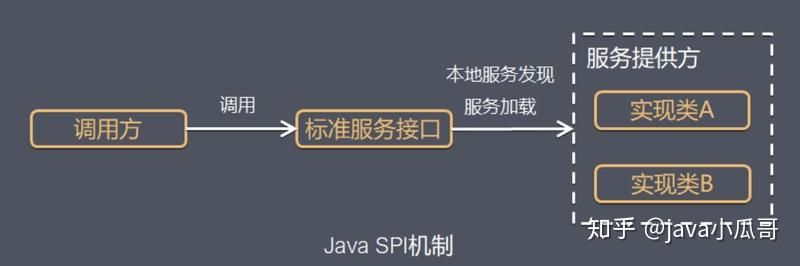
在Java中,当服务的提供者提供了一种接口的实现之后,需要在classpath下的META-INF/services/目录里创建一个以服务接口命名的文件,这个文件里的内容就是这个接口的具体的实现类。当其他的程序需要这个服务的时候,就可以通过查找这个jar包(一般都是以jar包做依赖)的META-INF/services/中的配置文件,配置文件中有接口的具体实现类名,可以根据这个类名进行加载实例化,就可以使用该服务了。JDK中查找服务的实现的工具类是:java.util.ServiceLoader。
在 Spring Boot
中,META-INF/spring/org.springframework.boot.autoconfigure.AutoConfiguration.imports,在
META-INF/spring.factories 中声明自动配置类,使 Spring Boot
能够发现并加载它们。
在这里主要以 Spring Boot 为背景说了,上面那个 Java 原生的我哪天再单开
角色划分
- 服务接口(Service Interface):定义系统提供的功能契约,由框架开发者定义。
- 服务提供者(Service Provider):实现服务接口的具体类,由第三方开发者提供。
- 服务注册表(Service
Registry):
ServiceLoader类,负责加载和管理服务提供者。
约定大于配置
SPI 机制遵循以下约定:
- 在
META-INF/services目录下创建以接口全限定名命名的文件 - 文件内容为实现类的全限定名
- 多个实现类可按行分隔
SPI 的工作流程
定义服务接口 框架开发者定义公共接口:
1
2
3public interface PaymentService {
void pay(double amount);
}实现服务提供者 第三方实现该接口:
1
2
3
4
5
6
7
8
9
10
11
12
13public class AlipayService implements PaymentService {
public void pay(double amount) {
System.out.println("使用支付宝支付: " + amount + "元");
}
}
public class WechatPayService implements PaymentService {
public void pay(double amount) {
System.out.println("使用微信支付: " + amount + "元");
}
}注册服务提供者 在
META-INF/services/com.example.PaymentService文件中写入实现类:1
2com.example.impl.AlipayService
com.example.impl.WechatPayService加载服务提供者 使用
ServiceLoader动态加载实现类:1
2
3
4ServiceLoader<PaymentService> loader = ServiceLoader.load(PaymentService.class);
for (PaymentService service : loader) {
service.pay(100.0);
}其中,加载服务提供者的方式如下
1
2
3
4
5
6
7
8
9
10
11
12
13
14
15
16
17
18
19
20
21
22
23// 方式一:使用线程上下文类加载器
ServiceLoader<PaymentService> loader = ServiceLoader.load(PaymentService.class);
// 方式二:指定类加载器
ServiceLoader<PaymentService> loader = ServiceLoader.load(
PaymentService.class,
Thread.currentThread().getContextClassLoader()
);
// 方式三:Java 9+ 模块系统使用
ServiceLoader<PaymentService> loader = ServiceLoader.load(PaymentService.class, ModuleLayer.boot());
// 迭代器方式(Java 8 之前)
Iterator<PaymentService> iterator = loader.iterator();
while (iterator.hasNext()) {
PaymentService service = iterator.next();
service.pay(100.0);
}
// Stream 方式(Java 8+)
loader.stream()
.map(ServiceLoader.Provider::get)
.forEach(service -> service.pay(100.0));
SPI与传统依赖注入的区别
在 Spring 环境中使用 SPI 并注入依赖:
1 | public class SpringServiceProvider implements PaymentService { |
ServiceLoader采用懒加载策略,只有在真正迭代时才会实例化服务提供者:
1 | public class SpiLazyLoadingDemo { |