
Thymeleaf引擎
Thymeleaf 简介
什么是
Thymeleaf:Thymeleaf是适用于Web和独立环境的现代服务器端Java模板引擎
由于 Spring Boot 使用了嵌入式 Servlet 容器,所以 JSP 默认是不能使用的
如果依旧需要服务端进行页面渲染,优先考虑使用模板引擎
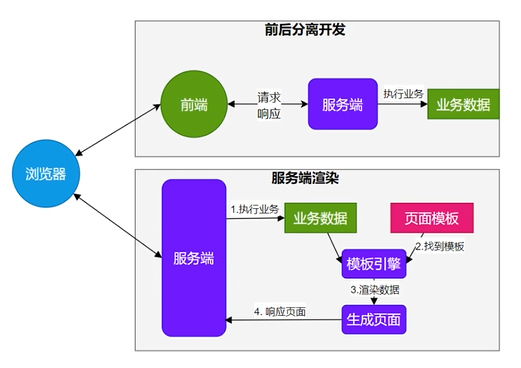
模板引擎页面默认放在 src/main/resources/templates
SpringBoot 包含以下模板引擎的自动配置
- FreeMarker
- Groovy
- Thymeleaf Thymeleaf官⽹:https://www.thymeleaf.org/
- Mustache
Thymeleaf 是一个现代化的服务器端 Java 模板引擎,专为 Web 和独立环境而设计。与传统模板引擎相比,它具有以下核心优势:
- 开箱即用的 HTML 兼容性:Thymeleaf 模板可以直接在浏览器中预览,因为它会忽略未解析的标签和属性,这大大提升了前端开发的效率。
- 天然的模板设计:模板本身就是有效的 HTML,开发时无需区分 “模板” 和 “最终渲染结果”。Thymeleaf使用html通过一些特定标签语法代表其含义,但并未破坏html结构,即使无网络、不通过后端渲染也能在浏览器成功打开,大大方便界面的测试和修改。
- 与 Spring 生态深度集成:在 Spring Boot 中实现了自动化配置和无缝整合。Thymeleaf拥有适用于Spring Framework的模块
- 支持多种数据格式:不仅支持 HTML,还能处理 XML、JavaScript、CSS 等格式。
- 强大的表达式语言:提供简洁灵活的表达式语法,方便数据绑定和逻辑处理。
什么是模板引擎
模板引擎?你可能第一次听说模板引擎,估计你会禁不住想问:什么是模板引擎?
- 模板引擎(这里特指用于Web开发的模板引擎)是为了使用户界面与业务数据(内容)分离而产生的,它可以生成特定格式的文档,用于网站的模板引擎就会生成一个标准的html文档。从字面上理解模板引擎,最重要的就是模板二字,这个意思就是做好一个模板后套入对应位置的数据,最终以html的格式展示出来,这就是模板引擎的作用。
- 对于模板引擎的理解,可以这样形象的做一个类比:开会! 相信你在上学初高中时候每次开会都要提前布置场地、拿小板凳、收拾场地。而你上了大学之后每次开会再也不去大操场了,每次开会都去学校的大会议室,桌子板凳音响主席台齐全,来个人即可,还可复用……。模板引擎的功能就类似我们的会议室开会一样开箱即用,将模板设计好之后直接填充数据即可而不需要重新设计整个页面。提高页面、代码的复用性。
不仅如此,在 Java
中模板引擎还有很多,模板引擎是动态网页发展进步的产物,在最初并且流传度最广的jsp它就是一个模板引擎。jsp
是官方标准的模板,但是由于 jsp 的缺点比较多也挺严重的,所以很多人弃用
jsp
选用第三方的模板引擎,市面上开源的第三方的模板引擎也比较多,有Thymeleaf、FreeMaker、Velocity等模板引擎受众较广。
听完了模板引擎的介绍,相信你也很容易明白了模板引擎在web领域的主要作用:让网站实现界面和数据分离,这样大大提高了开发效率,让代码重用更加容易。
MVC设计模式介绍
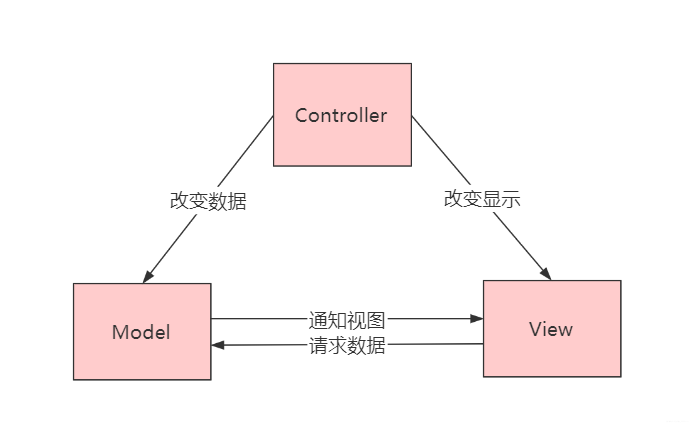
我们使用的Thymeleaf模板引擎在整个web项目中起到的作用为视图展示(view),谈到视图就不得不提起模型(model)以及控制器(view),其三者在web项目中分工和职责不同,但又相互有联系。三者组成当今web项目较为流行的MVC架构。
MVC全名是Model View Controller,是模型(model)-视图(view)-控制器(controller)的缩写,其中:
- Model(模型)表示应用程序核心(用来存储数据供视图层渲染)。
- View(视图)显示数据,而本篇使用的就是Thymeleaf作为视图。
- Controller(控制器)处理输入请求,将模型和视图分离。
使用MVC设计模式程序有很多优点,比如降低程序耦合、增加代码的复用性、降低开发程序和接口的成本,并且通过这样分层结构在部署维护能够提供更大的便捷性。
在Java web体系最流行的MVC框架无疑就是SpringMvc框架了,在项目中经常配合模板引擎使用或者提供Restful接口。
探讨动静分离
部分内容借自 https://developer.aliyun.com/article/769977
主要是由于Thymeleaf模板基于html,后缀也是.html。
对于传统jsp或者其他模板来说,没有一个模板引擎的后缀为.html,就拿jsp来说jsp的后缀为.jsp,它的本质就是将一个html文件修改后缀为.jsp,然后在这个文件中增加自己的语法、标签然后执行时候通过后台处理这个文件最终返回一个html页面。
浏览器无法直接识别.jsp文件,需要借助网络(服务端)才能进行访问;而
Thymeleaf 用 html 做模板可以直接在浏览器中打开。开发者充分考虑 html
页面特性,将 Thymeleaf 的语法通过 html
的标签属性来定义完成,这些标签属性不会影响 html
页面的完整性和显示。如果通过后台服务端访问页面服务端会寻找这些标签将服务端对应的数据替换到相应位置实现动态页面!大体区别可以参照下图:

上图的意思就是如果直接打开这个 html
那么浏览器会对th等标签忽视而显示原始的内容。如果通过服务端访问那么服务端将先寻找th标签将服务端储存的数据替换到对应位置。具体效果可以参照下图,下图即为一个动静结合的实例。
- 右上角为动态页面通过服务端访问,数据显示为服务端提供的数据,样式依然为html的样式
- 右下角为静态页面可通过浏览器直接打开,数据为初始的数据

所以说,Thymeleaf 实现的动静分离并非简单的技术特性,而是一种融合前端开发与后端逻辑的工程化思想。其核心在于:让 HTML 回归为纯粹的前端设计载体,同时通过非侵入式的属性扩展实现服务端数据注入。这种设计打破了传统模板引擎对页面结构的强耦合,具体体现在:
语法层面的解耦 Thymeleaf 通过 HTML 属性(如
th:text、th:href)而非标签体或特殊语法块来定义动态逻辑,例如1
2
3<!-- 动态数据绑定完全通过属性实现,不破坏HTML结构 -->
<h1 th:text="${title}">默认标题</h1>
<a th:href="@{/users/{id}(id=${user.id})}">用户详情</a>这种设计使得 HTML 模板在脱离服务端时仍为标准可渲染文档,而服务端仅需解析属性即可完成数据注入,形成 “一份模板,两种渲染模式” 的能力。
渲染流程的分层处理
- 静态渲染:浏览器直接打开时,Thymeleaf
属性会被忽略,页面显示静态占位内容(如
th:text的默认值)。 - 动态渲染:服务端处理时,通过解析 Thymeleaf 属性将模型数据注入,生成完整动态页面。 这种机制使得前端设计师可在无服务端环境下直接预览页面布局,而后端开发仅需关注属性绑定逻辑,实现真正的前后端并行开发
- 静态渲染:浏览器直接打开时,Thymeleaf
属性会被忽略,页面显示静态占位内容(如
以 JSP、FreeMarker 为例,Thymeleaf 在动静分离能力上的突破体现在:
| 维度 | Thymeleaf | JSP | FreeMarker |
|---|---|---|---|
| 语法载体 | HTML 属性(th:*) |
标签体(<%= %>)或自定义标签 |
模板指令(${...} 或 <#if>) |
| 静态可预览性 | 完全支持(属性被浏览器忽略) | 不支持(需服务端编译执行) | 部分支持(需特殊语法隐藏指令) |
| 前端工具兼容性 | 可直接使用 HTML 编辑器、浏览器调试 | 依赖 IDE 插件或服务端环境 | 需专用模板预览工具 |
| 前后端耦合度 | 低(属性扩展非侵入) | 高(标签体混合逻辑) | 中(模板指令需后端配合) |
| 部署模式 | 支持前后端同构部署或分离部署 | 强依赖服务端容器 | 需与后端 |
动静分离的工程化实践
静态资源优化策略 Thymeleaf 模板中的静态资源(如 CSS/JS)可通过标准 HTML 标签引入,并利用 Spring Boot 的静态资源缓存机制:
1
2
3
4
5
6<!-- 静态资源直接引用,浏览器可独立缓存 -->
<link rel="stylesheet" href="/static/css/style.css">
<script src="/static/js/app.js"></script>
<!-- 动态资源路径(如带版本号的URL)可通过Thymeleaf属性生成 -->
<script th:src="@{/js/app.js?v=${appVersion}}"></script>当页面包含大量动态交互(如实时数据更新、复杂表单验证)时,Thymeleaf 的服务端渲染可能存在性能瓶颈。此时可采用 “动静混合” 架构:
- 服务端渲染:处理首屏加载、SEO 相关的静态内容
- 客户端渲染:通过 AJAX 或前端框架(如 Vue、React)处理交互逻辑
Thymeleaf 整合
依赖
1 | <dependency> |
Spring Boot 对 Thymeleaf 的自动配置主要通过以下类实现:
- ThymeleafAutoConfiguration:核心自动配置类,负责初始化 Thymeleaf 的基本环境。
- ThymeleafProperties:提供 Thymeleaf
的配置属性,可通过
application.properties或application.yml自定义。 - ThymeleafViewResolver:视图解析器,负责将逻辑视图名解析为 Thymeleaf 模板。
默认配置下,Thymeleaf 的工作机制如下:
- 模板文件默认存放路径:
src/main/resources/templates/ - 模板文件后缀默认:
.html - 静态资源默认路径:
src/main/resources/static/、public/、resources/、META-INF/resources/
自动配置原理
- 开启了
org.springframework.boot.autoconfigure.thymeleaf.ThymeleafAutoConfiguration自动配置 - 属性绑定在 ThymeleafProperties 中,对应配置文件
spring.thymeleaf内容 - 所有的模板页面默认在
classpath:/templates文件夹下 - 默认效果
- 所有的模板页面在
classpath:/templates/下 - 找后缀名为 .html 的页面
- 所有的模板页面在
第一个 Thymeleaf 程序
添加依赖:在
pom.xml中添加 Thymeleaf 依赖1
2
3
4<dependency>
<groupId>org.springframework.boot</groupId>
<artifactId>spring-boot-starter-thymeleaf</artifactId>
</dependency>创建模板文件:在
src/main/resources/templates/下创建hello.html1
2
3
4
5
6
7
8
9
10
11
12
13
14
<html xmlns:th="http://www.thymeleaf.org">
<head>
<meta charset="UTF-8">
<title>Thymeleaf 示例</title>
</head>
<body>
<h1 th:text="${message}">默认文本</h1>
<p>当前时间: <span th:text="${#temporals.format(#temporals.createNow(), 'yyyy-MM-dd HH:mm:ss')}"></span></p>
<h2>
<span th:text="${msg}"></span>
</h2>
</body>
</html>创建控制器
1
2
3
4
5
6
7
8
9
10
11
12
13
14
15
16
17
18import org.springframework.stereotype.Controller;
import org.springframework.ui.Model;
import org.springframework.web.bind.annotation.GetMapping;
// 前后端不分离的模式,使用 Controller 返回渲染后的页面
public class HelloController {
// 模板的逻辑视图名
// 物理视图 = 前缀 + 逻辑视图名 + 后缀
// 真实地址 = classpath:/templates/welcome.html
public String hello( String name, Model model) {
model.addAttribute("message2", "name");
model.addAttribute("message", "Hello Thymeleaf!");
return "hello"; // 返回视图名,对应 templates/hello.html
}
}访问测试:启动应用后访问
http://localhost:8080/hello,将看到渲染后的页面。
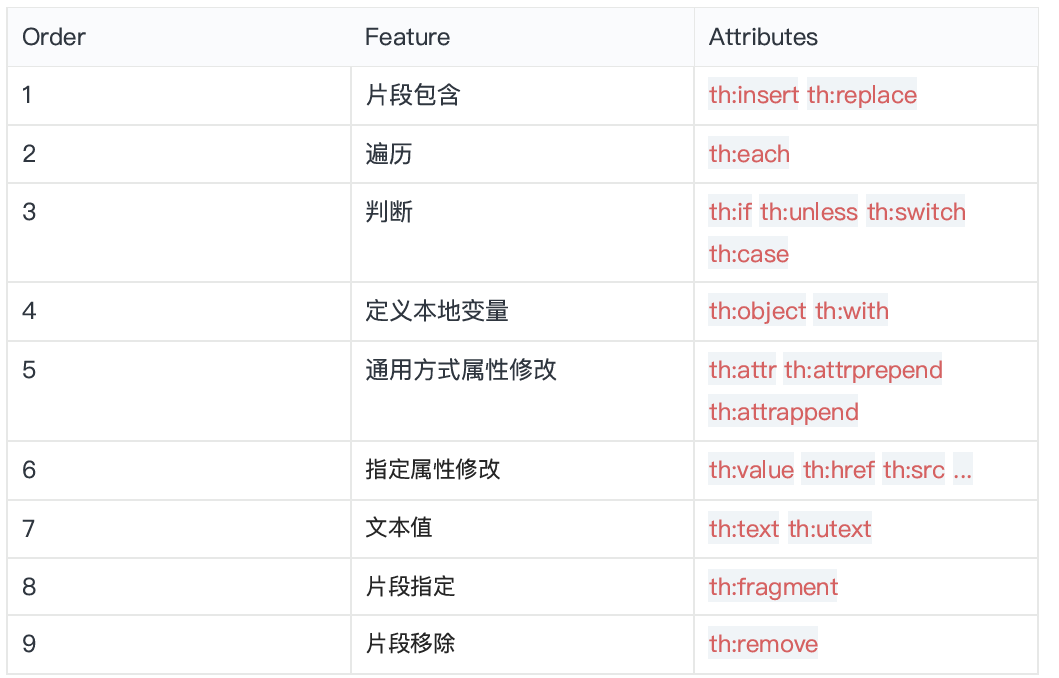
Thymeleaf 核心语法
th:xxx
:动态渲染指定的 html 标签属性值、或者th指令(遍历、判断等)
核心用法
th:text:替换标签体内的内容,使用标签体内文本值渲染,会转义th:utext:不会转义,显示为html原本的样⼦,真正显示成html该有的样式
1
2
3
4
5
6
7
8
9<!-- 后端控制器 -->
public class DemoController {
public String demo(Model model) {
model.addAttribute("message", "<strong>Hello Thymeleaf!</strong>");
return "demo";
}
}1
2
3
4
5
6
7
8
9
10<!-- 模板 -->
<p th:text="${message}">默认文本</p>
<!-- 渲染结果 -->
<p><strong>Hello Thymeleaf!</strong></p>
<p th:utext="${message}">默认文本</p>
<!-- 渲染结果 -->
<p><strong>Hello Thymeleaf!</strong></p>th: 任意html属性:标签指定属性渲染th:attr:标签任意属性渲染,动态设置多个属性1
2
3<button th:attr="id='btn-' + ${user.id}, disabled=${user.status != 'active'}">
[[${user.name}]]
</button>th:*:动态设置 HTML 标签的任意属性。1
2
3
4
5
6
7
8<!-- 设置 href 属性 -->
<a href="#" th:href="@{/users/{id}(id=${user.id})}">查看用户</a>
<!-- 设置 src 属性 -->
<img src="default.jpg" th:src="@{/images/${user.avatar}}">
<!-- 设置 class 属性 -->
<div class="card" th:classappend="${user.active}? 'active' : 'inactive'">内容</div>th:if th:each… :th:其他指令,其他th指令th:if:条件渲染,根据表达式的值决定是否渲染标签。1
2
3
4
5
6<div th:if="${user.age >= 18}">
成年用户
</div>
<div th:unless="${user.age >= 18}"> <!-- 等同于 th:if="!${...}" -->
未成年用户
</div>th:each:循环渲染,遍历集合或数组,为每个元素生成一个标签。1
2
3
4
5
6
7
8
9
10
11
12
13
14
15<table>
<tr>
<th>ID</th>
<th>姓名</th>
<th>年龄</th>
</tr>
<tr th:each="user, stat : ${userList}">
<td th:text="${user.id}">1</td>
<td th:text="${user.name}">张三</td>
<td th:text="${user.age}">20</td>
<td th:text="${stat.index}">索引</td> <!-- 当前迭代索引 (0-based) -->
<td th:text="${stat.count}">计数</td> <!-- 当前迭代计数 (1-based) -->
<td th:text="${stat.size}">总数</td> <!-- 集合大小 -->
</tr>
</table>
Thymeleaf支持的各种字面量与运算符
Thymeleaf 提供了丰富的字面量和运算符支持,这些表达式可以嵌套组合,实现复杂的逻辑处理。
常⻅:
- ⽂本:使用单引号
'包裹,支持转义字符。 - 数字: 支持整数、小数和科学计数法。
- 布尔:true、false
- null: null
- 变量名: 直接引用上下文变量,无需引号。
1 | <p th:text="'Hello, World!'">默认文本</p> |
文本操作:
拼串:
+1
2<p th:text="'Hello, ' + ${user.name} + '!'">Hello, 访客!</p>
<p th:text="'欢迎来到 ' + ${app.name} + ' 系统'">欢迎来到系统</p>文本替换:
| The name is ${name}1
2
3<p th:text="|欢迎, ${user.name}! 今天是 ${#dates.format(today, 'yyyy-MM-dd')}|">
欢迎, 访客! 今天是 2023-01-01
</p>
布尔操作:
- 二进制运算:
and,or - 取反:
!,not
比较运算:
基本比较符
>:大于<:小于>=:大于等于<=:小于等于==:等于!=:不等于
安全比较(避免空指针) 使用
eq和ne进行安全比较。1
2<p th:if="${user.role eq 'ADMIN'}">管理员用户</p>
<p th:if="${user.email ne null}">已设置邮箱</p>
条件运算:
三元运算符:
条件 ? 值1 : 值21
<p th:text="${user.vip ? 'VIP用户' : '普通用户'}">用户类型</p>
Elvis 运算符(空值默认)
1
2<p th:text="${user.nickname ?: user.name}">昵称或用户名</p>
<p th:text="${product.discountPrice ?: product.price}">折扣价或原价</p>if-thenif-then-elsedefault:(value)?:(defaultValue)
特殊语法:
选择表达式(
\*{...})安全导航操作符(
?.):避免空指针1
<p th:text="${user?.address?.city ?: '未知城市'}">城市</p>
方法调用(
())1
2<p th:text="${user.getFullName()}">全名</p>
<p th:text="${#strings.toUpperCase(user.name)}">大写姓名</p>列表 / 数组索引(
[]) 访问集合或数组元素。集合选择(
?{...})过滤集合元素。
1
2
3
4<!-- 假设 products 是商品列表 -->
<div th:each="product : ${products.?{#strings.contains(name, '手机')}}">
<p th:text="${product.name}">手机产品</p>
</div>集合投影(
!{...}) 提取集合元素的属性。1
2<!-- 获取所有用户的姓名列表 -->
<p th:text="${#strings.join(users.!{name}, ', ')}">用户列表</p>
核心表达式:用来动态取值
Thymeleaf
通过特定命名空间(xmlns:th="http://www.thymeleaf.org")来定义模板表达式,主要表达式类型包括:
变量表达式
${...}:用于访问模型中的变量,使用model共享给页面的值都用这个其中支持各种字面量与运算符
1
2
3
4
5
6
7
8
9
10
11
12
13
14<!-- 基础对象属性访问 -->
<p th:text="${user.name}">默认姓名</p>
<!-- 嵌套对象访问 -->
<p th:text="${user.address.city}">默认城市</p>
<!-- 安全导航操作符(避免空指针) -->
<p th:text="${user?.address?.city ?: '未知城市'}">默认城市</p>
<!-- 调用对象方法 -->
<p th:text="${user.getFullName()}">全名</p>
<!-- 访问集合元素 -->
<p th:text="${userList[0].name}">第一个用户</p>选择表达式
*{}:在th:object上下文中使用,需要配合th:object绑定对象1
2
3
4
5<div th:object="${user}">
<p th:text="*{name}">姓名</p>
<p th:text="*{age}">年龄</p>
<p th:text="*{address.street}">街道</p>
</div>链接表达式
@{...}:生成 URL 链接,自动处理上下文路径和参数编码,专门用来取各种路径1
2
3
4
5
6
7
8
9
10
11
12
13
14<!-- 绝对路径 -->
<a th:href="@{/home}">首页</a>
<!-- 带路径变量 -->
<a th:href="@{/users/{id}(id=${user.id})}">用户详情</a>
<!-- 查询参数 -->
<a th:href="@{/search(keyword=${query}, page=${page})}">搜索</a>
<!-- 相对路径 -->
<a th:href="@{../edit(id=${user.id})}">编辑</a>
<!-- 锚点和查询参数混合 -->
<a th:href="@{/articles/{id}#comments(id=${article.id}, sort='newest')}">查看评论</a>国际化表达式
#{}:国际化消息处理,从资源文件读取文本。1
2
3
4
5
6
7<!-- messages.properties -->
welcome=欢迎光临
user.greeting=欢迎, {0}!
<!-- 模板 -->
<p th:text="#{welcome}">默认欢迎语</p>
<p th:text="#{user.greeting(${user.name})}">欢迎, 访客!</p>片段表达式
~{...}:引用模板片段,实现代码复用1
2
3
4
5
6
7
8
9
10
11
12
13
14
15
16<!-- 定义片段 -->
<footer th:fragment="footer">
<p>版权所有 © 2025</p>
</footer>
<!-- 引入片段 -->
<div th:insert="~{layout/footer :: footer}"></div>
<!-- 带参数的片段 -->
<header th:fragment="header(title, user)">
<h1 th:text="${title}">默认标题</h1>
<p>欢迎, <span th:text="${user.name}">访客</span></p>
</header>
<!-- 传递参数 -->
<div th:replace="~{layout/header :: header(title='用户中心', user=${currentUser})}"></div>
系统⼯具&内置对象
Thymeleaf 通过内置工具对象(以 #
开头进行引用)提供了强大的功能扩展,这些工具可以在表达式中直接使用,处理各种常见任务
基础环境对象
param- 请求参数对象 访问 HTTP 请求参数,返回字符串数组。1
2
3
4
5
6<!-- URL: /page?name=John&age=30 -->
<p th:text="${param.name[0]}">默认姓名</p> <!-- 输出: John -->
<p th:text="${param.age[0]}">默认年龄</p> <!-- 输出: 30 -->
<!-- 安全获取参数(避免数组越界) -->
<p th:text="${param.name}?.[0] ?: '未知'">默认姓名</p>session- Session 对象访问 HTTP Session 属性。
1
2
3
4
5<!-- 假设 session 中存储了 user 对象 -->
<p th:text="${session.user.name}">默认用户名</p>
<!-- 判断 session 属性是否存在 -->
<div th:if="${session.user != null}">用户已登录</div>application- ServletContext 对象 访问应用范围内的属性。1
2<!-- 假设 application 中存储了 appName -->
<p th:text="${application.appName}">默认应用名</p>
表达式工具对象
#execInfo- 模板执行信息 获取模板执行的上下文信息。1
2<p th:text="${#execInfo.templateName}">模板名称</p> <!-- 输出当前模板名 -->
<p th:text="${#execInfo.lineNumber}">行号</p> <!-- 输出当前表达式所在行号 -->#messages- 国际化消息 获取国际化资源文件中的消息。1
2
3
4
5
6
7<!-- messages.properties -->
welcome=欢迎光临
user.greeting=欢迎, {0}!
<!-- 模板 -->
<p th:text="#{welcome}">默认欢迎语</p>
<p th:text="#{user.greeting(${user.name})}">欢迎, 访客!</p>#uris- URI/URL 工具处理 URI 和 URL 编码。
1
2
3
4
5<!-- 编码参数 -->
<a th:href="@{/search(query=${#uris.encodePath(param.query[0], 'UTF-8')})}">搜索</a>
<!-- 解码参数 -->
<p th:text="${#uris.decode(param.encodedValue[0], 'UTF-8')}">解码值</p>#ctx- 上下文对象 访问当前模板上下文。1
2<p th:text="${#ctx.locale}">当前语言环境</p>
<p th:text="${#ctx.variables.get('user')}">用户对象</p>#locale- 本地化工具 获取本地化信息。1
2<p th:text="${#locale.language}">当前语言</p>
<p th:text="${#locale.country}">当前国家</p>
数据类型工具
#conversions- 类型转换工具 执行 Spring 定义的类型转换。1
2
3
4
5<!-- 将字符串转换为日期 -->
<p th:text="${#conversions.convert('2023-01-01', 'java.util.Date')}">日期</p>
<!-- 将数字格式化 -->
<p th:text="${#conversions.convert(1234.56, 'java.lang.String', '#,##0.00')}">1,234.56</p>#dates- 日期工具(java.util.Date) 处理java.util.Date类型的日期。1
2
3
4<!-- 假设 user.birthday 是 java.util.Date 类型 -->
<p th:text="${#dates.format(user.birthday, 'yyyy-MM-dd')}">生日</p>
<p th:text="${#dates.year(user.birthday)}">出生年份</p>
<p th:text="${#dates.dayOfWeek(user.birthday)}">星期几</p>#calendars- 日历工具(java.util.Calendar) 处理java.util.Calendar类型的日期。1
2
3<!-- 假设 user.registerDate 是 Calendar 类型 -->
<p th:text="${#calendars.format(user.registerDate, 'yyyy-MM-dd')}">注册日期</p>
<p th:text="${#calendars.month(user.registerDate)} + 1">月份</p> <!-- 注意: 月份从0开始 -->#temporals- JDK8+ 日期时间工具(java.time) 处理 JDK8 引入的java.timeAPI(如LocalDate,LocalDateTime)1
2
3
4<!-- 假设 now 是 LocalDateTime 类型 -->
<p th:text="${#temporals.format(now, 'yyyy-MM-dd HH:mm:ss')}">当前时间</p>
<p th:text="${#temporals.plusDays(now, 7)}">一周后</p>
<p th:text="${#temporals.between(now, futureDate).days}">相差天数</p>#numbers- 数字工具 处理数字格式化和操作。1
2
3
4
5
6
7
8<!-- 格式化货币 -->
<p th:text="${#numbers.formatCurrency(1234.56)}">¥1,234.56</p>
<!-- 格式化百分比 -->
<p th:text="${#numbers.formatPercent(0.75, 2, 2)}">75.00%</p> <!-- 保留两位小数 -->
<!-- 四舍五入 -->
<p th:text="${#numbers.round(3.14159, 2)}">3.14</p>#strings- 字符串工具 处理字符串操作。1
2
3
4
5
6
7
8
9
10
11<!-- 字符串拼接 -->
<p th:text="${#strings.concat('Hello', ' ', user.name)}">Hello 访客</p>
<!-- 截取子串 -->
<p th:text="${#strings.substring(user.email, 0, user.email.indexOf('@'))}">邮箱前缀</p>
<!-- 判断空值 -->
<p th:text="${#strings.isEmpty(user.nickname)}? '无昵称' : user.nickname">昵称</p>
<!-- 大小写转换 -->
<p th:text="${#strings.toUpperCase(user.name)}">大写姓名</p>#objects- 对象工具 处理对象操作和空值安全。1
2
3
4
5<!-- 空值安全获取 -->
<p th:text="${#objects.nullSafe(user.name, '匿名用户')}">用户名</p>
<!-- 判断相等 -->
<p th:text="${#objects.equals(user.role, 'ADMIN')}? '管理员' : '普通用户'">用户角色</p>#bools- 布尔工具 处理布尔逻辑。1
2
3
4
5<!-- 逻辑判断 -->
<div th:if="${#bools.isTrue(user.active)}">用户活跃</div>
<!-- 条件组合 -->
<div th:if="${#bools.and(user.active, user.verified)}">用户已激活并验证</div>
集合与数组工具
#arrays- 数组工具 处理数组操作。1
2
3
4
5
6
7
8<!-- 假设 userIds 是 Long[] 类型 -->
<p th:text="${#arrays.length(userIds)}">数组长度</p>
<!-- 数组是否包含元素 -->
<p th:text="${#arrays.contains(userIds, 1L)}? '包含' : '不包含'">是否包含ID=1</p>
<!-- 数组连接 -->
<p th:text="${#arrays.join(userIds, ', ')}">1, 2, 3</p>#lists- 列表工具 处理java.util.List操作。1
2
3
4
5
6
7
8
9
10<!-- 假设 userList 是 List<User> 类型 -->
<p th:text="${#lists.size(userList)}">用户数量</p>
<!-- 列表排序 -->
<th:block th:each="user : ${#lists.sort(userList, 'age')}">
<p th:text="${user.name}">用户名</p>
</th:block>
<!-- 判断列表是否为空 -->
<p th:if="${#lists.isEmpty(userList)}">暂无用户</p>#sets- 集合工具 处理java.util.Set操作。1
2<!-- 假设 roles 是 Set<Role> 类型 -->
<p th:text="${#sets.contains(roles, 'ADMIN')}? '是管理员' : '不是管理员'">用户权限</p>#maps- 映射工具 处理java.util.Map操作。1
2
3
4
5
6
7<!-- 假设 userMap 是 Map<Long, User> 类型 -->
<p th:text="${userMap.get(1L).name}">ID为1的用户名</p>
<!-- 遍历Map -->
<th:block th:each="entry : ${userMap}">
<p>ID: <span th:text="${entry.key}">1</span>, 姓名: <span th:text="${entry.value.name}">张三</span></p>
</th:block>#aggregates- 集合聚合工具 计算集合的聚合值(如总和、平均值)。1
2
3
4<!-- 假设 scores 是 List<Integer> 类型 -->
<p th:text="${#aggregates.sum(scores)}">总分</p>
<p th:text="${#aggregates.avg(scores)}">平均分</p>
<p th:text="${#aggregates.max(scores)}">最高分</p>#ids- ID 生成工具 生成唯一 ID。1
2<!-- 生成唯一ID -->
<div th:id="${#ids.next('form')}">表单</div> <!-- 生成类似 form1, form2 的ID -->
其他工具
#links- 链接工具 生成链接,功能与@{...}类似。1
<a th:href="${#links.url('/users', {'page': pageNum})}">第 [[${pageNum}]] 页</a>
#dates/#temporals的更多功能 处理复杂日期计算。1
2
3
4
5<!-- 判断日期是否在今天之后 -->
<p th:text="${#temporals.isAfter(user.expireDate, #temporals.createNow())}? '未过期' : '已过期'">会员状态</p>
<!-- 计算日期差 -->
<p th:text="${#temporals.between(user.registerDate, #temporals.createNow()).days}">注册天数</p>
一个比较全面的例子
1 | package edu.software.ergoutree.springbootwebpart1.controller; |
1 |
|
1 |
|
Thymeleaf属性
属性设置
Thymeleaf 通过 th:* 系列属性实现 HTML 标签的动态渲染
URL 属性设置(
th:href、th:src):动态设置
href属性,生成相对应用上下文的 URL特性
@{...}表达式会自动添加应用上下文路径(如/app)- 避免硬编码 URL,提高代码可维护性
示例
1
2
3
4<a th:href="@{/product/list}">产品列表</a>
<!-- 若应用上下文为 /app -->
<a href="/app/product/list">产品列表</a>
通用属性设置(
th:attr)作用:动态设置任意 HTML 属性
特性
- 支持单个或多个属性同时设置
- 属性值可以是表达式
示例:
1
2
3
4
5
6
7
8<div th:attr="class=${active}">内容</div>
<!-- 若 ${active} 为 "highlight" -->
<div class="highlight">内容</div>
<!--同时设置多个属性-->
<img src="../../images/gtvglogo.png"
th:attr="src=@{/images/gtvglogo.png},title=#{logo},alt=#{logo}" />
布尔属性设置(
th:checked、th:disabled等)作用:动态控制布尔属性(如
checked、disabled、selected等)特性
- 当表达式为
true时添加属性 - 当表达式为
false时移除属性
- 当表达式为
示例
1
2
3
4
5
6
7<input type="checkbox" th:checked="${user.active}" />
<!-- 若 ${user.active} 为 true -->
<input type="checkbox" checked />
<!-- 若 ${user.active} 为 false -->
<input type="checkbox" />
内容替换(
th:text、th:utext)作用:替换标签内的文本内容
特性
- 自动转义 HTML 字符(如
<转为<) - 若表达式为
null,则显示空字符串
- 自动转义 HTML 字符(如
示例:
1
2
3
4
5
6
7
8
9<p th:text="${content}">原内容</p>
<!-- 若 ${content} 为 "<b>Hello</b>" -->
<p><b>Hello</b></p>
<p th:utext="${content}">原内容</p>
<!-- 渲染结果 -->
<p><b>Hello</b></p>
注意:
- 属性名大小写:
- HTML 属性名是大小写不敏感的(如
class和CLASS等价) - Thymeleaf 属性名是大小写敏感的(如
th:href必须小写)
- HTML 属性名是大小写不敏感的(如
- 特殊属性:
th:class:完全覆盖原class属性th:classappend:追加到原class属性th:styleappend:追加到原style属性
- 注意空值处理
属性优先级与覆盖规则
常见的属性优先级:片段 > 遍历 > 判断
Thymeleaf 属性优先:
1
2
3
4<a href="/static-link" th:href="@{/dynamic-link}">链接</a>
<!-- 渲染结果 -->
<a href="/app/dynamic-link">链接</a>多属性合并:
1
2
3
4
5
6
7
8<div class="base" th:classappend="${active}? 'active' : 'inactive'">内容</div>
<!-- 渲染结果 -->
<!-- 若 ${active} 为 true -->
<div class="base active">内容</div>
<!-- 若 ${active} 为 false -->
<div class="base inactive">内容</div>
Thymeleaf 遍历与判断
遍历
语法:th:each=" 元素名 , 迭代状态 : ${ 集合 }"
基础遍历
1 | <tr th:each="prod : ${prods}"> |
- 说明
- 遍历
prods集合,每次迭代创建一个 标签 ${prod}表示当前迭代的产品对象- 直接使用对象属性(如
prod.name)访问数据
- 遍历
带状态变量的遍历
1 | <tr th:each="prod,iterStat : ${prods}" th:class="${iterStat.odd}? 'odd'"> |
- 迭代状态变量(
iterStat)的属性index:当前索引(从 0 开始)count:当前计数(从 1 开始)size:集合总大小current:当前元素对象even/odd:是否为偶数 / 奇数行first/last:是否为第一个 / 最后一个元素
遍历 Map
1 | <table> |
- 说明
entry是Map.Entry对象- 通过
entry.key和entry.value访问键值对
判断
基础语法:(th:if、th:unless、th:switch)
1. th:if 和 th:unless
1 | <!-- 显示评论链接(仅当产品有评论时) --> |
- 说明
th:if:条件为true时渲染标签th:unless:条件为false时渲染标签(与th:if相反)
2. th:switch 和
th:case
1 | <div th:switch="${user.role}"> |
- 说明
th:switch:设置表达式th:case:匹配值*:默认情况(相当于default)
Thymeleaf 模板引用
Thymeleaf 通过强大的模板引用、变量选择和布局功能,实现了代码复用和高效开发。
变量选择
变量选择(th:object 和
*{...})
- 使用
th:object="${user}"绑定一个属性,在接下来使用*{...}能直接取出其th:object绑定的对象的属性
1 | <!-- 传统方式 --> |
优势:
- 简化嵌套对象的访问
- 提高代码可读性
- 与表单绑定结合更方便
模板布局
模板布局(th:fragment、th:insert、th:replace)
定义模板片段(
th:fragment) 在布局文件中定义可复用的片段:1
2
3
4
5
6
7
8
9
10<!-- layout/footer.html -->
<footer th:fragment="footer">
<p>© 2025 版权所有</p>
</footer>
<!-- 带参数的片段 -->
<header th:fragment="header(title, user)">
<h1 th:text="${title}">默认标题</h1>
<p>欢迎, <span th:text="${user.name}">访客</span></p>
</header>引用模板片段 使用
~{模板名::片段名}语法引用片段:1
2
3
4
5<!-- 引入页脚 -->
<div th:insert="~{layout/footer::footer}"></div>
<!-- 引入带参数的头部 -->
<div th:replace="~{layout/header::header(title='用户中心', user=${currentUser})}"></div>插入方式对比
th:insert:保留当前标签,将片段插入内部th:replace:替换当前标签为片段内容1
2
3
4
5
6
7
8
9
10
11
12
13<!-- 使用 th:insert -->
<div th:insert="~{footer::copy}"></div>
<!-- 渲染结果 -->
<div>
<footer>© 2011 The Good Thymes Virtual Grocery</footer>
</div>
<!-- 使用 th:replace -->
<div th:replace="~{footer::copy}"></div>
<!-- 渲染结果 -->
<footer>© 2011 The Good Thymes Virtual Grocery</footer>
内容传递
1. 变量传递
在引用布局时传递参数:
1 | <!-- home.html --> |
在布局中使用这些参数:
1 | <!-- layout/main.html --> |
2. 多层内容传递
布局模板可以定义多个可替换区域:
布局模板:
1 |
|
内容模板:
1 |
|
片段引用语法
标准引用:
1
th:replace="~{layout/main::content}"
简化引用:
1
th:replace="layout/main::content" <!-- 省略 ~{} -->
带参数的引用:
1
th:replace="~{layout/header::header(title='首页', user=${user})}"
模板继承
Thymeleaf 的模板继承机制允许创建一个基础模板定义页面结构,然后子模板可以继承这个基础模板并替换特定部分。这种模式类似于 Java 中的类继承,是实现页面布局复用的核心功能。
1. 定义布局模板
定义页面的整体结构,包含通用元素(如头部、导航、页脚),并使用
th:fragment 定义可替换的区域。
1 |
|
2. 子模板继承 继承布局模板,通过
th:replace 或 th:insert
指令替换布局中的特定片段。
th:replace = “{模板名 :: 片段名}”
布局模板
1 |
|
devtools
1. 添加依赖 在 pom.xml 中添加
DevTools:
1 | <dependency> |
2. 主要功能
- 自动重启:修改模板或 Java 代码后自动重启应用
- 热部署:模板文件修改后无需重启,直接刷新页面
- 禁用缓存:自动禁用模板缓存,确保修改实时生效
3. 注意事项
- Java 代码修改可能导致热启动异常(如静态变量状态丢失)
- 复杂 Bean 初始化可能失败,需手动重启
- 使用
ctrl + F9强制刷新模板更改