Fegin 实践
使用 Fegin 的步骤编写
Http 客户端的步骤
首先肯定要添加项目依赖,你需要什么放什么,我都放出来了在这里
1
2
3
4
5
6
7
8
9
10
11
12
13
14
15
16
17
18
19
20
21
22
23
24
25
| <dependencies>
<dependency>
<groupId>org.springframework.cloud</groupId>
<artifactId>spring-cloud-starter-openfeign</artifactId>
</dependency>
<dependency>
<groupId>org.springframework.cloud</groupId>
<artifactId>spring-cloud-starter-netflix-eureka-client</artifactId>
</dependency>
<dependency>
<groupId>org.springframework.cloud</groupId>
<artifactId>spring-cloud-starter-loadbalancer</artifactId>
</dependency>
<dependency>
<groupId>org.springframework.cloud</groupId>
<artifactId>spring-cloud-starter-circuitbreaker-resilience4j</artifactId>
</dependency>
</dependencies>
|
然后需要启用 Fegin 客户端,在主启动类上添加
@EnableFeignClients 注解:
1
2
3
4
5
6
7
8
| @SpringBootApplication
@EnableEurekaClient
@EnableFeignClients
public class Application {
public static void main(String[] args) {
SpringApplication.run(Application.class, args);
}
}
|
接下来需要继续创建 Feign 客户端接口,这是 Feign
的核心,通过接口定义来声明 HTTP 调用:
与 RestTemple 不同的是, Feign
的接口需要在上面标注注解,来表明你的请求方式
1
2
3
4
5
6
7
8
9
10
11
12
13
14
15
16
17
18
19
20
21
22
23
24
25
26
27
28
29
30
31
32
33
34
35
36
37
38
| @FeignClient(
name = "user-service", // 服务名称
path = "/api/v1", // 基础路径
fallback = UserServiceFallback.class // 降级处理类
)
public interface UserServiceClient {
@GetMapping("/users/{id}")
UserDTO getUserById(@PathVariable("id") Long id);
@GetMapping("/users")
List<UserDTO> getUsers(
@RequestParam("page") int page,
@RequestParam("size") int size,
@RequestParam(value = "name", required = false) String name
);
@PostMapping("/users")
UserDTO createUser(@RequestBody CreateUserRequest request);
@PutMapping("/users/{id}")
UserDTO updateUser(
@PathVariable("id") Long id,
@RequestBody UpdateUserRequest request
);
@DeleteMapping("/users/{id}")
void deleteUser(@PathVariable("id") Long id);
@GetMapping("/users/profile")
UserDTO getUserProfile(@RequestHeader("Authorization") String token);
}
|
到这里,基本的 http
客户端的控制器已经构建出来了,但是接下来我们继续看看如何做其他事情
使用 Feign 如何进行服务间的远程调用,在 Service 层直接注入 Feign
接口,调用其方法即可完成远程服务调用,这样 Feign
就把远程间的调用被简化为普通的方法调用,代码清晰且聚焦业务逻辑。
1
2
3
4
5
6
7
8
9
10
11
12
13
14
15
16
17
18
19
20
21
22
23
24
25
26
27
28
29
30
31
32
33
34
| @Service
public class OrderService {
@Autowired
private UserServiceClient userClient;
public OrderDTO createOrder(CreateOrderRequest request) {
UserDTO user = userClient.getUserById(request.getUserId());
if (user == null) {
throw new RuntimeException("用户不存在");
}
List<UserDTO> validUsers = userClient.getUsers(0, 1, user.getUsername());
if (validUsers.isEmpty()) {
throw new RuntimeException("用户状态异常");
}
OrderDTO order = new OrderDTO();
order.setUserId(user.getId());
order.setUserName(user.getUsername());
order.setProductId(request.getProductId());
order.setAmount(request.getAmount());
order.setStatus("PENDING");
return order;
}
}
|
当远程服务不可用或响应超时,为避免级联失败,可通过
fallback 实现降级逻辑进行熔断处理
1
2
3
4
5
6
7
8
9
10
11
12
13
14
15
16
17
18
19
20
21
22
23
|
@Component
public class UserServiceFallback implements UserServiceClient {
@Override
public UserDTO getUserById(Long id) {
log.warn("调用用户服务查询用户 {} 失败,触发降级", id);
return new UserDTO(id, "默认用户", "unknown@example.com");
}
@Override
public List<UserDTO> getUsers(int page, int size, String name) {
log.warn("调用用户服务分页查询失败,触发降级");
return Collections.emptyList();
}
}
|
在 application.yml 中进行 Feign 的相关配置可以
1
2
3
4
5
6
7
8
9
10
11
12
13
14
15
16
17
18
19
20
|
feign:
client:
config:
default:
connectTimeout: 5000
readTimeout: 10000
loggerLevel: basic
user-service:
connectTimeout: 3000
readTimeout: 8000
loggerLevel: full
compression:
request:
enabled: true
mime-types: text/xml,application/xml,application/json
response:
enabled: true
hystrix:
enabled: true
|
当然自定义 Feign 配置也可通过配置类或属性自定义 Feign
的行为(如超时时间、日志级别等)
1
2
3
4
5
6
7
8
9
10
11
12
13
14
15
16
17
18
19
20
21
22
23
24
25
26
|
@Configuration
public class FeignConfig {
@Bean
Logger.Level feignLoggerLevel() {
return Logger.Level.FULL;
}
@Bean
public Request.Options requestOptions() {
return new Request.Options(
Duration.ofSeconds(2),
Duration.ofSeconds(5)
);
}
}
@FeignClient(
name = "user-service",
configuration = FeignConfig.class // 应用自定义配置
)
public interface UserServiceClient { ... }
|
提取出最核心的内容,我们来总结一下 Fegin 的使用的步骤
- 引入依赖
- 添加
@EnableFeginClients 注解
- 编写 FeignClient 接口
- 使用 FeginClient 中定义的方法代替 RestTemple
使用 Feign 进行服务调用实践
在之前我们讲解了基本的步骤,这次我们详细的进行 Fegin 的开发使用
我们需要准备模块,cloud-order 和 cloud-product 模块,在此基础上使用
Fegin,这两个模块你自己写一下,随便写就行
主要就是把实体类,repo
两个内容写出来就行,然后就相当于是把控制器的内容放到 Fegin
模块中写来了算是
然后创建一个我们的 Feign 接口并添加 @FeignClient
注解
1
2
3
4
5
6
7
8
9
10
11
12
13
14
15
16
17
18
19
20
21
22
23
| package edu.software.ergoutree.feginapi.client;
@FeignClient(name = "cloudProduct", path = "/product/api/products")
public interface ProductClient {
@GetMapping("/{id}")
ProductDTO getProductById(@PathVariable("id") Long id);
@GetMapping("/active")
List<ProductDTO> getActiveProducts();
@GetMapping("/category")
List<ProductDTO> getProductsByCategory(@RequestParam("category") String category);
}
|
@FeignClient
注解中的 name 属性是一个任意的客户端名称,用于创建 Ribbon
负载均衡器。
注意,这里你对应的产品和订单的 Controller
层就需要进行修改,也需要添加对应的发方法内容
1
2
3
4
5
6
7
8
9
10
11
12
13
14
15
16
17
18
|
@GetMapping("/active")
public ResponseEntity<?> getActiveProducts() {
log.info("接收到获取激活产品列表请求");
try {
List<Product> products = productRepository.findByIsActiveTrue();
log.info("找到{}个激活产品", products.size());
return ResponseEntity.ok(products);
} catch (Exception e) {
log.error("获取激活产品列表时发生错误", e);
Map<String, Object> response = new HashMap<>();
response.put("message", "获取激活产品列表时发生错误: " + e.getMessage());
response.put("status", "ERROR");
return ResponseEntity.status(HttpStatus.INTERNAL_SERVER_ERROR).body(response);
}
}
|
总之,在 Feign 中创建客户端接口总结如下
1
2
3
4
5
| @FeignClient(name = "服务名称", path = "服务路径")
public interface 新客户端接口 {
@请求方法("接口路径")
返回类型 方法名(@参数注解 参数类型 参数名);
}
|
创建 TestController 控制器,在其中调用 Client
的方法,来测试 Feign 的服务调用的内容
1
2
3
4
5
6
7
8
9
10
11
12
13
14
15
16
17
18
19
20
21
22
23
24
25
26
27
28
29
30
31
32
33
| package edu.software.ergoutree.feginapi.controller;
@RestController
@RequestMapping("/api/test")
public class TestController {
@Autowired
private ProductClient productClient;
@GetMapping("/product/{id}")
public ProductDTO testGetProduct(@PathVariable("id") Long id) {
return productClient.getProductById(id);
}
@GetMapping("/products/active")
public List<ProductDTO> testGetActiveProducts() {
return productClient.getActiveProducts();
}
@GetMapping("/products/category/{category}")
public List<ProductDTO> testGetProductsByCategory(@PathVariable("category") String category) {
return productClient.getProductsByCategory(category);
}
}
|
最后,启动类添加@EnableFeignClients注解,来启用 Feign
服务
1
2
3
4
5
6
7
8
| @SpringBootApplication
@EnableFeignClients(basePackages = "edu.software.ergoutree.feginapi.client")
public class FeginApiApplication {
public static void main(String[] args) {
SpringApplication.run(FeginApiApplication.class, args);
}
}
|
现在我们启动这些所需要的模块,我们来看看服务正不正常
 image-20250723170538505
666这个入开了(我指的服务)
既然您的项目已经有了,并且Nacos中的服务都能正常发现,下面我将正式开始Feign的实践:
我们先测试各个服务的基本功能是否正常,这一步不要忽略
 image-20250723171008224
然后我们通过 fegin-api
模块来测试Feign调用,根据上面的接口,我们获取一下产品信息试试,可以看到,程序不但实现了声明式的REST
APT调用,同时还实现了客户端侧的负载均衡。
 image-20250723171804233
666我们通过 Feign 调用了 cloud-product 的获取产品列表的服务
使用 Feign
进行服务间调用实践
上面我们只是进行了 Feign
调用了单个的服务,现在,我们要进阶修改,进行服务间调用的内容
创建一个场景测试,例如:下单流程,需要调用产品服务检查库存,然后创建订单:
在fegin-api
的控制器中,添加一个方法,来进行订单的创建,一般服务间调用的方法都是
post 请求,添加如下接口
1
2
3
4
5
|
@PostMapping
OrderDTO createOrder(@RequestBody Map<String, Object> orderData);
|
controller 层添加
1
2
3
4
5
6
7
8
9
10
11
12
13
14
15
16
17
18
19
20
21
22
23
24
25
26
27
28
29
30
31
32
33
34
35
36
37
38
39
40
41
42
43
44
45
46
47
|
@PostMapping("/create-order")
public ResponseEntity<?> createOrderDemo(@RequestBody(required = false) Map<String, Object> requestBody) {
try {
log.info("接收到创建订单请求: {}", requestBody);
List<Long> productIds = (List<Long>) orderData.get("productIds");
if (productIds == null || productIds.isEmpty()) {
log.warn("产品ID列表为空");
Map<String, Object> error = new HashMap<>();
error.put("success", false);
error.put("message", "产品ID列表不能为空");
return ResponseEntity.badRequest().body(error);
}
try {
log.info("开始创建订单");
OrderDTO order = orderClient.createOrder(orderData);
log.info("订单创建成功: {}", order);
Map<String, Object> result = new HashMap<>();
result.put("success", true);
result.put("message", "订单创建成功");
result.put("orderId", order.getId());
result.put("orderNumber", order.getOrderNumber());
return ResponseEntity.ok(result);
} catch (Exception e) {
log.error("处理订单创建时出错", e);
Map<String, Object> error = new HashMap<>();
error.put("success", false);
error.put("message", "处理订单创建时出错: " + e.getMessage());
error.put("errorType", e.getClass().getSimpleName());
return ResponseEntity.status(500).body(error);
}
} catch (Exception e) {
log.error("处理请求时出错", e);
Map<String, Object> error = new HashMap<>();
error.put("success", false);
error.put("message", "处理请求时出错: " + e.getMessage());
error.put("errorType", e.getClass().getSimpleName());
return ResponseEntity.status(500).body(error);
}
}
|
多参数的URL也可以使用Map构建。当目标 url
参数非常多时,可以使用这种方式简化Feign接口的编写。
1
2
| @GetMapping("/user/getByUsernameAndAge")
User getByUsernameAndAge2(@RequestParam Map<String,Object> userMap);
|
1
2
3
4
5
6
7
| @GetMapping("/getByUsernameAndAge2")
public User getByUsernameAndAge2(){
Map<String,Object> map=new HashMap<>();
map.put("username","zhaoliu");
map.put("age",20);
return userClientFeign.getByUsernameAndAge2(map);
}
|
一般我们的 post 请求包含会包含多个参数,可以按照这样的方式写
1
2
| @PostMapping("/user/add")
int addUser(@RequestBody User user);
|
controller 层级里面可以加入,按实体类进行传递
1
2
3
4
| @PostMapping("/add")
public int getByUsernameAndAge2(@RequestBody User user){
return userClientFeign.addUser(user);
}
|
当然你可以在配置文件中配置 Feign 一些常用内容
1
2
3
4
5
6
7
8
9
10
11
12
13
14
15
16
17
| feign:
client:
config:
default:
connectTimeout: 5000
readTimeout: 5000
loggerLevel: full
cloudProduct:
connectTimeout: 2000
readTimeout: 3000
compression:
request:
enabled: true
response:
enabled: true
circuitbreaker:
enabled: true
|
这样,我们在 fegin
的控制器中,可以同时调用产品服务和订单服务进行订单的创建
Feign 开发总结
我们要进行依赖引入,如果你的 fegin 的模块,我们一般引入
spring-cloud-starter-openfeign
在上启动类上,用 @EnableFeignClients 开启 Feign
功能,可指定扫描路径
Feign 接口通过 注解 + 方法签名 映射 HTTP
请求,核心规则总结和开发流程如下
用 @FeignClient(name = "服务名")
绑定目标服务(服务名对应注册中心的服务 ID),支持指定
URL(非注册中心场景:url = "http://localhost:8080")。
用 @GetMapping/@PostMapping
等注解指定请求方式和路径,参数通过
@PathVariable、@RequestParam、@RequestBody
映射:
- 复杂对象参数(如
UserForm)默认用
@RequestBody,对应
Content-Type: application/json。
- 路径参数
@PathVariable 必须指定 value(如
@PathVariable("id")),否则会报错。
- 多个简单参数需用
@RequestParam 逐个指定
Feign 支持通过配置类或属性文件定制行为,满足复杂场景需求
全局配置
1
2
3
4
5
6
| feign:
client:
config:
default:
connect-timeout: 5000
read-timeout: 10000
|
局部配置
1
2
3
4
5
| feign:
client:
config:
user-service:
connect-timeout: 3000
|
如果你需要使用拦截器,用于统一处理请求(如添加鉴权头、日志打印):
1
2
3
4
5
6
7
8
| @Component
public class AuthInterceptor implements RequestInterceptor {
@Override
public void apply(RequestTemplate template) {
template.header("Authorization", "Bearer " + getToken());
}
}
|
局部生效需在 @FeignClient 中指定配置类
默认使用 Spring 的 HttpMessageConverter(支持
JSON、表单等),可自定义编码
1
2
3
4
| @Bean
public Encoder feignEncoder() {
return new SpringEncoder(() -> new HttpMessageConverters(new GsonHttpMessageConverter()));
}
|
一般在进行 Feign
开发的时候,我们会自定义异常的解码器,当服务返回非 200 状态码时,Feign
会抛出 FeignException,可通过 ErrorDecoder
自定义异常转换:
1
2
3
4
5
6
7
8
9
| @Bean
public ErrorDecoder errorDecoder() {
return (methodKey, response) -> {
if (response.status() == 404) {
return new UserNotFoundException("用户不存在");
}
return new RuntimeException("服务调用失败: " + response.reason());
};
}
|
在使用 Feign 的时候,我们会不止使用
Feign,如果你需要需开启熔断功能,并指定降级方法(fallback
或 fallbackFactory),需要编写组件和配置文件
1
2
3
4
5
6
7
8
9
10
11
| @FeignClient(name = "user-service", fallback = UserClientFallback.class)
public interface UserClient { ... }
@Component
public class UserClientFallback implements UserClient {
@Override
public UserDTO getUserById(Long id, String name) {
return new UserDTO(id, "默认用户", "降级数据");
}
}
|
推荐一个我习惯使用的多层的端口编写方式,服务端可将 Controller
接口抽象为公共 API 接口(如 UserApi),Feign
客户端直接继承,避免代码重复:
1
2
3
4
5
6
7
8
9
10
11
12
13
14
15
16
|
public interface UserApi {
@GetMapping("/users/{id}")
UserDTO getUserById(@PathVariable("id") Long id);
}
@RestController
public class UserController implements UserApi {
@Override
public UserDTO getUserById(Long id) { ... }
}
@FeignClient(name = "user-service")
public interface UserClient extends UserApi {}
|
fegin 可能会涉及到把自己的模块作为依赖导入到其他模块中,但是
Feign 客户端接口若被同一服务的其他组件调用,需注意扫描路径,避免
@FeignClient 与 @Service
形成循环依赖。
启用连接池:Feign 默认使用 JDK 原生
URLConnection(无连接池),推荐替换为 Apache HttpClient 或
OkHttp:
1
2
3
4
| <dependency>
<groupId>io.github.openfeign</groupId>
<artifactId>feign-okhttp</artifactId>
</dependency>
|
并在配置中启用:feign.okhttp.enabled: true。
Feign 的自定义配置
虽然 Feign 会和其他 Spring
组件一样,在自动装配和自动配置的时候就有了很完备的默认配置,但是万一部分不符合需求,你可以进行很高程度上的自定义,在实践中,你有两种主流方式来配置
Feign,配置文件和配置类,这是和别的一样的
在一般情况下,我们常用配置 Feign 的五个内容
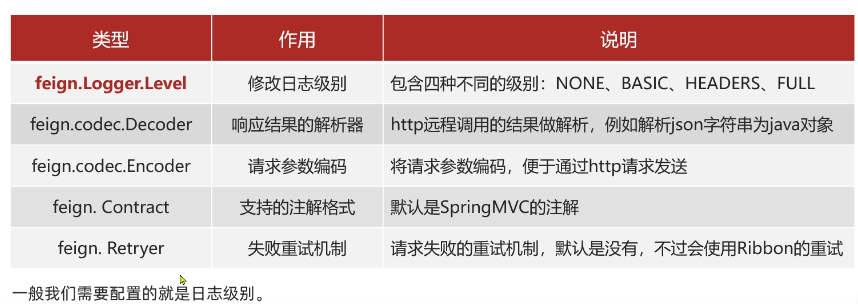 image-20250725102943036
我们通常会配置日志的相关配置,因为 Feign
貌似自身不会打印任何日志,一旦出问题(比如参数没传对、对方服务报错),你将无从下手。
所以我们需要在 application.yml 中为你的 Feign
客户端指定日志级别。
Feign 的日志级别分为四种:
- NONE: 不记录任何日志(默认)。
- BASIC: 仅记录请求方法、URL、响应状态码及执行时间。
- HEADERS: 在 BASIC 基础上,增加请求和响应的头信息。
- FULL:
记录所有请求与响应的明细,包括头信息、请求体、元数据。(调试)
一般日志常用的配置项目如下
1
2
3
4
5
6
7
8
9
10
|
feign.client.config.default.logger-level=full
feign.client.config.user-service.logger-level=headers
feign.client.config.order-service.logger-level=base
logging.level.feign.Logger=debug
|
例如
1
2
3
4
5
| logging:
level:
com.example.clients.UserClient: FULL
|
虽然用配置文件足够简单,但你仍需要提供一个 Logger 的
Bean。你可以在一个全局的 Feign
配置类中定义它。在我们的日志文件比较复杂的时候,配置类更简单
1
2
3
4
5
6
7
8
9
10
11
12
13
14
15
16
| import feign.Logger;
import org.springframework.context.annotation.Bean;
import org.springframework.context.annotation.Configuration;
@Configuration
public class GlobalFeignConfig {
@Bean
Logger.Level feignLoggerLevel() {
return Logger.Level.FULL;
}
}
|
然后,你需要告诉 Feign 去使用这个配置。你可以设置为全局默认配置:
1
2
3
4
5
6
7
8
|
@SpringBootApplication
@EnableFeignClients(defaultConfiguration = GlobalFeignConfig.class)
public class MyApplication {
public static void main(String[] args) {
SpringApplication.run(MyApplication.class, args);
}
}
|
我们一般会组合使用。在 Java 配置类中提供
Logger.Level Bean,然后在 application.yml
中灵活控制具体哪个客户端在什么环境下开启哪个级别的日志。
接下来,就是配置超时时间,防止服务雪崩
这是生产环境必须配置的项。Feign
默认的连接和读取超时时间较短(或依赖底层客户端的默认值),在高延迟网络或对方服务响应慢时,会频繁超时失败,或者长时间等待导致自身服务资源耗尽。
为 Feign 调用设置合理的连接超时和读取超时。
- 连接超时 (Connect Timeout):
与目标服务器建立连接的最长时间。
- 读取超时 (Read Timeout):
建立连接后,等待服务器返回响应的最长时间。
通过 application.yml
配置这个是不推荐的,因为它在较新版本中可能不生效或被弃用,因为级别太低,而且好像会被覆盖
最标准、最可靠的方式我们基本建一个Config,创建一个 Request.Options
类型的 Bean。
1
2
3
4
5
6
7
8
9
10
11
12
13
14
15
16
|
import feign.Request;
import org.springframework.context.annotation.Bean;
import java.util.concurrent.TimeUnit;
public class CustomFeignConfig {
@Bean
public Request.Options options() {
return new Request.Options(
5, TimeUnit.SECONDS,
10, TimeUnit.SECONDS,
true
);
}
}
|
然后,将这个配置应用到具体的 Feign 客户端:
1
2
3
4
5
6
7
|
import org.springframework.cloud.openfeign.FeignClient;
@FeignClient(name = "user-service", url = "http://localhost:8081", configuration = CustomFeignConfig.class)
public interface UserClient {
}
|
我们一般为不同的微服务调用设置不同的超时时间。调用一个执行复杂计算的服务,其超时时间应该比调用一个只读缓存的服务要长。因此,为每个
FeignClient 创建独立的配置类是最佳实践。
自定义错误处理
如果 Feign 调用返回 4xx 或 5xx 状态码,它会统一抛出一个
FeignException。我看到全是这玩意直接秒开哈气形态
使用 ErrorDecoder,ErrorDecoder
可以让你检查原始的响应信息,并根据自己的业务逻辑返回一个自定义的异常。
创建一个自定义异常
1
2
3
4
5
| public class ResourceNotFoundException extends RuntimeException {
public ResourceNotFoundException(String message) {
super(message);
}
}
|
创建 ErrorDecoder 实现
1
2
3
4
5
6
7
8
9
10
11
12
13
14
15
16
17
18
19
|
import feign.Response;
import feign.codec.ErrorDecoder;
public class CustomErrorDecoder implements ErrorDecoder {
private final ErrorDecoder defaultDecoder = new Default();
@Override
public Exception decode(String methodKey, Response response) {
if (response.status() == 404) {
return new ResourceNotFoundException("Resource not found for request: " + methodKey);
}
return defaultDecoder.decode(methodKey, response);
}
}
|
在配置类中注册并应用
1
2
3
4
5
6
7
8
9
10
11
12
13
14
15
16
|
import feign.codec.ErrorDecoder;
import org.springframework.context.annotation.Bean;
public class FeignWithErrorHandlingConfig {
@Bean
public ErrorDecoder errorDecoder() {
return new CustomErrorDecoder();
}
}
@FeignClient(name = "any-service", configuration = FeignWithErrorHandlingConfig.class)
public interface AnyServiceClient {
}
|
ErrorDecoder 是提升服务健壮性的利器。通过它,你的业务代码可以
try-catch 特定的业务异常,使代码逻辑更清晰。
全局配置 和 客户端独立配置的选择存在一个重要实践原则
一个常见的困惑是:这些配置应该放在哪里?是全局共享还是每个客户端独立一份?
- 全局配置 (@EnableFeignClients(defaultConfiguration
= …)):
- 适用场景: 对所有客户端都通用的配置,如日志 Bean
的提供、全局的分布式追踪拦截器。
- 优点: 配置一次,到处生效。
- 缺点:
不够灵活,一个不当的全局配置(如过长的超时时间)会影响所有客户端。
- 客户端独立配置 (@FeignClient(configuration =
…)):
- 适用场景: 针对特定服务的配置,如对 A
服务的超时时间、对 B 服务的认证拦截器、对 C 服务的错误解码器。
- 优点:
精准控制,隔离性好,互不影响。这是更推荐的方式。
- 缺点:
如果多个客户端需要相同配置,会产生一些重复代码(可以通过继承配置类解决)。
一般情况下我们会进行隔离配置类
一个非常重要的技巧是:不要让你为 Feign 写的 @Configuration
类被主应用的 @ComponentScan 扫描到!
如果 GlobalFeignConfig 被扫描到,它里面的 Bean(如
Request.Options)会变成一个全局
Bean,可能会影响到其他不想关的技术栈。
正确做法:
- 不要在 Feign 的配置类上加
@Configuration 注解。
- 或者,如果加了
@Configuration,就把它放在一个不会被主应用扫描到的包里。
这样,这个配置类就只对通过 defaultConfiguration 或
configuration 属性显式指定的 Feign
客户端生效,实现了完美隔离。
1
2
3
4
5
6
7
8
9
10
11
|
public class MyClientConfig {
@Bean
public feign.Retryer retryer() {
return new feign.Retryer.Default(100, 1000, 3);
}
}
@FeignClient(name = "resilient-service", configuration = MyClientConfig.class)
public interface ResilientClient { ... }
|
Feign 的性能调优
连接优化
Feign 的性能优化已经很好了,在我们上文进行的 Feign
的原理分析我们知道了,默认情况下,Feign 使用 Java 的
HttpURLConnection 来发送 HTTP
请求。它的问题是不支持连接池。
这意味着每次 Feign 调用都可能需要经历一次完整的 TCP 三次握手和 TLS
握手,然后连接被关闭。在高并发场景下,这会产生巨大的性能开销和资源浪费。
一般我们会替换 Feign 底层的 HTTP 客户端为 Apache
HttpClient 或
OkHttpClient。它们都内置了强大的连接池管理。
选择其中一个添加到你的 pom.xml 中。通常两者性能相近,Apache
HttpClient 在 Spring 生态中更常见。
1
2
3
4
| <dependency>
<groupId>io.github.openfeign</groupId>
<artifactId>feign-httpclient</artifactId>
</dependency>
|
在 application.yml
中启用并配置连接池,一旦你添加了依赖,Spring Cloud Feign
的自动配置机制会检测到它。你只需要在 application.yml
中开启并调优即可。
如果你对性能十分敏感,在这里关掉日志还能更进一步,连接池打印的日志挺多的
以 Apache HttpClient 为例:
1
2
3
4
5
6
7
8
9
10
11
12
13
14
15
16
| feign:
httpclient:
enabled: true
max-connections: 200
max-connections-per-route: 50
connection-timer-repeat: 1000
time-to-live: 900
time-to-live-unit: SECONDS
|
在任何生产项目中,这都应该是标准操作。
如何设置池大小:max-connections 和
max-connections-per-route 的值需要根据你的应用的
QPS(每秒查询率)和下游服务的数量进行压测和调整。初始值可以设为 200 和
50,然后通过监控工具(如
Micrometer、Prometheus)观察连接池的使用情况来微调。
过小的连接池会在高并发时导致请求排队等待连接,增加响应延迟;过大的连接池会占用过多内存和文件句柄。
数据传输优化
在微服务之间传输巨大的 JSON
对象会消耗大量的网络带宽,增加网络传输时间,成为性能瓶颈,尤其是在跨机房或公网调用时。我们需要减少网络传输的数据量。常用的解决方案如下
- 启用 GZIP 压缩:对请求体和响应体进行压缩。
- 更换更高效的序列化库(微优化)。
在application.yml中开启 GZIP 压缩
1
2
3
4
5
6
7
8
9
10
11
12
13
14
15
| feign:
compression:
request:
enabled: true
mime-types:
- text/xml
- application/xml
- application/json
min-request-size: 2048
response:
enabled: true
|
- 这里存在一个权衡:压缩会消耗 CPU,但能大幅减少网络
I/O。对于目前大多数应用来说,CPU
资源相对廉价,而网络延迟是主要矛盾,因此开启压缩通常是明智之举。
- min-request-size
是一个很好的调优参数,避免为几十个字节的小请求执行压缩操作。
当然你也可以更换 JSON 序列库,Spring Boot 默认使用
Jackson。在绝大多数情况下,它的性能已经足够好。但如果你在性能分析中发现序列化/反序列化是应用的热点,可以考虑更换为
GSON 或其他更高性能的库。
这是一个微优化。除非有明确的性能瓶颈证据,否则坚持使用默认的
Jackson 即可,避免引入新的技术栈和潜在的兼容性问题。
异步优化
串行到并行的优化也很关键
在一个业务逻辑中,你可能需要调用多个不同的微服务来组装数据(比如,获取订单详情时,需要调用用户服务、商品服务、库存服务)。默认的
Feign
调用是同步阻塞的,这意味着这些调用会一个接一个地执行,总耗时是所有调用耗时之和。
一般情况下我们会将多个独立的 Feign
调用并行化执行,将总耗时缩短为其中最慢的那个调用的耗时。
结合 Spring 的 @Async 和 CompletableFuture
来异步执行 Feign 调用。
在启动类开启异步支持
1
2
3
4
| @EnableAsync
@SpringBootApplication
@EnableFeignClients
public class MyApplication { ... }
|
创建一个专门的 Service,将 Feign 的同步调用封装在异步方法中。
1
2
3
4
5
6
7
8
9
10
11
12
13
14
15
16
17
18
19
20
21
22
| @Service
public class AggregationService {
@Autowired
private UserClient userClient;
@Autowired
private ProductClient productClient;
@Async
public CompletableFuture<User> getUserDetails(String userId) {
User user = userClient.getUserById(userId);
return CompletableFuture.completedFuture(user);
}
@Async
public CompletableFuture<Product> getProductDetails(String productId) {
Product product = productClient.getProductById(productId);
return CompletableFuture.completedFuture(product);
}
}
|
在业务逻辑中并行编排,在你的主业务逻辑中,同时发起调用并等待所有结果返回。
1
2
3
4
5
6
7
8
9
10
11
12
13
14
15
16
17
18
19
20
21
22
23
24
25
26
| @RestController
public class OrderController {
@Autowired
private AggregationService aggregationService;
@GetMapping("/order-details")
public Map<String, Object> getOrderDetails() {
CompletableFuture<User> userFuture = aggregationService.getUserDetails("123");
CompletableFuture<Product> productFuture = aggregationService.getProductDetails("p456");
CompletableFuture.allOf(userFuture, productFuture).join();
Map<String, Object> result = new HashMap<>();
try {
result.put("user", userFuture.get());
result.put("product", productFuture.get());
} catch (InterruptedException | ExecutionException e) {
}
return result;
}
}
|
这是一种架构层面的优化,效果非常显著。但需要注意配置和管理
Spring 的异步线程池(TaskExecutor),避免线程池耗尽。
负载均衡优化
负载均衡的方面我们也可以进行优化
默认的轮询(Round-robin)策略无法感知下游服务的真实负载和健康状况,可能将请求发送给一个响应缓慢或即将崩溃的实例。而且默认
Feign
不进行重试。如果配置了重试,它可能会对非幂等的写操作(如
POST)进行重试,导致数据重复。
在分析原理的时候我们知道Feign是无缝集成Spring Cloud LoadBalancer
(替代了 Ribbon)的, 提供了灵活的策略。在 application.yml
中配置,为特定服务指定不同的负载均衡策略。
1
2
3
4
5
6
7
8
9
10
11
12
| spring:
cloud:
loadbalancer:
clients:
user-service:
cache:
enabled: true
ttl: 5s
|
如果启用 Load Balancer 缓存 (spring.cloud.loadbalancer.cache.enabled:
true) ,也是一个简单有效的优化,可以降低与服务注册中心的交互频率。
对于更高级的策略,如基于响应时间的加权负载均衡,你需要自定义实现,参考我负载均衡那章
精细化重试策略
通过 Java 配置类自定义 Retryer。
1
2
3
4
5
6
7
8
9
10
11
12
13
14
15
16
17
18
19
20
|
import feign.Retryer;
import org.springframework.context.annotation.Bean;
import java.util.concurrent.TimeUnit;
public class SmartRetryerConfig {
@Bean
public Retryer feignRetryer() {
return new Retryer.Default(100, TimeUnit.SECONDS.toMillis(1L), 3);
}
}
|
- 幂等性警告:切记,Feign 的重试对 POST
等非幂等操作有风险。
- 最佳实践:将重试逻辑交给更专业的熔断降级组件,如
Resilience4J。你可以用它的 @Retry 注解来包裹 Feign
调用方法,并精确配置重试的条件(如只对 IOException 或 5xx
错误重试),而对 4xx 业务错误不重试。这比 Feign 内置的 Retryer
更强大、更安全。
Feign 的最佳实践
方式一:继承,给消费者的
FeignClient 和提供者的 Controller 定义统一的父接口作为标准
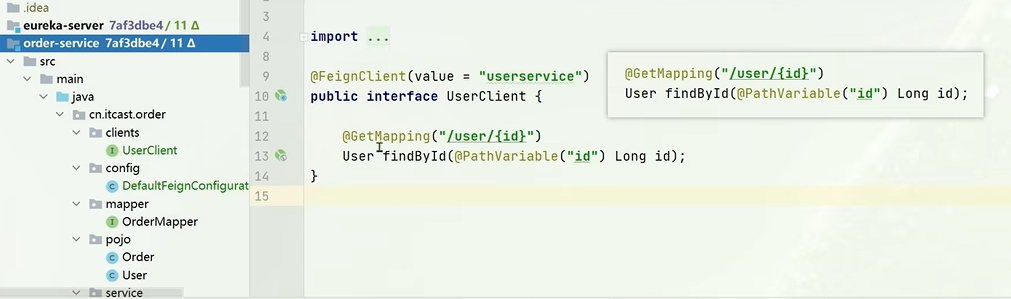 image-20250725105147954
首先,这个接口的目的是让消费者基于这些声明的信息,去发送一次 http
请求,这个请求最终会到达对应服务的一个实例的Controller中
 image-20250725105300611
整个方法的声明,除了方法名,都是一样的,那么既然都一样,可以不可以进行抽取,肯定可以
所以我们创建一个共享接口(API模块)来统一服务契约,既然服务提供方
(Provider)在 Controller 中定义接口,包括 @RequestMapping, @PathVariable, @RequestBody
等注解,以及方法的参数和返回类型。服务消费方
(Consumer)又在 FeignClient
接口中,必须一模一样地再声明一遍这些注解、参数和返回类型。
这种方式存在巨大的问题,为了解决上述问题,我们引入一个专门的
API 模块。里面写好其中的API,然后 Client 和 Controller
直接继承就可以了。
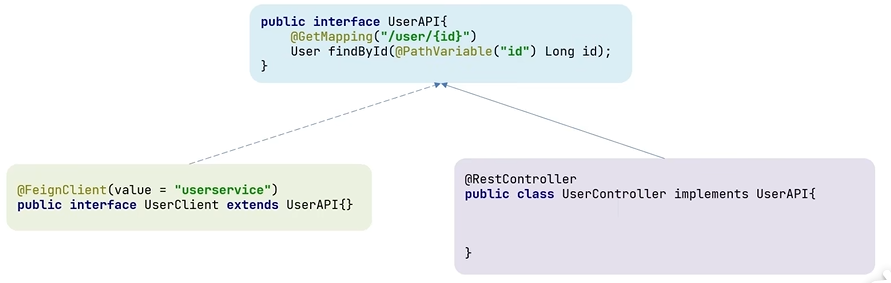 image-20250725110044562
但是 Spring 官方不推荐这么做
 image-20250725110147923
这会造成紧耦合,仔细一想,从 API 都耦合了,一炸都炸,成鞭炮了
而且对 SpringMVC
这招不好使,父接口方法的参数列表参数是继承不下来的,自己还得写一篇
但是面向契约的思想还是很好的
方式二:抽取
将 FeignClient 抽取为独立的模块,并且把接口有关的POJO,默认的 Feign
配置都放到这个模块中,提供过所有的消费者使用
这就是最现代,最常用,目前最佳的方式了,我也是这样,无数人也是这样
在 Maven 项目中,这通常是一个独立的 jar 包模块。
这个模块的核心定位是:定义服务之间通信的“合同”。
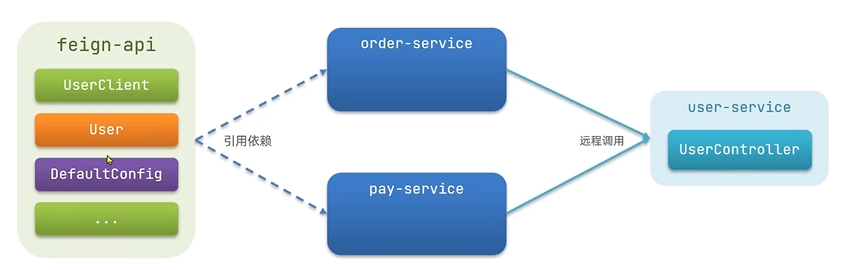 image-20250725110600600
在你的多模块 Maven 项目中,创建一个新的 jar 模块,例如
feign-api。这个模块非常轻量,它只包含
- 项目中共享的接口定义。
- 接口中用到的 DTO (Data Transfer Object) 或 POJO 类(如 User,
ResultVO 等)。
这个模块不包含任何具体的业务实现逻辑,也没有复杂的依赖。
之后在 feign-api
模块中定义共享接口,我们将原来分散在两边的定义,统一放在 user-api
模块中。
1
2
3
4
5
6
7
8
9
10
11
12
13
14
15
16
17
18
19
20
21
|
package com.example.user.api;
import org.springframework.web.bind.annotation.GetMapping;
import org.springframework.web.bind.annotation.PathVariable;
import com.example.user.api.dto.UserDTO;
public interface UserApi {
@GetMapping("/user/{id}")
UserDTO findUserById(@PathVariable("id") Long id);
}
|
所有用于定义 HTTP 请求的注解(@GetMapping, @PostMapping, @PathVariable, @RequestParam, @RequestBody
等)都必须在这里声明。这里就是这份“合同”最核心的条款。
服务提供方 (Provider) 实现接口
在 user-service 项目中:
- 在其 pom.xml 中添加对 feign-api 模块的依赖。
- 让 UserController 实现 (implements) 这个 UserApi
接口。
1
2
3
4
5
6
7
8
9
10
11
12
13
14
15
16
17
18
19
|
package com.example.userservice.controller;
import com.example.user.api.UserApi;
import com.example.user.api.dto.UserDTO;
import org.springframework.web.bind.annotation.RestController;
@RestController
public class UserController implements UserApi {
@Override
public UserDTO findUserById(Long id) {
return userService.findById(id);
}
}
|
- UserController 实现 (implements)
接口,提供了方法的具体业务逻辑。
- 因为 Java 的注解继承机制,UserController 中的 findUserById
方法自动继承了来自 UserApi 接口的所有注解 (@GetMapping, @PathVariable)。你无需在 Controller
的方法上重复声明它们!
- 使用 @Override
是一个好习惯,如果接口方法签名发生变化,而实现类没有同步修改,编译器会立刻报错,将运行时风险提前到编译时解决。
服务消费方 (Consumer) 继承接口
在 order-service 项目中:
- 在其 pom.xml 中同样添加对 feign-api 模块的依赖。
- 让 UserClient (Feign 客户端) 继承 (extends) 这个
UserApi 接口。
1
2
3
4
5
6
7
8
9
10
11
|
package com.example.orderservice.client;
import com.example.user.api.UserApi;
import org.springframework.cloud.openfeign.FeignClient;
@FeignClient(name = "user-service")
public interface UserClient extends UserApi {
}
|
- UserClient 继承 (extends)
接口。对于一个接口来说,extends 意味着它包含了父接口的所有方法声明。因为
Feign
是为接口创建动态代理,所以它不需要方法的实现体,只需要方法的声明,这正是
extends 所提供的。
- @FeignClient
注解是 Feign
自身需要的,用于指定目标服务名等配置,所以需要保留在子接口上。
- 接口体是空的!这极大地简化了消费方的代码。
这招带来的巨大优势体现在,单一事实来源,API
契约被定义在唯一的 user-api 模块中。任何关于接口的疑问,都以此为准。
如果需要修改接口,你只需要修改 feign-api 中的 UserApi 接口。
- 提供方
(user-service):会立刻出现编译错误,因为它实现的接口方法签名不匹配了,强制开发者去修正实现。
- 消费方
(order-service):无需任何改动,它会自动继承新的接口定义。
这就将原来可能在生产环境才暴露的运行时错误,提前扼杀在了开发阶段的编译期。
代码复用与维护性
避免了大量的重复代码。修改和维护只在一处进行,所有依赖方都能自动享受到更新,大大提高了开发效率和代码质量。
清晰的模块边界与职责
feigm-api
模块清晰地定义了服务的边界和能力。其他团队的开发者只需要关心这个 API
模块,就能知道如何与你的服务进行交互,而无需关心你的内部实现细节。
但是如果要对外提供开放 API (Open API),让第三方(可能使用不同语言,如
Python, Go)来调用,则不应共享 Java jar
包。此时应使用与语言无关的契约定义方式,如 OpenAPI (Swagger)
规范 或 gRPC 的 .proto 文件。