事件驱动开发
简介
在现代应用程序开发中,事件驱动架构(EDA)越来越受欢迎。它不仅可以提高系统的解耦性,还能提升系统的可扩展性和响应速度。Spring
Boot
中的事件驱动开发是一种解耦业务逻辑 的设计模式,核心思想是:通过
“事件发布 - 监听”
机制,让不同组件在不直接依赖的情况下协作 。
事件驱动开发是一种软件架构模式,系统通过事件来进行通信和协调。事件可以是系统中发生的任何有意义的事情,如用户点击按钮、数据更新等。事件驱动架构的核心思想是将事件的发布者和事件的处理者解耦,通过事件总线来传递事件。这样可以使得系统更加灵活,易于扩展和维护。
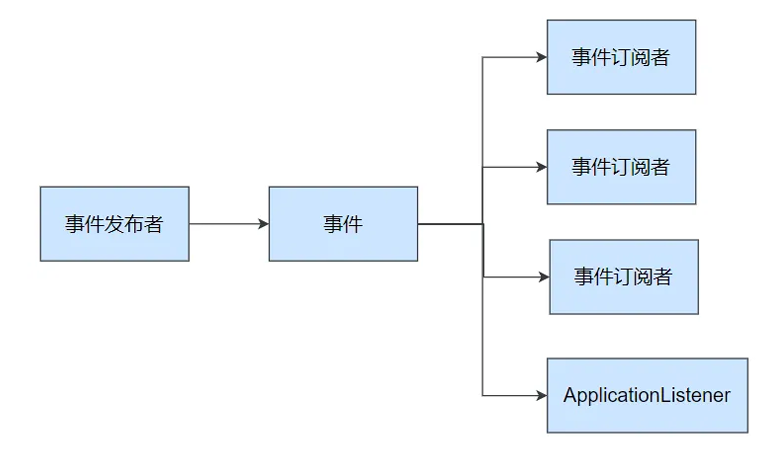
Spring Boot中的事件模型基于 Spring Framework 的 ApplicationEvent 和
ApplicationListener。ApplicationEvent
是所有事件的基类,ApplicationListener
是所有事件监听器的接口。我们可以自定义事件并发布,自定义监听器来处理这些事件。
简单说,事件驱动开发是用 “事件” 作为业务流程的
“粘合剂” ,让不同组件在 “松耦合”
的情况下协作。当业务逻辑复杂、需求多变时,它能让代码更清晰、更易扩展
核心概念
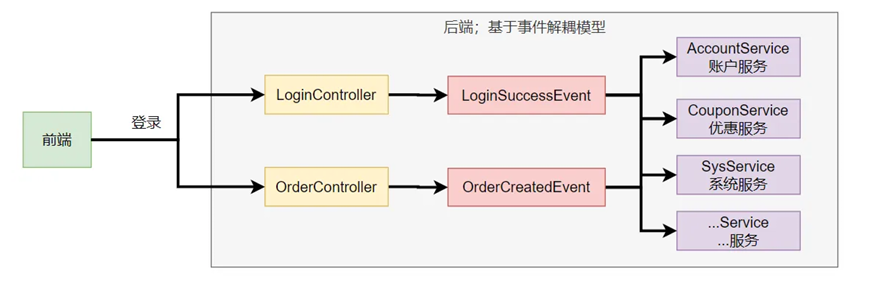
如果我们按照原来的模式,把事件解耦,会有如下思路
image-20250621164940785
应用启动过程生命周期事件感知(9大事件) 、应用运行中事件感知(无数种)
image-20250621164843835
事件(Event) :
描述 “发生了什么事” 的对象(如 LoginSuccessEvent
登录成功、OrderCreatedEvent 订单创建 )。
可以是 Spring 内置事件(如启动阶段的
ApplicationReadyEvent
),也可以是自定义事件 (业务场景需要的事件 )。
事件发布者(Publisher) :
触发事件的组件(如图中的
LoginController、OrderController )。
职责:在业务逻辑中 “发布事件”(比如用户登录成功后,发布
LoginSuccessEvent )。、
事件订阅者(Subscriber) :
监听事件并执行逻辑的组件(如图中的
AccountService、CouponService )。
职责:“订阅事件”,当事件发生时执行对应的业务(比如登录成功后,给用户发优惠券、记录系统日志
)。
事件发布 :ApplicationEventPublisherAware或注入:ApplicationEventMulticaster事件监听 :组件 + @EventListener
代码落地举例思路
开启Spring Boot 的事件监听
为了更直观的看到 Spring Boot 执行的生命周期的事件监听,我们首先打开
Spring Boot 的事件监听
首先要实现ApplicationListener<ApplicationEvent>这个类中的onApplicationEvent方法,我们在这里打印了事件的出现信息
1
2
3
4
5
6
7
public class MyApplicationListener implements ApplicationListener <ApplicationEvent> { @Override public void onApplicationEvent (ApplicationEvent event) { System.out.println("----事件" + event + "到达-------" ); } }
在resources下面创建一个META-INF/spring.factories文件
1
2
org.springframework.context.ApplicationListener =\ edu.software.ergoutree.springbootwebpart2.listener.MyApplicationListener
事件驱动开发的完整流程
普通开发流程
在普通的情况下,我们的代码流程如下:
设计数据模型:设计用户实体、数据库表结构。
编写Repository:实现数据访问层(如UserRepository)。
编写Service:实现业务逻辑(如UserServiceImpl),所有业务逻辑都直接写在Service里。
编写Controller:实现接口,调用Service完成注册、登录等功能。
一个实体三大层的情况下大约就是这样
如果用普通开发 ,代码会耦合在
UserController 里;用事件驱动 ,则通过
“事件”
解耦这些逻辑。更利于在需要添加需求的时候的操作,避免扩展新功能(如登录后发邮件)需要修改原有Service代码。
事件驱动代码开发流程
设计数据实体和编写Repository
当然这个和普通的开发也没什么不同
自定义事件
之前提到的 “应用启动过程生命周期事件(9 大事件)”,这些是 Spring Boot
内置的框架级事件 (如 ApplicationReadyEvent
应用就绪 )。而上面的
LoginSuccessEvent是业务级事件 。
框架级事件 :由 Spring Boot
自动发布,用于感知启动流程(如 ApplicationListener 监听
)。
业务级事件 :由开发者自定义发布,用于解耦业务逻辑(如登录、订单场景
)。
需要实现ApplicationEventPublisher,Spring
Boot会通过ApplicationEventPublisherAware 接口自动注入给我们,实现setApplicationEventPublisher 方法,并且自定义一个方法来调用底层API发送事件,事件是广播出去的。所有监听这个事件的监听器都可以收到
创建事件发布者
1
2
3
4
5
6
7
8
9
10
11
12
13
14
15
16
17
18
19
20
21
22
23
@Service public class EventPublisher implements ApplicationEventPublisherAware { ApplicationEventPublisher applicationEventPublisher; public void sendEvent (ApplicationEvent event) { applicationEventPublisher.publishEvent(event); } @Override public void setApplicationEventPublisher (ApplicationEventPublisher applicationEventPublisher) { this .applicationEventPublisher = applicationEventPublisher; } }
写一个用户登录和注册的事件
1 2 3 4 5 6 7 8 9 10 11 12 13 14 15 16 17 18 19 20 21 22 23 24 25 26 27 28 29 30 31 32 33 34 public class UserLoginEvent extends ApplicationEvent { private final User user; private final String ip; private final boolean success; private final String message; public UserLoginEvent (Object source, User user, String ip, boolean success, String message) { super (source); this .user = user; this .ip = ip; this .success = success; this .message = message; } public User getUser () { return user; } public String getIp () { return ip; } public boolean isSuccess () { return success; } public String getMessage () { return message; } }
1 2 3 4 5 6 7 8 9 10 11 12 13 14 15 16 public class UserRegistrationEvent extends ApplicationEvent { private final User user; public UserRegistrationEvent (Object source, User user) { super (source); this .user = user; } public User getUser () { return user; } }
编写事件监听器
这个需要实现ApplicationListener,专门处理某类事件(如登录日志、注册欢迎邮件、安全告警等)。
1 2 3 4 5 6 7 8 9 10 11 12 13 14 15 16 17 18 19 20 21 22 23 24 25 26 @Component public class UserRegistrationEventListener implements ApplicationListener <UserRegistrationEvent> { private static final Logger logger = LoggerFactory.getLogger(UserRegistrationEventListener.class); @Override public void onApplicationEvent (UserRegistrationEvent event) { String username = event.getUser().getUsername(); String email = event.getUser().getEmail(); logger.info("新用户注册 - 用户名: {}, 邮箱: {}" , username, email); System.out.println("====用户注册事件处理完成====" ); } }
Service新增代码
就以其中的登录为例子吧
1
2
3
4
5
6
7
8
9
10
11
12
13
14
15
16
17
18
19
20
21
22
23
24
25
@Override public User register (String username, String password, String email) { Optional<User> existingUser = userRepository.findByUsername(username); if (existingUser.isPresent()) { eventPublisher.publishEvent(new SecurityEvent ( this , username, "REGISTER_ATTEMPT" , "N/A" , "注册失败:用户名已存在" )); return null ; } User newUser = new User (username, password, email); User savedUser = userRepository.save(newUser); eventPublisher.publishEvent(new UserRegistrationEvent (this , savedUser)); return savedUser; }
最后在 Controller 中发送事件
1 2 3 4 5 6 7 8 9 10 11 12 13 14 15 16 17 18 19 20 21 22 23 24 25 26 27 28 29 30 31 32 33 34 35 36 37 38 @PostMapping("/login") public ResponseEntity<Map<String, Object>> login ( @RequestBody Map<String, String> request, HttpServletRequest httpRequest) { String username = request.get("username" ); String password = request.get("password" ); String ip = httpRequest.getRemoteAddr(); Map<String, Object> response = new HashMap <>(); if (username == null || password == null ) { response.put("success" , false ); response.put("message" , "用户名和密码不能为空" ); return ResponseEntity.badRequest().body(response); } User loggedInUser = userService.login(username, password, ip); if (loggedInUser == null ) { response.put("success" , false ); response.put("message" , "用户名或密码错误" ); return ResponseEntity.status(HttpStatus.UNAUTHORIZED).body(response); } response.put("success" , true ); response.put("message" , "登录成功" ); response.put("user" , Map.of( "id" , loggedInUser.getId(), "username" , loggedInUser.getUsername(), "email" , loggedInUser.getEmail() )); return ResponseEntity.ok(response); }
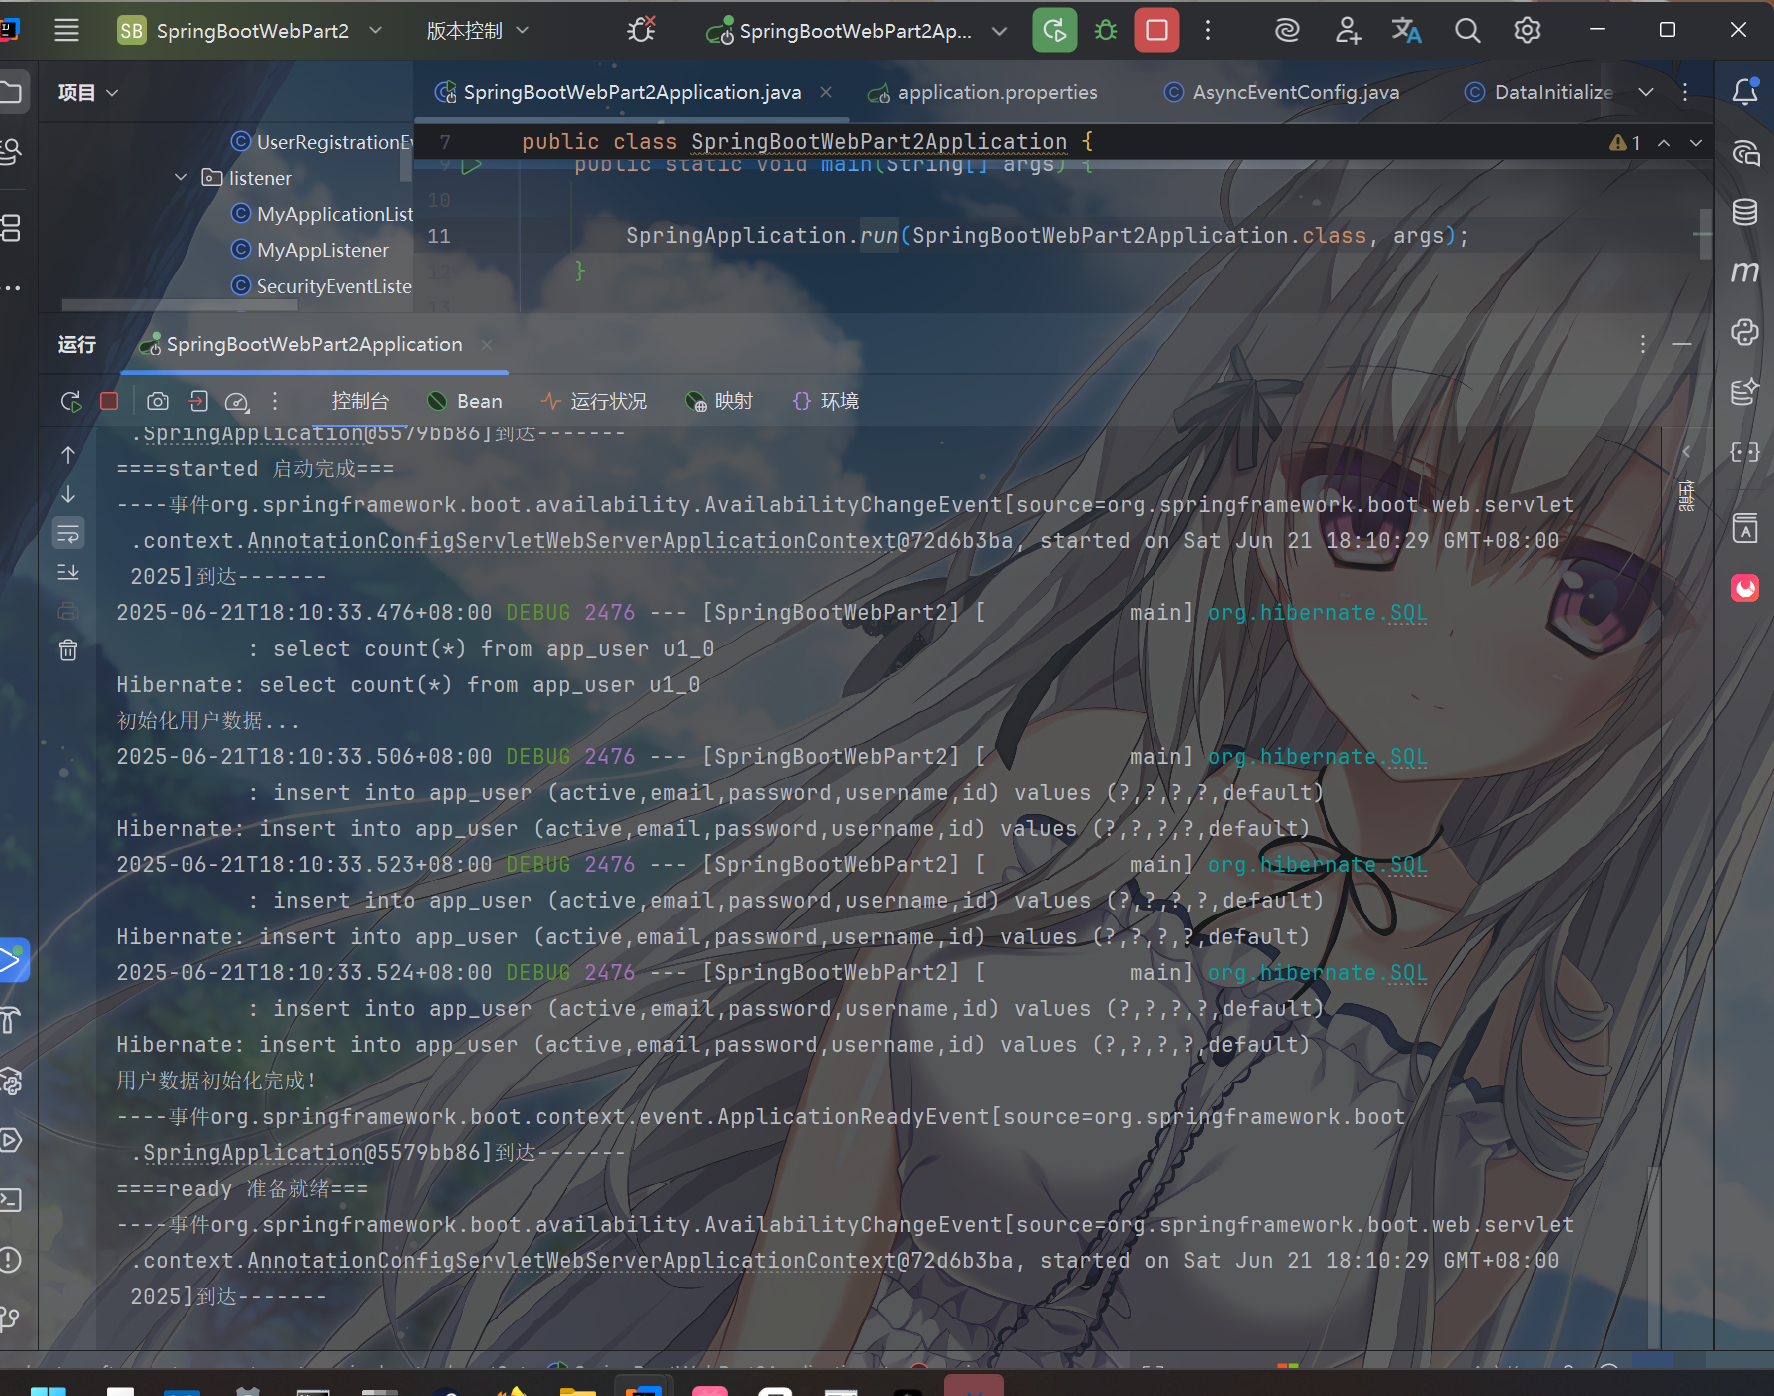
启动后发现监听器正常运转,且事件解耦
image-20250621181112888
在url中输入请求时,界面会出现如下
image-20250621181313567