
IoC 基于注解方式操作 Bean 管理
使用Spring的IoC容器,实际上就是通过类似XML这样的配置文件,把我们自己的Bean的依赖关系描述出来,然后让容器来创建并装配Bean。一旦容器初始化完毕,我们就直接从容器中获取Bean使用它们。
使用XML配置的优点是所有的Bean都能一目了然地列出来,并通过配置注入能直观地看到每个Bean的依赖。它的缺点是写起来非常繁琐,每增加一个组件,就必须把新的Bean配置到XML中。
我们可以使用Annotation配置
基于注解配置 Bean
在Spring中,基于注解方式配置Bean,主要应用于项目开发中的组件,eg : Controller, Service, DAO.
常用的组件注解的形式有——
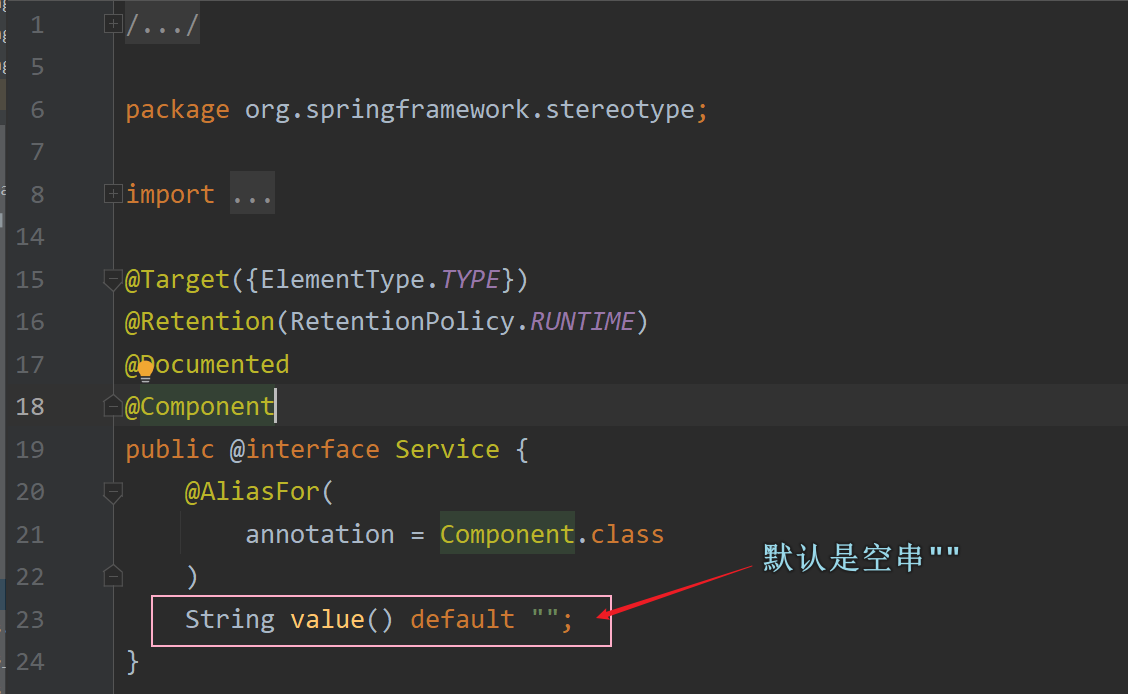
- @Component :
表示当前注解标识的是一个组件,相当于定义了一个Bean,它有一个可选的名称,默认是
mailService,即小写开头的类名。 - @Controller : 表示当前注解标识的是一个控制器,通常用于Servlet
- @Service : 表示当前注解标识的是一个处理业务逻辑的类,通常用于Service。
- @Repository : 表示当前注解标识的是一个持久化层的类,通常用于DAO类。
应用实例
首先,在已有jar包的基础上,各种依赖
我们依旧根据“Web层调用Service层,Service层调用DAO层”的分层设计思想,分别在web, service, dao包下新建PotUserServlet, PotUserServiceImpl, PotUserDAOImpl类;并在component包下新建一个CyanComponent类
PotUserServlet类代码如下 : (使用@Controller注解标记)
1 | import org.springframework.stereotype.Controller; |
PotUserServiceImpl类代码如下 : (使用@Service注解标记)
1 | import org.springframework.stereotype.Service; |
PotUserDAOImpl类代码如下 : (使用@Repository注解标记)
1 | import org.springframework.stereotype.Repository; |
新建一个配置文件beans_annotation.xml,在配置文件中通过context命名空间配置自动扫描,格式如下
<context:component-scan base-package="..."/> 其中
- context:component-scan表示配置对指定包的自动扫描,并创建对象到容器;
- 属性base-package表示被扫描的包;
- 配置达到的效果是:Spring 容器创建时,就会扫描base-package对应包下所有的用@Controller, @Service, @Repository, @Component注解标记的类,并将其实例化,放入到IOC容器中。
1 |
|
接着,新建一个测试类,用于定义进行单元测试的方法。 TestBeanByAnnotation类代码如下
1 |
|
注意后面@之后的内容
注意事项:
若想配置自动扫描一个包下所有的子包,可以使用通配符 * 来指定。eg :
<context:component-scan base-package="com.cyan.spring.*"/>,表示会自动扫描com.cyan.spring包下所有的子包。即使不使用通配符 * ,Spring IOC容器也会默认扫描base-package所指定包的全部子包。**Spring的IOC容器不能检测一个使用了@Controller注解的类究竟是否为一个控制器(其他注解同理),即注解的名称只是用于程序员自己识别当前标识的组件类型,Spring IOC容器只要扫描到注解标识的类就会创建其对象,并不会去识别注解的含义。
context:component-scan亦可支持只扫描满足特定要求的类,需要用到resource-pattern属性,格式为: resource-pattern=“特定要求”/>. eg:
Spring IOC容器还支持扫描时指定过滤某些类 以及 在扫描时指定扫描某些类。
指定过滤某些类 : 通过
<context:exclude-filter/>标签来指定(该标签要放在<context:component-scan>标签内),其中,type属性表示根据什么规则来进行过滤,expression属性则表示具体要过滤的类型。1
2
3
4
5
6
7
8
9
10<!--
(1) context:component-scan表示配置自动扫描,
base-package="com.cyan.spring"表示扫描com.cyan.spring下的所有子包。
(2) context:exclude-filter表示配置过滤的类,
type="annotation"表示以注解类型为规则进行过滤,
expression="org.springframework.stereotype.Service"表示以该注解标记的类会被过滤掉,不会被扫描。
-->
<context:component-scan base-package="com.cyan.spring">
<context:exclude-filter type="annotation" expression="org.springframework.stereotype.Service"/>
</context:component-scan>指定扫描某些类 : 通过
<context:include-filter/>标签来指定(该标签要放在<context:component-scan>标签内),其中,type 属性表示根据什么规则来进行扫描,expression 属性则表示具体要扫描的类型。可见,<context:include-filter/>标签 和 上文的<context:exclude-filter/>标签在格式上非常类似,不过需要注意的一点是,<context:include-filter/>标签在使用时还需要在<context:include-filter/>标签中额外标识一个属性use-default-filters="false",表示不再使用默认扫描机制。1
2
3
4
5
6<!--
表示指定扫描com.cyan.spring包及其所有子包下的————使用了@Service注解标记的类。
-->
<context:component-scan base-package="com.cyan.spring" use-default-filters="false">
<context:include-filter type="annotation" expression="org.springframework.stereotype.Service"/>
</context:component-scan>
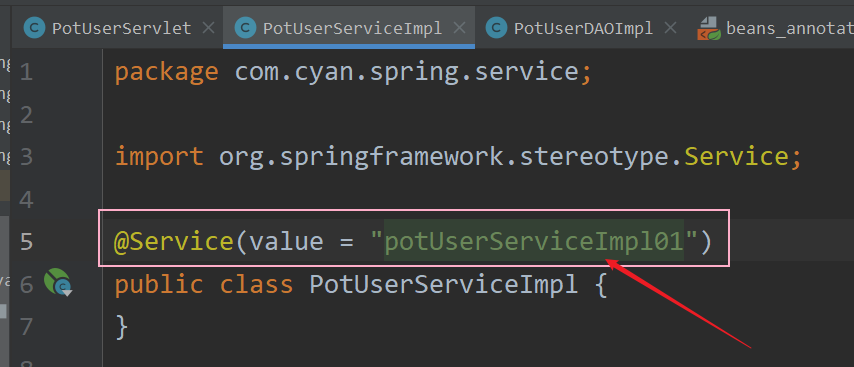
使用注解标记后,默认情况下所创建的Bean对象的id = 类名首字母小写;但也可以借助注解的value属性手动指定id值,且value可以省略。注解的value属性(注解中定义的方法实际上对应的是注解的属性,而不是传统意义上的方法。),如下图所示 :
我们可以在配置注解时,给出指定的id值
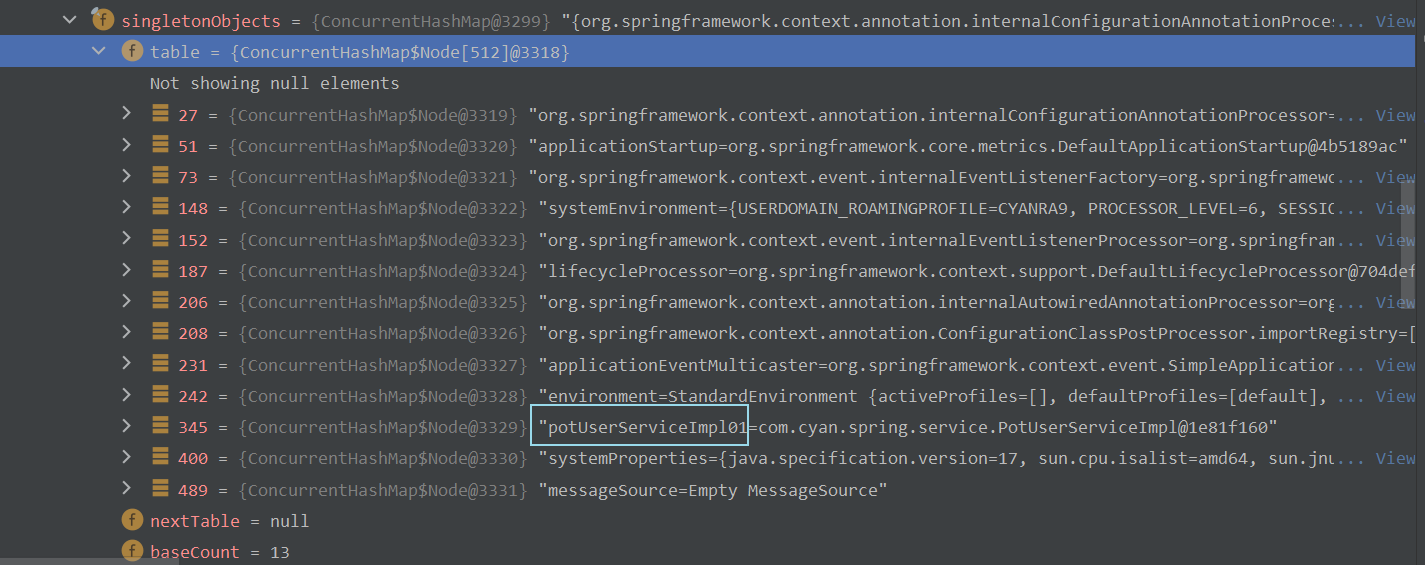
进入Debug界面,在IOC容器的beanFactory –> singletonObjects下,可以看到bean对象的id值已经变成了我们在配置@Service注解时给出的value = “…” 的值。如下图所示 :
全注解开发
如果完全不使用 XML 来配置 Spring 的 IoC 容器,我们可以使用 Java 配置类来替代。下面是对之前例子的更改
我们保持之前定义的类不变,即
PotUserServlet、PotUserServiceImpl 和
PotUserDAOImpl,这些类依然使用相应的注解进行标记。
1 | // PotUserServlet.java |
我们需要创建一个 Java 配置类来替代 beans_annotation.xml
文件。使用 @Configuration
注解标记该类,表示这是一个配置类,使用 @ComponentScan
注解来指定要扫描的包
@Configuration
- 作用:该注解用于标记一个类为 Spring 的配置类,类似于 XML 配置文件。配置类中可以定义 Bean 的创建和依赖关系。
@ComponentScan
- 作用:该注解用于指定 Spring 容器要扫描的包,Spring
会自动扫描这些包及其子包下使用
@Controller、@Service、@Repository、@Component等注解标记的类,并将它们注册为 Bean,并根据@Autowired进行装配。 - 属性
basePackages:指定要扫描的包的名称,可以是一个数组,用于指定多个包。basePackageClasses:指定要扫描的包下的某个类,Spring 会扫描该类所在的包及其子包。includeFilters和excludeFilters:用于指定扫描时的过滤规则,类似于 XML 中的和。
1 | import org.springframework.context.annotation.ComponentScan; |
测试类也需要进行相应的修改,使用
AnnotationConfigApplicationContext 来加载 Java 配置类
1 | import org.springframework.context.ApplicationContext; |
使用Annotation配合自动扫描能大幅简化Spring的配置,我们只需要保证:
- 每个Bean被标注为
@Component并正确使用@Autowired注入; - 配置类被标注为
@Configuration和@ComponentScan; - 所有Bean均在指定包以及子包内。
使用@ComponentScan非常方便,但是,我们也要特别注意包的层次结构。通常来说,启动配置AppConfig位于自定义的顶层包(例如com.itranswarp.learnjava),其他Bean按类别放入子包。
自动装配
Spring
基于注解配置和管理Bean也可实现自动装配,使用的注解主要是两种,分别是@AutoWired和@Resource。
@Autowired自动装配:根据属性类型进行自动装配
使用@Autowired就相当于把指定类型的Bean注入到指定的字段中。和XML配置相比,@Autowired大幅简化了注入,因为它不但可以写在set()方法上,还可以直接写在字段上,甚至可以写在构造方法中
1 |
|
当类中的某个属性上使用@Autowired注解标识时,会在IOC容器中查找待装配的组件的类型,如果有唯一的bean对象与之匹配,则使用该bean对象进行装配。
若待装配的属性在IOC容器中对应有多个同类型的bean对象,则使用待装配的属性的属性名作为id值再进行查找,若找到就进行装配,若找不到就抛出异常。
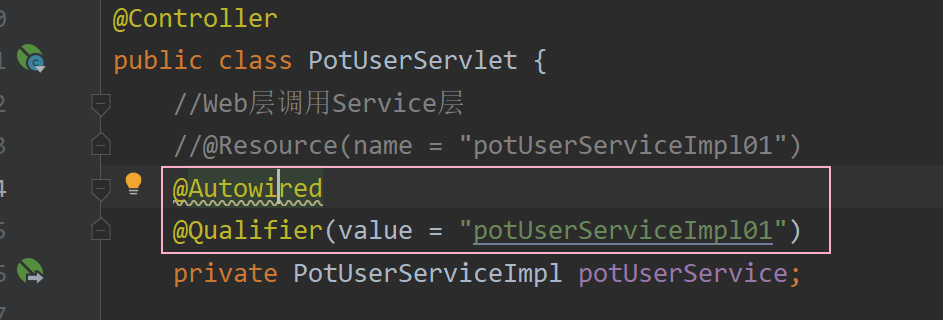
若想在使用@Autowired注解时也指定id值,可以配合@Qualifier注解,@Qualifier:根据名称进行注入,目的在于区别同一接口下有多个实现类,根据类型就无法选择,如下图所示 :
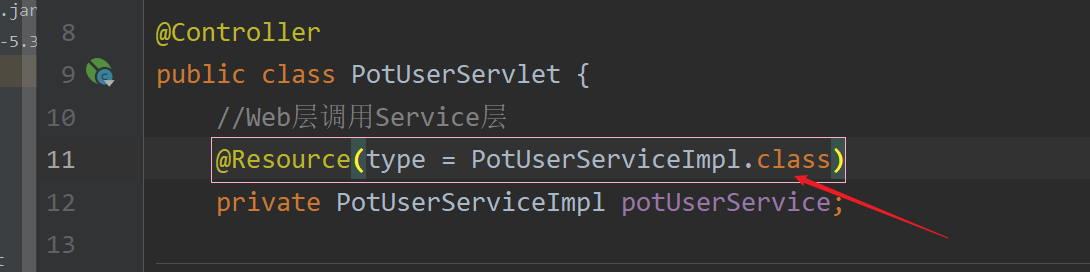
@Resource:可以根据类型注入,也可以根据名称注入(它属于javax包下的注解,不推荐使用!)
1 | //@Resource //根据类型进行注入 |
@Value:注入普通类型属性
1 |
|
示例
新建一个beans_Auto.xml配置文件,在配置文件中配置要扫描的包
1 |
|
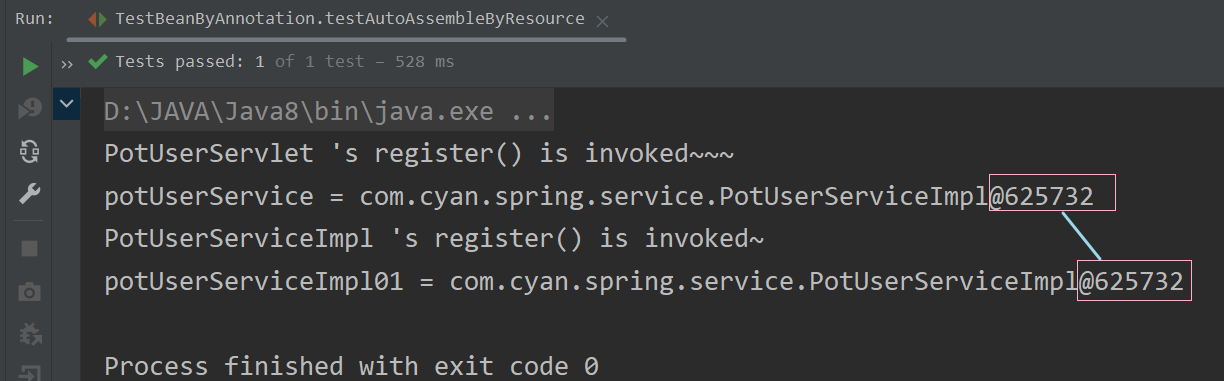
以PotUserServlet和PotUserServiceImpl类为例,在PotUserServlet类中维护一个PotUserServiceImpl类的属性,使用@Autowired对其进行自动装配。
PotUserServlet类代码如下 :
(在register()方法中打印出属性potUserService,与测试类中获取到的Bean对象进行比较)
1 | import org.springframework.beans.factory.annotation.Autowired; |
PotUserServiceImpl类代码如下 : (注意,此处给出了指定的id值[value=“potUserServiceImpl01”])
1 | import org.springframework.stereotype.Service; |
在测试类中定义单元测试方法,在测试类中单独通过 id
获取到PotUserServiceImpl类的 Bean 对象,与
PotUserServlet的register方法中打印出的Bean对象进行对比,查看是否为同一个对象。testAutoAssembleByAutoWired()方法代码如下
1 |
|
可以看到,由于此时我们在bean_Auto.xml中配置了自动扫描,而使用@Service注解时,我们又给出了value = "potUserServiceImpl01"的指定id。所以最终IOC容器中只有一个PotUserServiceImpl类型的
bean
对象[根据类型进行自动装配],并且其id = potUserServiceImpl01。因此,在测试方法中,我们通过id = potUserServiceImpl01获取到的Bean对象就是自动装配的Bean对象。
@Resource自动装配
@Resource有两个属性比较重要,分别是name 和 type;Spring将@Resource注解的name属性解析为bean对象的id值,而将type属性解析为bean对象的类型。
当使用name属性时,采取byName的自动注入策略;当使用type属性时,采取byType的自动注入策略。
若@Resource注解未指定name 和 type,则优先使用byName注入策略,若匹配不上再采取byType注入策略,若仍然匹配不上,报错。
JDK17.0不支持@Resource注解。
将 Resource 改为 by Type 策略
此时,由于IOC容器中只有唯一一个PotUserServiceImpl类型的Bean对象,所以可以装配成功。
但是,如果此时我们在beans_Auto.xml中再配置一个以上PotUserServiceImpl类型的bean对象
[注意:基于注解配置Bean和基于XML配置Bean,两者配置的Bean对象是互不干扰的,但容器中总共存在的Bean对象的数量会发生改变]
那么再次运行testAutoAssembleByResource()方法,就会报错
当@Resource注解采取“**byType”注入策略时,同样要求当前IOC容器中只有唯一一个该类型的Bean对象。
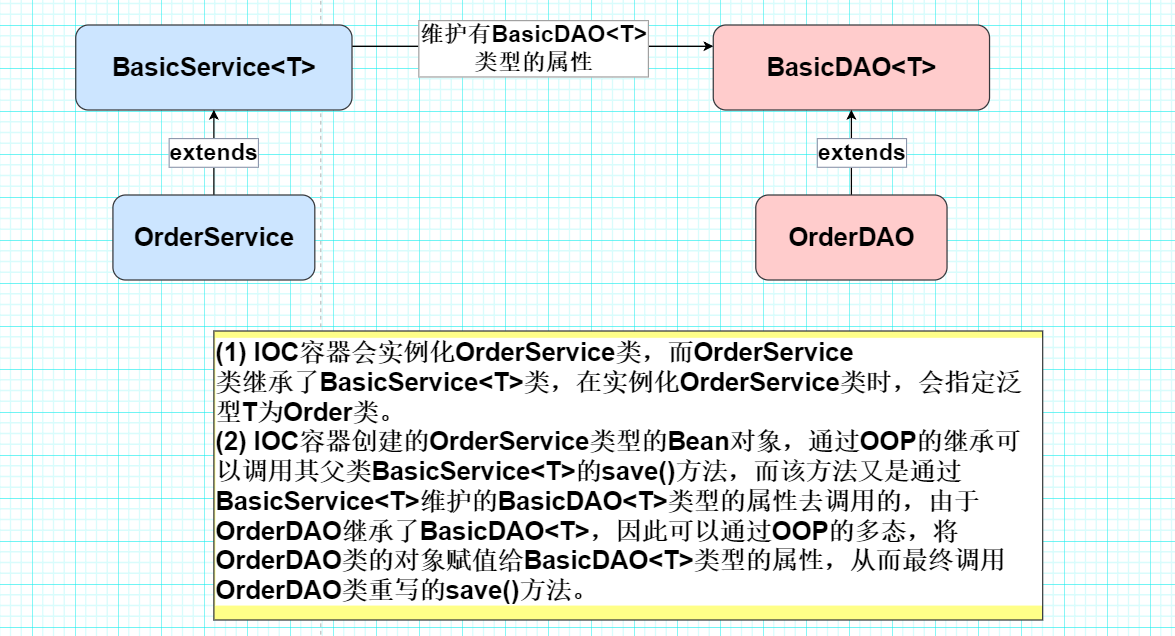
泛型依赖注入
- Spring提供了基于泛型依赖的注入机制,以更好地管理有继承和相互依赖的Bean的自动装配。
- 泛型依赖注入需要用到@Autowired注解。
- 泛型依赖注入,本质是利用了OOP的多态机制。eg : BasicService中维护有一个使用了泛型的BasicDAO类的属性。
实例:
首先需要创建下面这五个类,如下图所示 : (最终要实现——将OrderDAO类型的Bean对象装配给BasicService中维护的BasicDAO类型的属性[多态])
Order类代码如下 : (作为JavaBean类)
1 | public class Order { |
BasicDAO类代码如下 : (定义了save()抽象方法)
1 | public abstract class BasicDAO<T> { |
OrderDAO类代码如下 : (继承自BasicDAO,并重写BasicDAO的save方法)
1 | import org.springframework.stereotype.Repository; |
BasicService类代码如下 : (注意,针对basicDAO属性使用了@Autowire自动装配,最终会将OrderDAO类型的对象引用给basicDAO属性,构成多态)
1 | import org.springframework.beans.factory.annotation.Autowired; |
OrderService类代码如下 : (继承自BasicService)
1 |
|
然后配置文件 xml 配置一下
测试输出发现 OrderService 被装配,且 bean 对象是 basicDAO属性,形成了多态
1 |
|