授权管理讲解
授权管理是什么
一般我们来说,权限认证就是解决你是谁的问题,也就是验证用户身份,在这个过程中,我们通常使用登录来实现,它的核心目标是,核实用户的身份合法性。
授权是在身份认证通过后,判断该用户是否有权限执行某个操作的过程。它的核心目标是,控制不同级别的用户对资源的访问权限。
授权的典型场景:
- 验证用户是否有权限访问某个 URL(如
/admin/*
仅管理员可访问)
- 验证用户是否有权限调用某个方法(如
deleteUser()
仅超级管理员可执行)
- 验证用户是否有权限操作某个数据(如只能修改自己创建的订单)
授权必须在认证之后进行(只有知道 “你是谁”,才能判断
“你能做什么”)。认证通过后,Spring Security 将用户的身份信息(含角色 /
权限)存入 SecurityContext,授权环节从
SecurityContext 中获取这些信息进行权限判断。
一般的授权需求有这样的两种:
- 用户-权限-资源
- 这是最基础的 “点对点” 授权模式,核心逻辑是
“给用户直接分配‘操作资源’的权限”,无需中间载体,权限与用户直接绑定。
- 例如:给 “张三” 分配 “查看文档 A(资源)” 和 “编辑表格 B(资源)”
的权限 → 张三直接拥有这两个 “权限 - 资源” 组合,无其他中间环节。
- 用户-角色-权限-资源
- 这是工业界主流的授权模式,核心逻辑是
“先定义角色,将权限分配给角色,再将角色分配给用户”,通过
“角色” 作为中间载体,实现权限的批量管理。
- 例:
- 定义 “产品经理” 角色;
- 给该角色分配 “查看需求文档(资源)”“编辑产品原型(资源)”
权限;
- 将 “张三” 关联到 “产品经理” 角色 →
张三间接获得角色对应的所有权限。
这两种授权需求,本质上是权限管理领域中经典的
DAC(自主访问控制)模型简化版 和
RBAC(基于角色的访问控制)模型,有兴趣可以自己去看一下
权限决策依据
既然谈到了 RBAC 和 ABAC
两个模型,就大家介绍下两者间的区别:
RBAC
核心思想:以角色作为权限管理的核心,每个用户被赋予一个或多个角色,而角色与权限之间存在固定的映射关系。
决策依据:当用户请求访问资源时,系统根据用户所属角色所拥有的权限进行校验。
粒度:粒度相对较粗,因为权限是绑定在角色上的,无法针对单个请求条件进行动态决策。
ABAC
核心思想:以属性(Attribute)为基础,利用用户属性、资源属性、环境属性等多个维度的条件进行权限判断。
决策依据:权限决策是基于各种属性之间的逻辑表达式和策略规则来动态确定是否允许访问。
粒度:支持非常细粒度的控制,可以针对具体属性制定规则,实现精准的权限控制。
权限系统设计
上面我们了解了 RBAC 和 ABAC
这两种业界主流的权限模型有两种
RBAC 模型
RBAC(Role-Based Access
Control,基于角色的访问控制)
是目前企业权限管理的事实标准,根据Gartner调查,超过85%的中大型企业采用RBAC或改进型RBAC作为核心权限管理框架。
基于角色的访问控制(Role-Based Access Control,简称
RBAC)
指的是通过用户的角色(Role)授权其相关权限,实现了灵活的访问控制,相比直接授予用户权限,要更加简单、高效、可扩展。
一个用户可以拥有若干角色,每一个角色又可以被分配若干权限,这样,就构造成
用户-角色-权限
的授权模型。在这种模型中,用户与角色、角色与权限之间构成了多对多的关系。
 image-20260223015537594
当使用 RBAC模型
时,通过分析用户的实际情况,基于共同的职责和需求,在不同的业务情况下,我们还可以授予他们不同的角色。这种
用户 -> 角色 -> 权限
间的关系,让我们可以不用再单独管理单个用户权限,用户从授予的角色里面获取所需的权限。
简单的单角色场景下,例如,整个系统的级别中,有
Admin、Maintainer、Operator
三种角色,这三种角色分别具备不同的权限,比如,只有 Admin
管理员权限,他可以删除别人评论,其他的角色不具备这些能力,然后我们授予某个用户
Admin 这个角色,他就具备了删除别人评论的能力。
也就是说,RBAC
模型对于动态的和多重情况下的用户权限,这就涉及到在不同的业务环境下,用户的权限和职责是不同的,这种情况下,RBAC
也能很好的进行设计,此时动态责任分离特性尤为重要
这样的情况下,权限校验分为两层
- 第一层:角色权限校验:用户是否拥有操作该资源的基础权限,比如发布者才有
video:edit 权限,观看者只有 video:view 权限
- 第二层:资源归属校验:用户是否是该视频的所有者,只有
video.user_id = 当前用户 ID,才能执行 edit/delete 操作
第二层有点类似 ABAC 的思想
例如,我发布的视频,我可以修改删除什么的,那么别人肯定不能删除我的视频,对于视频级别的业务,就有发布者和观看者两种角色
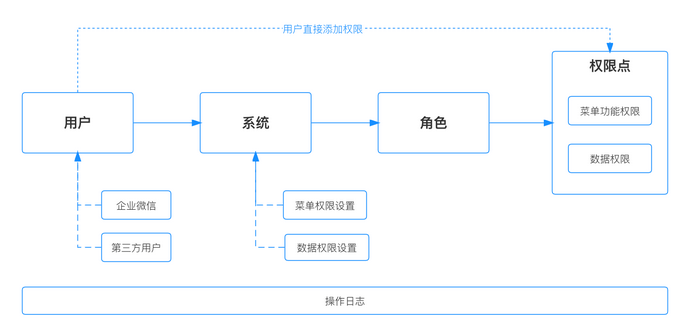 image-20260223020602610
ABAC 模型
基于属性的访问控制(Attribute-Based Access Control,简称
ABAC) 是一种比 RBAC模型
更加灵活的授权模型,它的原理是通过各种属性来动态判断一个操作是否可以被允许。这个模型在云系统中使用的比较多,比如
AWS,阿里云等。
考虑下面这些场景的权限控制:
- 授权某个人具体某本书的编辑权限
- 当一个文档的所属部门跟用户的部门相同时,用户可以访问这个文档
- 当用户是一个文档的拥有者并且文档的状态是草稿,用户可以编辑这个文档
- 早上九点前禁止 A 部门的人访问 B 系统
- 在除了上海以外的地方禁止以管理员身份访问 A 系统
- 用户对 2022-06-07 之前创建的订单有操作权限
可以发现上述的场景通过 RBAC模型 很难去实现,因为
RBAC模型
仅仅描述了用户可以做什么操作,但是操作的条件,以及操作的数据,RBAC模型
本身是没有这些限制的。但这恰恰是 ABAC模型
的长处,ABAC模型
的思想是基于用户、访问的数据的属性、以及各种环境因素去动态计算用户是否有权限进行操作
在 ABAC模型
中,一个操作是否被允许是基于对象、资源、操作和环境信息共同动态计算决定的。
- 对象:对象是当前请求访问资源的用户。用户的属性包括
ID,个人资源,角色,部门和组织成员身份等
- 资源:资源是当前用户要访问的资产或对象,例如文件,数据,服务器,甚至
API
- 操作:操作是用户试图对资源进行的操作。常见的操作包括“读取”,“写入”,“编辑”,“复制”和“删除”
- 环境:环境是每个访问请求的上下文。环境属性包含访问的时间和位置,对象的设备,通信协议和加密强度等
在 ABAC模型
的决策中,对决策的授权引擎会根据定义好的决策语句,结合对象、资源、操作、环境等因素动态计算出决策结果。每当发生访问请求时,ABAC模型
决策系统都会分析属性值是否与已建立的策略匹配。如果有匹配的策略,访问请求就会被通过。
Spring Security 中的授权方式
在这里简单介绍一下 Spring Security
中常见的授权方式和最简单的解释,方便后面了解
基于 URL 的授权
这是最常用的授权方式,通过拦截 HTTP 请求,根据请求的 URL
路径判断用户是否有权限访问。
通过 HttpSecurity 配置类中的
authorizeRequests() 方法定义 URL 与权限的映射关系。
1
2
3
4
5
6
7
8
9
10
11
12
13
14
15
16
17
18
19
| @Configuration
@EnableWebSecurity
public class SecurityConfig extends WebSecurityConfigurerAdapter {
@Override
protected void configure(HttpSecurity http) throws Exception {
http
.authorizeRequests()
.antMatchers("/public/**").permitAll()
.antMatchers("/admin/**").hasRole("ADMIN")
.antMatchers("/users/**").hasAuthority("USER_MANAGE")
.anyRequest().authenticated()
.and()
.formLogin();
}
}
|
基于角色的访问控制(RBAC)
通过用户所属的角色(Role)
进行授权,角色通常是一组权限的集合(如
ROLE_ADMIN、ROLE_USER)。
这种一般在数据库中也要存储用户对应的相关角色
实现方式:
在配置类中声明角色权限:
1
2
3
| http.authorizeRequests()
.antMatchers("/admin/**").hasRole("ADMIN")
.antMatchers("/user/**").hasAnyRole("ADMIN", "USER");
|
在用户信息中关联角色:
通过 UserDetailsService 加载用户时,返回包含角色信息的
UserDetails 对象:
1
2
3
4
5
6
7
8
9
10
11
12
13
14
15
16
| @Service
public class CustomUserDetailsService implements UserDetailsService {
@Override
public UserDetails loadUserByUsername(String username) {
boolean isAdmin = "admin".equals(username);
List<String> roles = isAdmin ?
Arrays.asList("ROLE_ADMIN") :
Arrays.asList("ROLE_USER");
return User.withUsername(username)
.password(passwordEncoder.encode("password"))
.roles(roles.toArray(new String[0]))
.build();
}
}
|
基于权限的访问控制(细粒度权限)
比角色更细粒度的控制,直接通过权限标识(Permission)
授权(如 user:delete、order:view)。
实现方式:
在配置类中指定权限:
1
2
3
4
| http.authorizeRequests()
.antMatchers(HttpMethod.GET, "/users").hasAuthority("user:view")
.antMatchers(HttpMethod.POST, "/users").hasAuthority("user:create")
.antMatchers(HttpMethod.DELETE, "/users/**").hasAuthority("user:delete");
|
在用户信息中关联权限:
1
2
3
4
5
6
7
8
9
10
11
12
13
14
15
16
17
| @Override
public UserDetails loadUserByUsername(String username) {
List<GrantedAuthority> authorities = new ArrayList<>();
if ("admin".equals(username)) {
authorities.add(new SimpleGrantedAuthority("user:view"));
authorities.add(new SimpleGrantedAuthority("user:create"));
authorities.add(new SimpleGrantedAuthority("user:delete"));
} else {
authorities.add(new SimpleGrantedAuthority("user:view"));
}
return User.withUsername(username)
.password(passwordEncoder.encode("password"))
.authorities(authorities)
.build();
}
|
方法级别的授权
通过注解控制方法调用权限,适用于服务层或业务逻辑层的权限控制。
实现方式:
开启方法级安全注解:
在配置类上添加 @EnableGlobalMethodSecurity 注解:
1
2
3
4
5
6
| @Configuration
@EnableWebSecurity
@EnableGlobalMethodSecurity(prePostEnabled = true)
public class SecurityConfig extends WebSecurityConfigurerAdapter {
}
|
使用注解控制方法权限:
1
2
3
4
5
6
7
8
9
10
11
12
13
14
15
16
17
18
19
20
| @Service
public class UserService {
@PreAuthorize("hasRole('ADMIN')")
public void deleteUser(Long userId) {
}
@PreAuthorize("hasAuthority('user:view')")
public User getUser(Long userId) {
}
@PreAuthorize("authentication.principal.username == #username or hasRole('ADMIN')")
public void updateUser(String username, UserInfo info) {
}
}
|
基于数据的授权(行级权限)
控制用户对具体数据对象的访问权限(如
“只能查看自己创建的订单”),是最细粒度的授权。
这种的实现方式一般就很自定义化了:
通过 SpEL 表达式结合方法参数:
1
2
3
4
| @PreAuthorize("hasPermission(#orderId, 'Order', 'view')")
public Order getOrder(Long orderId) {
return orderRepository.findById(orderId).orElse(null);
}
|
自定义 PermissionEvaluator:
实现 PermissionEvaluator 接口定义数据权限规则:
1
2
3
4
5
6
7
8
9
10
11
12
13
14
15
16
17
18
19
20
21
| @Component
public class CustomPermissionEvaluator implements PermissionEvaluator {
@Autowired
private OrderRepository orderRepository;
@Override
public boolean hasPermission(Authentication auth, Object targetId, Object targetType, Object permission) {
String username = auth.getName();
Long orderId = (Long) targetId;
Order order = orderRepository.findById(orderId).orElse(null);
return order != null && (
order.getCreator().equals(username) ||
auth.getAuthorities().stream().anyMatch(a -> a.getAuthority().equals("ROLE_ADMIN"))
);
}
}
|
注册自定义 PermissionEvaluator:
1
2
3
4
5
6
7
8
9
10
11
12
| @Configuration
public class MethodSecurityConfig extends GlobalMethodSecurityConfiguration {
@Autowired
private CustomPermissionEvaluator permissionEvaluator;
@Override
protected MethodSecurityExpressionHandler createExpressionHandler() {
DefaultMethodSecurityExpressionHandler handler = new DefaultMethodSecurityExpressionHandler();
handler.setPermissionEvaluator(permissionEvaluator);
return handler;
}
}
|
基于 request 的授权
在 Spring Security 中,基于 Request
的授权(Request-based Authorization)是一种针对 HTTP
请求进行的权限控制方式,它通过拦截客户端发送的 HTTP 请求(如 URL
访问、请求方法等),判断当前用户是否有权限执行该请求。
这种授权方式聚焦于 “请求资源” 本身,核心是控制
“哪些用户可以访问哪些 URL 或请求方法”,是 Web
应用中最基础也最常用的授权形式。
那么基于 Request 的授权,我们的目标需要完成以下内容
- 限制用户对特定 URL 路径的访问(如
/admin/*
仅管理员可访问)
- 限制用户对特定 HTTP 方法的使用(如仅允许 POST 请求创建资源)
- 结合请求参数、IP 地址等信息进行更精细的访问控制
基于 Request 的授权主要通过 HttpSecurity 配置类中的
authorizeRequests() 方法实现,该方法提供了一系列链式 API
来定义请求与权限的映射规则。通过这个来配置对权限的控制
1
2
3
4
5
6
7
8
9
10
11
12
13
14
15
16
17
18
19
20
21
22
23
24
25
26
27
28
29
30
31
| @Configuration
@EnableWebSecurity
public class SecurityConfig extends WebSecurityConfigurerAdapter {
@Override
protected void configure(HttpSecurity http) throws Exception {
http
.authorizeRequests()
.antMatchers("/", "/home", "/public/**").permitAll()
.antMatchers("/user/**").authenticated()
.antMatchers("/admin/**").hasRole("ADMIN")
.antMatchers("/api/users/**").hasAuthority("USER_MANAGE")
.antMatchers(HttpMethod.GET, "/api/orders").hasAuthority("ORDER_VIEW")
.antMatchers(HttpMethod.POST, "/api/orders").hasAuthority("ORDER_CREATE")
.anyRequest().authenticated()
.and()
.formLogin();
}
}
|
其中,核心匹配规则与方法如下
URL 路径匹配:
antMatchers(String... patterns):使用 Ant
风格路径匹配(如 /admin/** 匹配 /admin
下所有路径),Spring
的各个组件涉及到路径匹配的,比较新的版本中基本都用的是 AntregexMatchers(String... regexPatterns):使用正则表达式匹配
URLmvcMatchers(String... patterns):基于 Spring MVC
的路径匹配(考虑控制器映射)
请求方法匹配:
结合 HttpMethod 枚举限制请求类型
1
| .antMatchers(HttpMethod.DELETE, "/api/users/**").hasRole("ADMIN")
|
权限判断方法:
permitAll():允许所有用户访问(包括未认证用户)denyAll():拒绝所有用户访问authenticated():仅允许已认证用户访问anonymous():仅允许匿名用户访问(未认证用户)hasRole(String role):需要特定角色(自动拼接
ROLE_ 前缀)hasAnyRole(String... roles):需要任意一个角色hasAuthority(String authority):需要特定权限(不自动拼接前缀)hasAnyAuthority(String... authorities):需要任意一个权限access(String spelExpression):使用 SpEL
表达式自定义判断逻辑
也顺便简单提一下基于 Request
的授权的原理,其实我们之前简单的说过一些,就是通过
FilterSecurityInterceptor 过滤器实现,它是
Spring Security 过滤器链中的最后一个过滤器,负责对请求进行授权检查:
- 拦截请求:当客户端发送 HTTP
请求时,
FilterSecurityInterceptor 拦截该请求。
- 获取认证信息:从
SecurityContextHolder
中获取当前用户的 Authentication 对象(包含用户权限)。
- 匹配规则:根据
HttpSecurity
中配置的规则,确定当前请求对应的权限要求。
- 授权决策:调用
AccessDecisionManager(授权决策管理器),对比用户权限与请求所需权限:
- 权限足够:允许请求继续处理(进入控制器方法)。
- 权限不足:抛出
AccessDeniedException,并根据配置跳转至
403 页面或返回错误信息。
授权管理实例
基于request的授权——权限分配
配置思路
基于 Request
的授权主要通过HttpSecurity配置类实现,核心是通过antMatchers()、mvcMatchers()或regexMatchers()定义
URL
模式,再通过hasRole()、hasAuthority()等方法指定访问所需的权限
其实我们最常用的方法就是通过 HttpSecurity 直接配置,在 Security
配置类中重写configure(HttpSecurity http)方法:
1
2
3
4
5
6
7
8
9
10
11
12
13
14
15
16
17
18
19
20
21
22
23
24
25
26
27
| @Configuration
@EnableWebSecurity
public class SecurityConfig extends WebSecurityConfigurerAdapter {
@Override
protected void configure(HttpSecurity http) throws Exception {
http
.authorizeRequests()
.antMatchers("/", "/home", "/public/**").permitAll()
.antMatchers("/admin/**").hasRole("ADMIN")
.antMatchers("/user/**").hasAnyRole("USER", "ADMIN")
.antMatchers(HttpMethod.POST, "/api/**").hasAuthority("API_WRITE")
.antMatchers(HttpMethod.GET, "/api/**").hasAnyAuthority("API_READ", "API_WRITE")
.anyRequest().authenticated()
.and()
.formLogin()
.permitAll()
.and()
.logout()
.permitAll();
}
}
|
使用 @PreAuthorize
注解(方法级别控制)可以更灵活的权限被控制,首先在配置类上添加@EnableGlobalMethodSecurity注解开启方法级安全:
1
2
3
4
5
6
| @Configuration
@EnableWebSecurity
@EnableGlobalMethodSecurity(prePostEnabled = true)
public class SecurityConfig extends WebSecurityConfigurerAdapter {
}
|
在 Controller 方法上使用注解:
1
2
3
4
5
6
7
8
9
10
11
12
13
14
15
16
17
18
19
20
21
22
23
24
25
| @RestController
@RequestMapping("/api")
public class ApiController {
@PreAuthorize("hasAuthority('API_READ')")
@GetMapping("/data")
public String getData() {
return "敏感数据";
}
@PreAuthorize("hasRole('ADMIN')")
@PostMapping("/user")
public String createUser() {
return "用户创建成功";
}
@PreAuthorize("hasRole('ADMIN') or authentication.principal.id == #userId")
@GetMapping("/user/{userId}")
public String getUser(@PathVariable Long userId) {
return "用户信息";
}
}
|
对于更复杂的权限判断,可以实现PermissionEvaluator接口,先不展示了,极少使用
在实际开发中,权限这块是很讲究规范的
- 权限命名规范:
- 角色:通常用
ROLE_XXX格式(如ROLE_ADMIN)
- 权限:通常用
资源_操作格式(如USER_CREATE、ORDER_READ)
- URL 设计与权限的对应:
- 建议 URL 路径与资源对应(如
/users/**对应用户资源)
- HTTP 方法与操作对应(GET = 查询,POST = 创建,PUT = 更新,DELETE =
删除)
- 权限粒度控制:
- 粗粒度:使用角色控制(如
hasRole('ADMIN'))
- 细粒度:使用权限控制(如
hasAuthority('USER_DELETE'))
- 安全顺序:
- 具体的 URL 模式应该放在前面,通用的模式放在后面
- 因为 Spring Security 会按照配置的顺序进行匹配
开始实例
接下来我们搭建项目,开始真正的示例
我们是设计这样的一个数据库,很标准的权限认证的
1
2
3
4
5
6
7
8
9
10
11
12
13
14
15
16
17
18
19
20
21
22
23
24
25
26
27
28
29
30
31
32
33
34
35
36
37
38
39
40
41
42
43
44
45
46
47
48
49
50
51
52
53
54
55
56
57
58
|
CREATE TABLE users (
id BIGINT AUTO_INCREMENT PRIMARY KEY,
username VARCHAR(50) NOT NULL UNIQUE COMMENT '用户名',
password VARCHAR(255) NOT NULL COMMENT '密码(加密后)',
email VARCHAR(100) COMMENT '邮箱',
enabled BOOLEAN DEFAULT TRUE COMMENT '是否启用',
created_at TIMESTAMP DEFAULT CURRENT_TIMESTAMP COMMENT '创建时间',
updated_at TIMESTAMP DEFAULT CURRENT_TIMESTAMP ON UPDATE CURRENT_TIMESTAMP COMMENT '更新时间'
) COMMENT '用户表';
CREATE TABLE roles (
id BIGINT AUTO_INCREMENT PRIMARY KEY,
name VARCHAR(50) NOT NULL UNIQUE COMMENT '角色名称',
description VARCHAR(200) COMMENT '角色描述',
created_at TIMESTAMP DEFAULT CURRENT_TIMESTAMP COMMENT '创建时间'
) COMMENT '角色表';
CREATE TABLE permissions (
id BIGINT AUTO_INCREMENT PRIMARY KEY,
name VARCHAR(100) NOT NULL UNIQUE COMMENT '权限名称',
resource VARCHAR(100) NOT NULL COMMENT '资源路径,如 /api/users',
action VARCHAR(20) NOT NULL COMMENT '操作类型,如 GET, POST, PUT, DELETE',
description VARCHAR(200) COMMENT '权限描述',
created_at TIMESTAMP DEFAULT CURRENT_TIMESTAMP COMMENT '创建时间'
) COMMENT '权限表';
CREATE TABLE user_roles (
id BIGINT AUTO_INCREMENT PRIMARY KEY,
user_id BIGINT NOT NULL COMMENT '用户ID',
role_id BIGINT NOT NULL COMMENT '角色ID',
created_at TIMESTAMP DEFAULT CURRENT_TIMESTAMP COMMENT '分配时间',
FOREIGN KEY (user_id) REFERENCES users(id) ON DELETE CASCADE,
FOREIGN KEY (role_id) REFERENCES roles(id) ON DELETE CASCADE,
UNIQUE KEY uk_user_role (user_id, role_id)
) COMMENT '用户角色关联表';
CREATE TABLE role_permissions (
id BIGINT AUTO_INCREMENT PRIMARY KEY,
role_id BIGINT NOT NULL COMMENT '角色ID',
permission_id BIGINT NOT NULL COMMENT '权限ID',
created_at TIMESTAMP DEFAULT CURRENT_TIMESTAMP COMMENT '分配时间',
FOREIGN KEY (role_id) REFERENCES roles(id) ON DELETE CASCADE,
FOREIGN KEY (permission_id) REFERENCES permissions(id) ON DELETE CASCADE,
UNIQUE KEY uk_role_permission (role_id, permission_id)
) COMMENT '角色权限关联表';
CREATE INDEX idx_users_username ON users(username);
CREATE INDEX idx_permissions_resource_action ON permissions(resource, action);
|
表都有了,对应是实体类和repository就不写了,我们直接来看如何配置
1
2
3
4
5
6
7
8
9
10
11
12
13
14
15
16
17
18
19
20
21
22
23
24
25
26
27
28
29
30
31
32
33
34
35
36
37
38
39
40
41
42
43
44
45
46
47
48
49
50
51
52
53
54
55
56
57
58
59
60
61
62
63
64
65
66
67
68
69
70
71
72
73
74
75
76
77
78
|
@Configuration
@EnableWebSecurity
@RequiredArgsConstructor
public class SecurityConfig {
private final CustomUserDetailsService customUserDetailsService;
private final CustomFilterInvocationSecurityMetadataSource securityMetadataSource;
private final CustomAccessDecisionManager accessDecisionManager;
@Bean
public PasswordEncoder passwordEncoder() {
return new BCryptPasswordEncoder();
}
@Bean
public SecurityFilterChain filterChain(HttpSecurity http) throws Exception {
return http
.csrf(AbstractHttpConfigurer::disable)
.authorizeHttpRequests(auth -> auth
.requestMatchers("/api/public/**", "/login", "/logout").permitAll()
.anyRequest().authenticated()
)
.httpBasic(basic -> {})
.formLogin(form -> form
.loginPage("/login")
.permitAll()
)
.logout(logout -> logout
.logoutUrl("/logout")
.logoutSuccessUrl("/login?logout")
.permitAll()
)
.userDetailsService(customUserDetailsService)
.addFilterBefore(customFilterSecurityInterceptor(), FilterSecurityInterceptor.class)
.build();
}
@Bean
public FilterSecurityInterceptor customFilterSecurityInterceptor() {
FilterSecurityInterceptor interceptor = new FilterSecurityInterceptor();
interceptor.setSecurityMetadataSource(securityMetadataSource);
interceptor.setAccessDecisionManager(accessDecisionManager);
return interceptor;
}
}
|
但是你无论使用哪种方式,都需要确保用户的权限信息能被正确加载:
1
2
3
4
5
6
7
8
9
10
11
12
13
14
15
16
17
18
19
20
21
22
23
24
25
26
27
28
29
30
31
32
33
34
35
36
37
38
39
40
41
42
43
44
45
46
47
48
49
50
51
52
53
54
55
56
57
58
59
60
61
62
63
64
65
66
|
@Service
@RequiredArgsConstructor
@Slf4j
public class CustomUserDetailsService implements UserDetailsService {
private final UserRepository userRepository;
@Override
@Transactional(readOnly = true)
public UserDetails loadUserByUsername(String username) throws UsernameNotFoundException {
log.debug("尝试加载用户: {}", username);
User user = userRepository.findByUsernameWithRolesAndPermissions(username)
.orElseThrow(() -> new UsernameNotFoundException("用户不存在: " + username));
List<GrantedAuthority> authorities = buildUserAuthorities(user.getRoles());
log.debug("用户 {} 加载成功,拥有权限: {}", username, authorities);
return org.springframework.security.core.userdetails.User.builder()
.username(user.getUsername())
.password(user.getPassword())
.disabled(!user.getEnabled())
.authorities(authorities)
.build();
}
private List<GrantedAuthority> buildUserAuthorities(Set<Role> roles) {
List<GrantedAuthority> authorities = new ArrayList<>();
for (Role role : roles) {
authorities.add(new SimpleGrantedAuthority("ROLE_" + role.getName()));
for (Permission permission : role.getPermissions()) {
String authority = permission.getAuthority();
authorities.add(new SimpleGrantedAuthority(authority));
}
}
return authorities;
}
}
|
简单写个接口
1
2
3
4
5
6
7
8
9
10
11
12
13
14
15
16
17
18
19
20
21
22
23
24
25
26
27
28
29
30
31
32
33
34
35
36
|
@RestController
@RequestMapping("/api/users")
@RequiredArgsConstructor
@Slf4j
public class UserController {
private final UserService userService;
@GetMapping
public ResponseEntity<List<User>> getAllUsers() {
log.info("获取所有用户列表");
List<User> users = userService.findAll();
return ResponseEntity.ok(users);
}
@GetMapping("/{username}")
public ResponseEntity<User> getUserByUsername(@PathVariable String username) {
log.info("获取用户信息: {}", username);
return userService.findByUsername(username)
.map(ResponseEntity::ok)
.orElse(ResponseEntity.notFound().build());
}
}
|
我们发送这样的一个请求试试
1
| curl http://localhost:8080/api/public/info
|
可以看到我们访问公共接口是可以的
 image-20250927204926561
访问一个受保护的资源看看,可以看到失败了
1
| http://localhost:8080/api/users
|
 image-20250927205110728
测试一个正确的,发现是可以的
 image-20250927210802815
基于request的授权——请求未授权处理
配置思路
在 Spring Security 基于 Request 的授权体系中,“请求未授权处理”
是保障用户体验和系统安全性的关键环节 —— 当用户访问无权限的 URL
时,系统需要返回明确、友好且符合业务场景的响应(而非默认的
403 页面)。
先简单说一下请求未授权该怎么做,这个后面会从底层分析
- 触发条件:用户请求的 URL 匹配了 Spring Security
的授权规则(如
/admin/**需ROLE_ADMIN),但用户身份不满足权限要求(如仅拥有ROLE_USER)。
- 核心异常:Spring Security
会抛出
AccessDeniedException(访问拒绝异常),该异常是未授权处理的
“入口信号”。
- 处理链路:
- 异常先被
ExceptionTranslationFilter拦截(Spring Security
内置过滤器,负责处理认证 / 授权异常);
- 过滤器判断异常类型:若为
AccessDeniedException,则委托给「未授权处理器」处理;
- 处理器根据场景(如 Web 页面、API
接口)返回对应响应(如跳转页面、JSON 提示)。
一般情况下,我们会通过HttpSecurity配置全局的未授权处理器,适用于所有请求的统一处理(如前后端分离项目中,所有未授权请求均返回
JSON)。核心是实现AccessDeniedHandler接口,自定义响应内容。
前后端分离的项目,一般情况下我们就这么些,适用于所有未授权请求需统一响应逻辑的场景
但是,如果我们希望按请求类型差异化处理,这种情况下一般是传统项目
首先是实现差异化处理器,在CustomAccessDeniedHandler中增加请求类型判断(通过Accept请求头或
URL 后缀区分):
1
2
3
4
5
6
7
8
9
10
11
12
13
14
15
16
17
18
19
20
21
22
23
24
25
26
27
| @Component
public class CustomAccessDeniedHandler implements AccessDeniedHandler {
@Override
public void handle(HttpServletRequest request,
HttpServletResponse response,
AccessDeniedException accessDeniedException) throws IOException {
boolean isApiRequest = request.getRequestURI().startsWith("/api/")
|| request.getHeader("Accept").contains("application/json");
if (isApiRequest) {
response.setContentType("application/json;charset=UTF-8");
response.setStatus(HttpServletResponse.SC_FORBIDDEN);
String json = "{" +
"\"code\":403," +
"\"message\":\"API访问权限不足\"," +
"\"path\":\"" + request.getRequestURI() + "\"" +
"}";
response.getWriter().write(json);
} else {
response.sendRedirect(request.getContextPath() + "/error/403");
}
}
}
|
然后配置 403 页面的访问权限,要不然就死循环了
1
2
3
4
5
6
7
8
9
10
11
12
13
14
15
| @Bean
public SecurityFilterChain securityFilterChain(HttpSecurity http) throws Exception {
http
.authorizeHttpRequests(auth -> auth
.requestMatchers("/error/403").permitAll()
.requestMatchers("/admin/**").hasRole("ADMIN")
.anyRequest().authenticated()
)
.exceptionHandling(ex -> ex
.accessDeniedHandler(customAccessDeniedHandler)
);
return http.build();
}
|
二如果有更细的需求,就是若某几个特殊接口需要自定义未授权响应(与全局逻辑不同),可通过「方法级注解
+ 异常捕获」实现,核心是利用 Spring
的@ExceptionHandler捕获接口抛出的AccessDeniedException,然后进行差异化处理,不展示了,用的很少。
总之,Spring Security
的未授权处理核心是围绕AccessDeniedHandler接口扩展
实例编写
梳理一下我们要写什么
首先我们肯定要有一个统一异常处理器 -
处理授权失败和认证异常,对了,ApiResponse
也要有,这俩知道就行,不屑了
那么,继续上面的流程,要前后端分离,那么就需要当没有授权的时候返回
JSON 错误,那么就要自定义 AccessDeniedHandler
接口实现类,处理 AccessDeniedException。然后在 Spring
Security 配置类中注册该处理器。
那么在这之前,我需要做一件事,当用户尝试访问受保护资源但未登录(或登录状态失效)时,我希望提供定制化的响应,也就是用户已登录,但缺乏访问资源所需的权限,是由
AccessDeniedHandler 处理的(前文已讲)。
但是还有一种情况就是用户未登录、登录凭证过期或无效(如 Token
失效),此时访问受保护资源会触发该场景,也算是一种未授权,也就是实现
AuthenticationEntryPoint
接口的自定类,但实际业务中,我们可能需要定制响应(如返回 JSON
格式的错误信息、重定向到自定义登录页等),因此需要通过
CustomAuthenticationEntryPoint 实现个性化处理。
AuthenticationEntryPoint 专门负责处理 “未认证”
场景,其默认行为是:
- 对于 Web 应用,默认跳转到登录页面;
- 对于 API 接口,默认返回 401 状态码和简单提示。
1
2
3
4
5
6
7
8
9
10
11
12
13
14
15
16
17
18
19
20
21
22
23
24
25
26
27
28
29
30
31
32
33
34
35
36
37
38
39
40
41
42
43
44
45
46
47
48
49
50
51
52
53
54
55
56
|
@Component
@Slf4j
public class CustomAuthenticationEntryPoint implements AuthenticationEntryPoint {
private final ObjectMapper objectMapper = new ObjectMapper();
@Override
public void commence(HttpServletRequest request,
HttpServletResponse response,
AuthenticationException authException) throws IOException, ServletException {
log.warn("未认证访问 - IP: {}, 路径: {}, 方法: {}, User-Agent: {}",
getClientIpAddress(request),
request.getRequestURI(),
request.getMethod(),
request.getHeader("User-Agent"));
response.setStatus(HttpServletResponse.SC_UNAUTHORIZED);
response.setContentType(MediaType.APPLICATION_JSON_VALUE);
response.setCharacterEncoding(StandardCharsets.UTF_8.name());
ApiResponse<Void> errorResponse = ApiResponse.<Void>unauthorized("请先登录后再访问")
.path(request.getRequestURI());
String jsonResponse = objectMapper.writeValueAsString(errorResponse);
response.getWriter().write(jsonResponse);
}
private String getClientIpAddress(HttpServletRequest request) {
String xForwardedFor = request.getHeader("X-Forwarded-For");
if (xForwardedFor != null && !xForwardedFor.isEmpty() && !"unknown".equalsIgnoreCase(xForwardedFor)) {
return xForwardedFor.split(",")[0].trim();
}
String xRealIp = request.getHeader("X-Real-IP");
if (xRealIp != null && !xRealIp.isEmpty() && !"unknown".equalsIgnoreCase(xRealIp)) {
return xRealIp;
}
return request.getRemoteAddr();
}
}
|
接着编写实现 AccessDeniedHandler 接口的访问拒绝处理器
1
2
3
4
5
6
7
8
9
10
11
12
13
14
15
16
17
18
19
20
21
22
23
24
25
26
27
28
29
30
31
32
33
34
35
36
37
38
39
40
41
42
43
44
45
46
47
48
49
50
51
52
53
54
55
56
57
58
59
60
|
@Component
@Slf4j
public class CustomAccessDeniedHandler implements AccessDeniedHandler {
private final ObjectMapper objectMapper = new ObjectMapper();
@Override
public void handle(HttpServletRequest request,
HttpServletResponse response,
AccessDeniedException accessDeniedException) throws IOException, ServletException {
Authentication authentication = SecurityContextHolder.getContext().getAuthentication();
String username = authentication != null ? authentication.getName() : "匿名用户";
log.warn("权限不足访问 - 用户: {}, IP: {}, 路径: {}, 方法: {}, 权限: {}",
username,
getClientIpAddress(request),
request.getRequestURI(),
request.getMethod(),
authentication != null ? authentication.getAuthorities() : "无");
response.setStatus(HttpServletResponse.SC_FORBIDDEN);
response.setContentType(MediaType.APPLICATION_JSON_VALUE);
response.setCharacterEncoding(StandardCharsets.UTF_8.name());
ApiResponse<Void> errorResponse = ApiResponse.<Void>forbidden("权限不足,无法访问该资源")
.path(request.getRequestURI());
String jsonResponse = objectMapper.writeValueAsString(errorResponse);
response.getWriter().write(jsonResponse);
}
private String getClientIpAddress(HttpServletRequest request) {
String xForwardedFor = request.getHeader("X-Forwarded-For");
if (xForwardedFor != null && !xForwardedFor.isEmpty() && !"unknown".equalsIgnoreCase(xForwardedFor)) {
return xForwardedFor.split(",")[0].trim();
}
String xRealIp = request.getHeader("X-Real-IP");
if (xRealIp != null && !xRealIp.isEmpty() && !"unknown".equalsIgnoreCase(xRealIp)) {
return xRealIp;
}
return request.getRemoteAddr();
}
}
|
更新SecurityConfig
配置,在配置异常处理位置把我们上面写的东西配置进去
1
2
3
4
5
6
7
8
9
10
11
12
13
14
15
16
17
18
19
20
21
22
23
24
25
26
27
28
29
30
31
32
33
34
35
36
37
38
39
40
41
42
43
44
45
46
47
48
49
50
51
52
53
54
55
56
57
58
59
60
61
62
63
64
65
66
67
68
69
70
71
72
73
74
75
76
77
78
79
80
81
82
83
84
85
86
87
88
89
90
91
92
93
|
@Configuration
@EnableWebSecurity
@RequiredArgsConstructor
public class SecurityConfig {
private final CustomUserDetailsService customUserDetailsService;
private final CustomFilterInvocationSecurityMetadataSource securityMetadataSource;
private final CustomAccessDecisionManager accessDecisionManager;
private final CustomAuthenticationEntryPoint authenticationEntryPoint;
private final CustomAccessDeniedHandler accessDeniedHandler;
@Bean
public PasswordEncoder passwordEncoder() {
return new BCryptPasswordEncoder();
}
@Bean
public SecurityFilterChain filterChain(HttpSecurity http) throws Exception {
return http
.csrf(AbstractHttpConfigurer::disable)
.authorizeHttpRequests(auth -> auth
.requestMatchers(
"/api/public/**",
"/login",
"/logout",
"/error",
"/favicon.ico"
).permitAll()
.anyRequest().authenticated()
)
.httpBasic(basic -> {})
.formLogin(form -> form
.loginPage("/login")
.permitAll()
)
.logout(logout -> logout
.logoutUrl("/logout")
.logoutSuccessUrl("/login?logout")
.permitAll()
)
.exceptionHandling(exceptions -> exceptions
.authenticationEntryPoint(authenticationEntryPoint)
.accessDeniedHandler(accessDeniedHandler)
)
.userDetailsService(customUserDetailsService)
.addFilterBefore(customFilterSecurityInterceptor(), FilterSecurityInterceptor.class)
.build();
}
@Bean
public FilterSecurityInterceptor customFilterSecurityInterceptor() {
FilterSecurityInterceptor interceptor = new FilterSecurityInterceptor();
interceptor.setSecurityMetadataSource(securityMetadataSource);
interceptor.setAccessDecisionManager(accessDecisionManager);
return interceptor;
}
}
|
控制器我就不写了,我们直接测试一下
 image-20250928201223325
 image-20250928202304210
成功了
基于request的授权——角色分配
配置思路
在 Spring Security 基于 Request
的授权体系中,角色分配是控制 “哪些用户能访问哪些资源”
的核心环节,本质是将 “用户 - 角色 - 资源(URL)” 三者建立关联。
Spring Security
默认规则中,角色需以ROLE_为前缀(如ROLE_ADMIN),权限无需前缀;通过hasRole("ADMIN")判断角色时,框架会自动拼接ROLE_前缀,等价于hasAuthority("ROLE_ADMIN")。
有那么一种情况就是静态角色分配,指在 Security
配置类中直接硬编码 URL
与角色的关联关系,无需依赖数据库,适用于角色和 URL
固定的简单项目(如小型内部工具)。
1
2
3
4
5
6
7
8
9
10
11
12
13
14
15
16
17
18
19
20
21
22
23
24
25
26
27
28
29
30
31
32
33
34
35
36
37
| import org.springframework.context.annotation.Bean;
import org.springframework.context.annotation.Configuration;
import org.springframework.security.core.userdetails.User;
import org.springframework.security.core.userdetails.UserDetailsService;
import org.springframework.security.crypto.bcrypt.BCryptPasswordEncoder;
import org.springframework.security.crypto.password.PasswordEncoder;
import org.springframework.security.provisioning.InMemoryUserDetailsManager;
@Configuration
public class UserConfig {
@Bean
public PasswordEncoder passwordEncoder() {
return new BCryptPasswordEncoder();
}
@Bean
public UserDetailsService userDetailsService() {
InMemoryUserDetailsManager userManager = new InMemoryUserDetailsManager();
userManager.createUser(User.withUsername("admin")
.password(passwordEncoder().encode("123456"))
.roles("ADMIN")
.build());
userManager.createUser(User.withUsername("user")
.password(passwordEncoder().encode("123456"))
.roles("USER")
.build());
return userManager;
}
}
|
然后在SecurityFilterChain中通过hasRole()/hasAnyRole()指定
URL 所需角色:
1
2
3
4
5
6
7
8
9
10
11
12
13
14
15
16
17
18
19
20
21
22
23
24
25
26
27
28
29
30
| import org.springframework.context.annotation.Bean;
import org.springframework.context.annotation.Configuration;
import org.springframework.security.config.annotation.web.builders.HttpSecurity;
import org.springframework.security.web.SecurityFilterChain;
@Configuration
public class SecurityConfig {
@Bean
public SecurityFilterChain securityFilterChain(HttpSecurity http) throws Exception {
http
.csrf(csrf -> csrf.disable())
.authorizeHttpRequests(auth -> auth
.requestMatchers("/", "/login").permitAll()
.requestMatchers("/admin/**").hasRole("ADMIN")
.requestMatchers("/user/**").hasAnyRole("USER", "ADMIN")
.anyRequest().authenticated()
)
.formLogin(form -> form.permitAll());
return http.build();
}
}
|
这种用到很少的,但是动态角色分配,也就是从数据库中查出来的,是基于这个的思路来的
企业级项目中,角色、用户、URL
权限通常存储在数据库中(支持动态增删角色、调整权限),核心是通过「自定义UserDetailsService加载用户角色」+「动态配置
URL - 角色关联」实现。
首先是这样的数据库表结构如何设计,角色分配需至少 3
张表(用户表、角色表、用户 - 角色关联表),若需细粒度权限控制,可增加
“权限表” 和 “角色 - 权限关联表”,此处以 “用户 - 角色” 二级模型为例:
| 表名 |
核心字段 |
说明 |
sys_user |
id, username, password, status |
存储用户基本信息 |
sys_role |
id, role_name, role_code, remark |
存储角色(如 role_code=ROLE_ADMIN) |
sys_user_role |
id, user_id, role_id |
用户与角色的多对多关联 |
然后,通过UserDetailsService从数据库查询用户,并将用户的SysRole转换为
Spring Security 认可的GrantedAuthority:
所以,这时候,我们就要拿出来 实现了 UserDetailsService 接口的
CustomUserDetailsService 类来提供用户信息,因为我们这时候也需要
loadUserByUsername(String username)
方法,这个方法的作用是什么再说一次
是根据用户名(或其他唯一标识,如手机号、邮箱)从数据源(数据库、缓存、LDAP
等)中查询用户信息(包括用户名、密码、角色、权限等)。
然后将查询到的用户信息封装为 UserDetails
类型的对象返回,供 Spring Security 内部使用。
授权的前提是明确当前登录用户拥有哪些角色(如
ROLE_ADMIN、ROLE_USER)或权限(如
user:read)。这些信息需要通过
CustomUserDetailsService 从数据源中查询并封装到
UserDetails 对象中。
这支撑了 Spring Security 的授权决策,Spring Security
在进行授权判断时,会从 UserDetails 对象中提取用户的角色 /
权限信息,与请求所需的角色 / 权限进行比对。如果没有
CustomUserDetailsService
提供的用户角色数据,授权决策就失去了依据。
在实际业务中,用户的角色可能会动态变化(如管理员在后台修改用户角色)。CustomUserDetailsService
每次认证时都会从数据源查询最新的角色信息,确保授权基于最新的用户角色状态。
1
2
3
4
5
6
7
8
9
10
11
12
13
14
15
16
17
18
19
20
21
22
23
24
25
26
27
28
29
30
31
32
33
34
35
36
37
38
39
40
41
42
43
44
45
| import org.springframework.security.core.GrantedAuthority;
import org.springframework.security.core.authority.SimpleGrantedAuthority;
import org.springframework.security.core.userdetails.User;
import org.springframework.security.core.userdetails.UserDetails;
import org.springframework.security.core.userdetails.UserDetailsService;
import org.springframework.security.core.userdetails.UsernameNotFoundException;
import org.springframework.stereotype.Service;
import java.util.List;
import java.util.stream.Collectors;
@Service
public class CustomUserDetailsService implements UserDetailsService {
private final SysUserRepository sysUserRepository;
public CustomUserDetailsService(SysUserRepository sysUserRepository) {
this.sysUserRepository = sysUserRepository;
}
@Override
public UserDetails loadUserByUsername(String username) throws UsernameNotFoundException {
SysUser sysUser = sysUserRepository.findByUsername(username)
.orElseThrow(() -> new UsernameNotFoundException("用户不存在:" + username));
if (sysUser.getStatus() == 0) {
throw new UsernameNotFoundException("用户已禁用:" + username);
}
List<GrantedAuthority> authorities = sysUser.getRoles().stream()
.map(role -> new SimpleGrantedAuthority(role.getRoleCode()))
.collect(Collectors.toList());
return new User(
sysUser.getUsername(),
sysUser.getPassword(),
authorities
);
}
}
|
除了 URL
级别的角色分配,还可通过@PreAuthorize注解在Controller
方法上直接指定角色,实现更细粒度的控制(如同一 URL 的不同 HTTP
方法需不同角色)。
在配置类上添加@EnableMethodSecurity,然后在 Controller
方法上使用注解 @PreAuthorize就可以了就不细说了
实际编码
这个要写很多相关的dto,太几把多了,不写了,就说相关组件了
spring security 进行授权是这样的一个过程
- 请求拦截:
FilterSecurityInterceptor
拦截请求
- 权限匹配:
CustomFilterInvocationSecurityMetadataSource
根据 URL + Method 查找所需权限
- 权限决策:
CustomAccessDecisionManager
检查用户是否拥有所需权限
- 访问控制:根据决策结果允许或拒绝访问
首先,我们肯定是要写一个关于角色分配的服务,这里repository也要进行扩展
1
2
3
4
5
6
7
8
9
10
11
12
13
14
15
16
17
18
19
20
21
22
23
24
25
26
27
28
29
30
31
32
33
34
35
36
37
38
39
40
41
42
43
44
45
46
47
48
49
50
51
52
53
54
55
56
57
58
59
60
61
62
63
64
65
66
67
68
69
70
71
72
73
74
75
76
77
78
79
80
81
82
83
84
85
86
87
88
89
90
91
92
93
94
95
96
97
98
99
100
101
102
103
104
105
106
107
108
109
110
111
112
113
114
115
116
117
118
119
120
121
122
123
124
125
126
127
128
129
130
131
132
133
134
135
136
137
138
139
140
141
142
143
144
145
146
147
148
149
150
151
152
153
154
155
156
157
158
159
160
161
162
163
164
165
166
167
168
169
170
171
172
173
174
175
176
177
178
179
180
181
182
183
184
185
186
187
188
189
190
191
192
193
194
195
196
197
198
199
200
201
202
203
204
205
206
207
208
209
210
211
212
213
214
215
216
217
218
219
220
221
222
223
224
225
226
227
228
229
230
231
232
233
234
235
236
237
238
239
240
241
242
243
244
245
246
247
248
249
250
251
252
253
254
255
256
257
258
259
260
261
262
263
264
265
266
267
268
269
270
271
272
273
274
275
276
277
278
279
280
281
282
283
284
285
286
287
288
|
@Service
@RequiredArgsConstructor
@Slf4j
@Transactional
public class RoleAssignmentService {
private final UserRepository userRepository;
private final RoleRepository roleRepository;
public RoleAssignmentDto.RoleAssignmentResponse assignRoleToUser(Long userId, String roleName, String reason) {
log.info("为用户 {} 分配角色 {}, 原因: {}", userId, roleName, reason);
try {
User user = userRepository.findById(userId)
.orElseThrow(() -> new RuntimeException("用户不存在: " + userId));
Role role = roleRepository.findByName(roleName)
.orElseThrow(() -> new RuntimeException("角色不存在: " + roleName));
if (user.getRoles().contains(role)) {
log.warn("用户 {} 已经拥有角色 {}", user.getUsername(), roleName);
return new RoleAssignmentDto.RoleAssignmentResponse(
userId, user.getUsername(), roleName, "ASSIGN",
false, "用户已拥有该角色", LocalDateTime.now()
);
}
user.addRole(role);
userRepository.save(user);
log.info("成功为用户 {} 分配角色 {}", user.getUsername(), roleName);
return new RoleAssignmentDto.RoleAssignmentResponse(
userId, user.getUsername(), roleName, "ASSIGN",
true, null, LocalDateTime.now()
);
} catch (Exception e) {
log.error("为用户 {} 分配角色 {} 失败: {}", userId, roleName, e.getMessage());
return new RoleAssignmentDto.RoleAssignmentResponse(
userId, null, roleName, "ASSIGN",
false, e.getMessage(), LocalDateTime.now()
);
}
}
public RoleAssignmentDto.RoleAssignmentResponse removeRoleFromUser(Long userId, String roleName, String reason) {
log.info("移除用户 {} 的角色 {}, 原因: {}", userId, roleName, reason);
try {
User user = userRepository.findById(userId)
.orElseThrow(() -> new RuntimeException("用户不存在: " + userId));
Role role = roleRepository.findByName(roleName)
.orElseThrow(() -> new RuntimeException("角色不存在: " + roleName));
if (!user.getRoles().contains(role)) {
log.warn("用户 {} 没有角色 {}", user.getUsername(), roleName);
return new RoleAssignmentDto.RoleAssignmentResponse(
userId, user.getUsername(), roleName, "REMOVE",
false, "用户没有该角色", LocalDateTime.now()
);
}
user.removeRole(role);
userRepository.save(user);
log.info("成功移除用户 {} 的角色 {}", user.getUsername(), roleName);
return new RoleAssignmentDto.RoleAssignmentResponse(
userId, user.getUsername(), roleName, "REMOVE",
true, null, LocalDateTime.now()
);
} catch (Exception e) {
log.error("移除用户 {} 的角色 {} 失败: {}", userId, roleName, e.getMessage());
return new RoleAssignmentDto.RoleAssignmentResponse(
userId, null, roleName, "REMOVE",
false, e.getMessage(), LocalDateTime.now()
);
}
}
public List<RoleAssignmentDto.RoleAssignmentResponse> batchRoleAssignment(
RoleAssignmentDto.BatchRoleAssignmentRequest request) {
log.info("开始批量角色分配: 操作={}, 用户数={}, 角色数={}",
request.getOperation(), request.getUserIds().size(), request.getRoleNames().size());
List<RoleAssignmentDto.RoleAssignmentResponse> results = new ArrayList<>();
for (Long userId : request.getUserIds()) {
for (String roleName : request.getRoleNames()) {
RoleAssignmentDto.RoleAssignmentResponse result;
if ("ASSIGN".equalsIgnoreCase(request.getOperation())) {
result = assignRoleToUser(userId, roleName, request.getReason());
} else if ("REMOVE".equalsIgnoreCase(request.getOperation())) {
result = removeRoleFromUser(userId, roleName, request.getReason());
} else {
result = new RoleAssignmentDto.RoleAssignmentResponse(
userId, null, roleName, request.getOperation(),
false, "不支持的操作类型: " + request.getOperation(), LocalDateTime.now()
);
}
results.add(result);
}
}
long successCount = results.stream().mapToLong(r -> r.isSuccess() ? 1 : 0).sum();
log.info("批量角色分配完成: 总数={}, 成功={}, 失败={}",
results.size(), successCount, results.size() - successCount);
return results;
}
@Transactional(readOnly = true)
public RoleAssignmentDto.UserRoleInfo getUserRoleInfo(Long userId) {
User user = userRepository.findByIdWithRolesAndPermissions(userId)
.orElseThrow(() -> new RuntimeException("用户不存在: " + userId));
List<String> roleNames = user.getRoles().stream()
.map(Role::getName)
.sorted()
.collect(Collectors.toList());
Set<String> permissionSet = user.getRoles().stream()
.flatMap(role -> role.getPermissions().stream())
.map(Permission::getName)
.collect(Collectors.toSet());
List<String> permissions = permissionSet.stream()
.sorted()
.collect(Collectors.toList());
return new RoleAssignmentDto.UserRoleInfo(
user.getId(),
user.getUsername(),
user.getEmail(),
user.getEnabled(),
roleNames,
permissions,
user.getCreatedAt()
);
}
@Transactional(readOnly = true)
public RoleAssignmentDto.RolePermissionInfo getRolePermissionInfo(String roleName) {
Role role = roleRepository.findByNameWithUsersAndPermissions(roleName)
.orElseThrow(() -> new RuntimeException("角色不存在: " + roleName));
List<String> permissions = role.getPermissions().stream()
.map(Permission::getName)
.sorted()
.collect(Collectors.toList());
return new RoleAssignmentDto.RolePermissionInfo(
role.getId(),
role.getName(),
role.getDescription(),
role.getUsers().size(),
permissions,
role.getCreatedAt()
);
}
@Transactional(readOnly = true)
public List<RoleAssignmentDto.RolePermissionInfo> getAllRolesInfo() {
List<Role> roles = roleRepository.findAllWithUsersAndPermissions();
return roles.stream()
.map(role -> {
List<String> permissions = role.getPermissions().stream()
.map(Permission::getName)
.sorted()
.collect(Collectors.toList());
return new RoleAssignmentDto.RolePermissionInfo(
role.getId(),
role.getName(),
role.getDescription(),
role.getUsers().size(),
permissions,
role.getCreatedAt()
);
})
.collect(Collectors.toList());
}
@Transactional(readOnly = true)
public boolean userHasRole(Long userId, String roleName) {
User user = userRepository.findById(userId)
.orElseThrow(() -> new RuntimeException("用户不存在: " + userId));
return user.getRoles().stream()
.anyMatch(role -> role.getName().equals(roleName));
}
@Transactional(readOnly = true)
public List<RoleAssignmentDto.UserRoleInfo> getUsersByRole(String roleName) {
Role role = roleRepository.findByNameWithUsersAndPermissions(roleName)
.orElseThrow(() -> new RuntimeException("角色不存在: " + roleName));
return role.getUsers().stream()
.map(user -> {
List<String> roleNames = user.getRoles().stream()
.map(Role::getName)
.sorted()
.collect(Collectors.toList());
Set<String> permissionSet = user.getRoles().stream()
.flatMap(r -> r.getPermissions().stream())
.map(Permission::getName)
.collect(Collectors.toSet());
List<String> permissions = permissionSet.stream()
.sorted()
.collect(Collectors.toList());
return new RoleAssignmentDto.UserRoleInfo(
user.getId(),
user.getUsername(),
user.getEmail(),
user.getEnabled(),
roleNames,
permissions,
user.getCreatedAt()
);
})
.collect(Collectors.toList());
}
}
|
然后直接写对应的控制器就行了,这里我没有展示,但是,我要说之前写过的一个东西
就是 CustomFilterInvocationSecurityMetadataSource 这个类,通过通过
Ant 路径匹配器将请求 URL 和 HTTP
方法与数据库中的权限配置进行匹配,分配完了在这里进行校验,是 Spring
Security 基于 Request 授权的核心组件,它实现了动态的
URL-权限映射机制。
当请求到达时,Spring Security
的过滤器链会调用该方法,获取当前请求所需的权限(ConfigAttribute
集合)。
1
2
3
4
5
6
7
8
9
10
11
12
13
14
15
16
17
18
19
20
21
22
23
24
25
|
@Override
public Collection<ConfigAttribute> getAttributes(Object object) {
FilterInvocation filterInvocation = (FilterInvocation) object;
String requestUrl = filterInvocation.getRequestUrl();
String httpMethod = filterInvocation.getRequest().getMethod();
List<Permission> allPermissions = permissionRepository.findAll();
List<ConfigAttribute> configAttributes = new ArrayList<>();
for (Permission permission : allPermissions) {
if (pathMatcher.match(permission.getResource(), requestUrl) &&
permission.getAction().equalsIgnoreCase(httpMethod)) {
String authority = permission.getAuthority();
configAttributes.add(new SecurityConfig(authority));
}
}
return configAttributes.isEmpty() ? null : configAttributes;
}
|
该方法实现了
“动态权限元数据提取”,这也是实现不同情况不同权限的核心
- 当请求到达时,Spring Security
的过滤器链会调用该方法,获取当前请求所需的权限(
ConfigAttribute
集合)。
- Spring Security 会将这些权限与当前登录用户的权限(从
UserDetailsService 中获取)进行比对。
- 如果用户拥有所需权限,则允许访问;否则,触发
AccessDeniedException,由 AccessDeniedHandler
处理(即 “未授权” 场景)。
我们进行测试
 image-20250928212907783