使用组件

组件的创建

当使用构建步骤时,我们一般会将 Vue 组件定义在一个单独的 .vue 文件中,这被叫做单文件组件 (简称 SFC)

单文件组件的基本结构如下

1
2
3
4
5
6
7
8
9
10
11
12
13
14
15
16
17
18
19
20
21
22
23
24
25
26
27
28
29
30
<template>
<div class="hello">
<h1>{{ msg }}</h1>
</div>
</template>

<script>
export default {
name: 'HelloWorld',
props: {
msg: String
},
data() {
return {
count: 0
}
},
methods: {
increment() {
this.count++
}
}
}
</script>

<style scoped>
.hello {
padding: 20px;
}
</style>

总结一下就是,一个完整的 Vue 单文件组件(SFC)包含三个核心部分:

1
2
3
4
5
6
7
8
9
10
11
<template>
<!-- 模板:组件的HTML结构 -->
</template>

<script setup lang="ts">
// 脚本:组件的逻辑代码(组合式API + TypeScript)
</script>

<style scoped>
/* 样式:组件的CSS样式 */
</style>

首先,组件有命名规范

  • kebab-case (短横线分隔)<my-component>,推荐在模板中使用
  • PascalCase (大驼峰)<MyComponent>,推荐在单文件组件和 JavaScript 中使用

所以说,在编写组件的时候,我们首先需要编写组件的 HTML 结构,也就是模板部分<template>,在这部分我们需要完成如下内容

  • 定义组件的 HTML 结构
  • 使用 Vue 的模板语法(插值、指令等)
  • 必须有且仅有一个根元素(或使用 <template> 作为根容器)

然后,需要编写这个组件需要做的事情,也就是脚本部分 <script>

  • 定义组件的逻辑:数据、方法、Props、生命周期等
  • 使用 setup 语法糖(Vue 3 推荐)结合 TypeScript
  • 导出组件的配置选项

最后,你需要编写样式部分美化这个组件,也就是<style>部分

  • 定义组件的样式
  • scoped 属性:样式仅作用于当前组件
  • 可使用 CSS 预处理器(如 SCSS)

以下面组件为例,使用 Vue 3 的 <script setup> 语法糖创建组件是当前推荐的方式

1
2
3
4
<script setup lang="ts">
// lang="ts":启用 TypeScript 支持
// setup:使用组合式 API 语法糖
</script>

关于 <script setup> 语法糖 下面细说,来看组件的脚本部分

1
2
3
4
5
6
7
8
9
10
11
12
13
14
15
16
17
18
19
20
21
22
23
24
25
26
27
28
29
30
31
32
33
<script setup lang="ts">
import { computed } from 'vue'
import type { Word } from '../stores/wordbook'

// 定义 Props - 组件接收的属性
// 这是 Vue 3 组合式 API 的写法
interface Props {
word: Word
showExample?: boolean // 可选属性
cardStyle?: 'default' | 'compact' | 'detailed'
}

// 使用 defineProps 定义属性,支持 TypeScript 类型检查
const props = withDefaults(defineProps<Props>(), {
showExample: true,
cardStyle: 'default'
})

// 根据难度获取样式类
const difficultyClass = computed(() => {
return `difficulty-${props.word.difficulty}`
})

// 根据难度获取颜色
const difficultyColor = computed(() => {
const colors = {
easy: '#27ae60',
medium: '#f39c12',
hard: '#e74c3c'
}
return colors[props.word.difficulty]
})
</script>
  • import 语句导入依赖

    1
    2
    import { computed } from 'vue' // 导入 Vue 的响应式 API
    import type { Word } from '../stores/wordbook' // 导入类型定义
  • 然后定义 Props(组件属性)

    这是组件创建中非常重要的一环,用于接收父组件传递的数据:

    1
    2
    3
    4
    5
    6
    7
    8
    9
    10
    11
    12
    // 1. 定义 Props 接口(TypeScript 类型)
    interface Props {
    word: Word // 必选属性,Word 类型
    showExample?: boolean // 可选属性,布尔类型
    cardStyle?: 'default' | 'compact' | 'detailed' // 可选属性,联合类型
    }

    // 2. 使用 defineProps 定义属性并设置默认值
    const props = withDefaults(defineProps<Props>(), {
    showExample: true, // 默认显示例句
    cardStyle: 'default' // 默认样式
    })
    • 使用 TypeScript 接口定义类型,获得类型检查和智能提示
    • withDefaults() 为可选属性设置默认值
    • defineProps() 是 Vue 提供的编译宏,无需导入即可使用
  • 定义响应式数据和计算属性

    1
    2
    3
    4
    5
    6
    7
    8
    9
    10
    11
    12
    13
    14
    // 计算属性:根据难度动态生成样式类
    const difficultyClass = computed(() => {
    return `difficulty-${props.word.difficulty}`
    })

    // 计算属性:根据难度动态生成颜色
    const difficultyColor = computed(() => {
    const colors = {
    easy: '#27ae60',
    medium: '#f39c12',
    hard: '#e74c3c'
    }
    return colors[props.word.difficulty]
    })

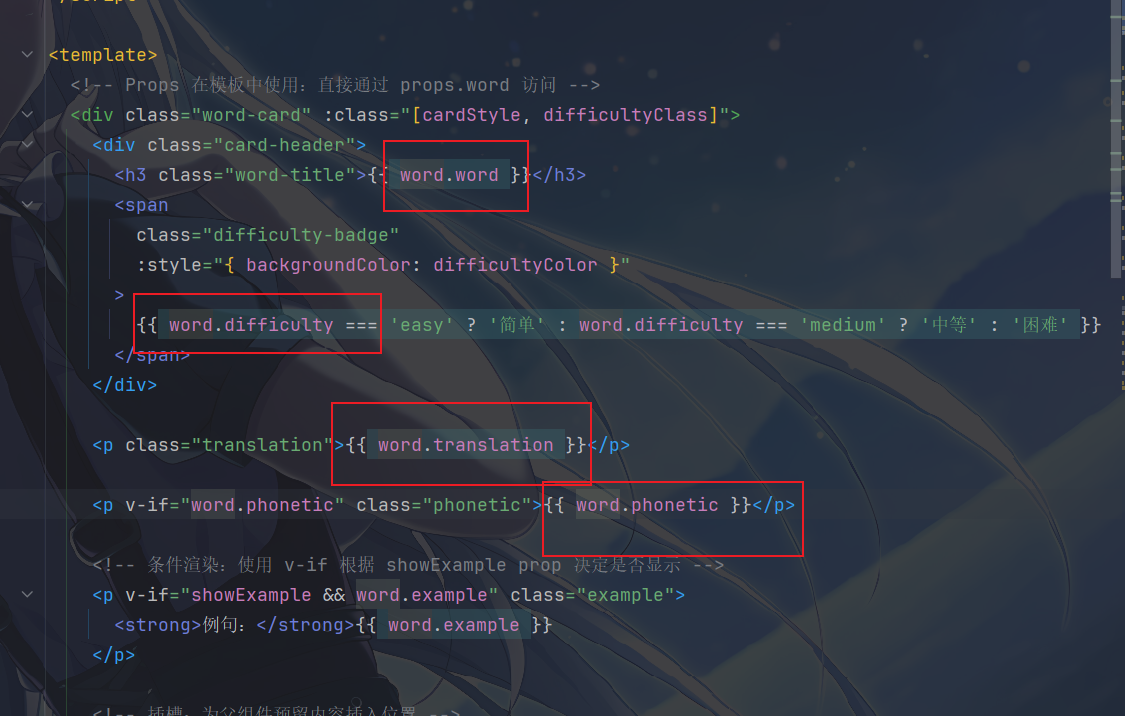
然后,我们会在 template 模板部分中使用这些内容

1
2
3
4
5
6
7
8
9
10
11
12
13
14
15
16
17
18
19
20
21
22
23
24
25
<template>
<div class="word-card" :class="[cardStyle, difficultyClass]">
<div class="card-header">
<h3 class="word-title">{{ word.word }}</h3>
<span
class="difficulty-badge"
:style="{ backgroundColor: difficultyColor }"
>
{{ word.difficulty === 'easy' ? '简单' : word.difficulty === 'medium' ? '中等' : '困难' }}
</span>
</div>

<p class="translation">{{ word.translation }}</p>

<p v-if="word.phonetic" class="phonetic">{{ word.phonetic }}</p>

<!-- 条件渲染:使用 v-if 根据 showExample prop 决定是否显示 -->
<p v-if="showExample && word.example" class="example">
<strong>例句:</strong>{{ word.example }}
</p>

<!-- 插槽:为父组件预留内容插入位置 -->
<slot name="actions"></slot>
</div>
</template>
  • 首先,我们定义了一个基础的 div ,作为模板的基本结构与根元素

    1
    2
    3
    <div class="word-card" :class="[cardStyle, difficultyClass]">
    <!-- 所有内容都包裹在这个根元素中 -->
    </div>
    • Vue 模板必须有且仅有一个根元素(Vue 3 支持多根节点,但单一根元素仍是最佳实践)
    • 根元素通常用于设置组件的基础样式和布局
    • 这里结合了静态类动态类的绑定,通过 v-bind: 指令,绑定了一个动态类数组,其中cardStyle来自上面 script 部分的 Props 接口,difficultyClass来自计算属性
  • 然后这里还使用了一些文本插值的内容,也算是之前的复习了

    1
    2
    <h3 class="word-title">{{ word.word }}</h3>
    <p class="translation">{{ word.translation }}</p>

    使用了{{ }},Mustache 语法,用于插入文本,然后也在里面访问 Props、data、计算属性等响应式数据,在模板中访问 Props 时可省略 props. 前缀(直接写 word 而非 props.word

  • 下面还有条件渲染的内容,使用 v-if 指令,意味着,只有当条件为真时,元素才会被渲染,注意 v-if 和 v-show 区别就好

    1
    2
    3
    4
    <!-- 条件渲染:使用 v-if 根据 showExample prop 决定是否显示 -->
    <p v-if="showExample && word.example" class="example">
    <strong>例句:</strong>{{ word.example }}
    </p>
  • 绑定样式,:style动态绑定内联样式,使用指令绑定,值为对象,键是 CSS 属性名,这里绑定了背景颜色,值来自计算属性 difficultyColor

    1
    2
    3
    4
    <span 
    class="difficulty-badge"
    :style="{ backgroundColor: difficultyColor }"
    >

最后就是组件样式的创建

1
2
3
4
5
6
7
8
9
10
11
12
13
14
15
16
17
18
19
20
21
22
23
24
25
26
27
28
29
<style scoped>
.word-card {
background: white;
border-radius: 8px;
padding: 1.5rem;
box-shadow: 0 2px 8px rgba(0, 0, 0, 0.1);
transition: transform 0.2s, box-shadow 0.2s;
border-left: 4px solid #3498db;
}

.word-card:hover {
transform: translateY(-2px);
box-shadow: 0 4px 12px rgba(0, 0, 0, 0.15);
}

.card-header {
display: flex;
justify-content: space-between;
align-items: center;
margin-bottom: 0.5rem;
}

.word-title {
font-size: 1.5rem;
color: #2c3e50;
margin: 0;
}

........

首先,组件的样式需要设置作用域

1
2
3
<style scoped>
/* scoped:样式仅作用于当前组件 */
</style>

使用 scoped 属性避免样式冲突,Vue 会自动为组件元素添加唯一属性,并修改选择器

可以发现,样式存在基础样式和它的变体

1
2
3
4
5
6
7
8
9
10
11
12
13
14
15
16
17
18
19
20
21
22
23
24
/* 基础样式 */
.word-card {
background: white;
border-radius: 8px;
padding: 1.5rem;
/* ... */
}

/* 不同样式变体 */
.word-card.compact {
padding: 1rem;
}

.word-card.compact .word-title {
font-size: 1.2rem;
}

.word-card.detailed {
padding: 2rem;
}

.word-card.detailed .word-title {
font-size: 1.8rem;
}

我们通过组合类名实现不同的样式变体,它与 Props 中的 cardStyle 配合使用

组件之间如何打造成父子组件的关系

上期的例子中,WordList 组件和 WordCard 组件形成了典型的父子组件关系

  • 父组件WordList 组件(负责管理单词列表数据,控制整体展示逻辑)
  • 子组件WordCard 组件(负责单个单词卡片的渲染,接收父组件传递的数据)

那么这种关系应该如何去维护

核心通信方式之一还是通过 Props 传递数据(父→子)

父组件(WordList)通过 Props 向子组件(WordCard)传递数据,子组件接收并使用这些数据。

子组件WordCard.vue通过 defineProps 明确声明需要接收的属性,并指定类型和默认值,确保数据规范:

1
2
3
4
5
6
7
8
9
10
11
12
// WordCard.vue 中定义 Props
interface Props {
word: Word; // 必须传递的单词对象(核心数据)
showExample?: boolean; // 可选:是否显示例句
cardStyle?: 'default' | 'compact' | 'detailed'; // 可选:卡片样式
}

// 设置默认值
const props = withDefaults(defineProps<Props>(), {
showExample: true,
cardStyle: 'default'
});
  • word 是必填属性(无默认值),类型为 Word 接口,其他属性为可选,通过 withDefaults 设置默认值。

父组件WordList 在使用子组件时,通过 属性绑定:属性名)传递数据:

1
2
3
4
5
6
7
<!-- WordList.vue 中使用 WordCard 并传递 Props -->
<WordCard
v-for="word in filteredWords"
:key="word.id"
:word="word" <!-- 传递单词对象(核心数据) -->
:show-example="true" <!-- 传递是否显示例句的开关 -->
/>
  • :word="word":将父组件中遍历的 word 对象传递给子组件,子组件通过 props.word 使用(如模板中直接用 {{ word.word }} 显示单词)。
image-20251127171814502

那么还存在一个核心通信方式就是 Events 传递事件(子→父)

子组件(WordCard)通过 事件 向父组件(WordList)传递交互信息,父组件监听并处理这些事件。

首先父组件定义并监听事件,WordList.vue父组件通过 defineEmits 声明可以接收的事件和事件出发后对应的操作,并在子组件触发时执行对应的事件逻辑

1
2
3
4
5
6
7
8
// WordList.vue 中定义可触发的事件
interface Emits {
deleteWord: [id: number]; // 删除事件,传递单词ID
editWord: [word: Word]; // 编辑事件,传递单词对象
wordClick: [word: Word]; // 点击事件,传递单词对象
}

const emit = defineEmits<Emits>(); // 创建事件发射器
image-20251127171954290

然后在模板中通过 @事件名 监听子组件的交互(如按钮点击):

1
2
3
4
5
6
7
8
9
10
11
<!-- WordList.vue 中监听子组件内部的交互 -->
<WordCard
...
@click="handleClick(word)" <!-- 监听卡片点击事件 -->
>
<!-- 插槽中定义按钮,点击时触发父组件的事件方法 -->
<template #actions>
<button @click.stop="handleEdit(word)">编辑</button>
<button @click.stop="handleDelete(word.id)">删除</button>
</template>
</WordCard>
  • 当子组件中的按钮被点击时,父组件的 handleEdithandleDelete 方法会被调用,并通过 emit 触发事件(如 emit('deleteWord', id)),将数据传递给更上层组件。

子组件中的按钮点击事件可能会冒泡到父组件的卡片点击事件,因此使用 @click.stop 阻止冒泡:

image-20251127173102396

插槽也是常用的方式,父组件通过 插槽 向子组件的指定位置插入内容,增强子组件的灵活性,也是父子组件通信的一种方式

子组件定义插槽WordCard.vue,在模板中预留插槽位置,供父组件插入内容:

image-20251127173216050

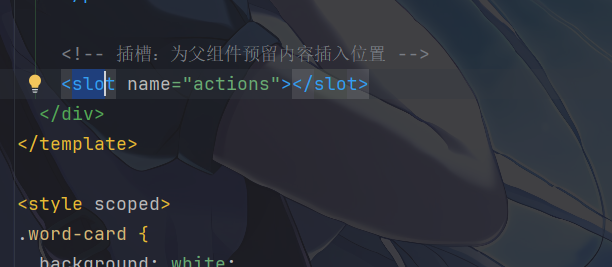
而命名插槽 actions 明确指定了插入位置

父组件通过 <template #插槽名> 向子组件的插槽插入内容:

image-20251127173305152

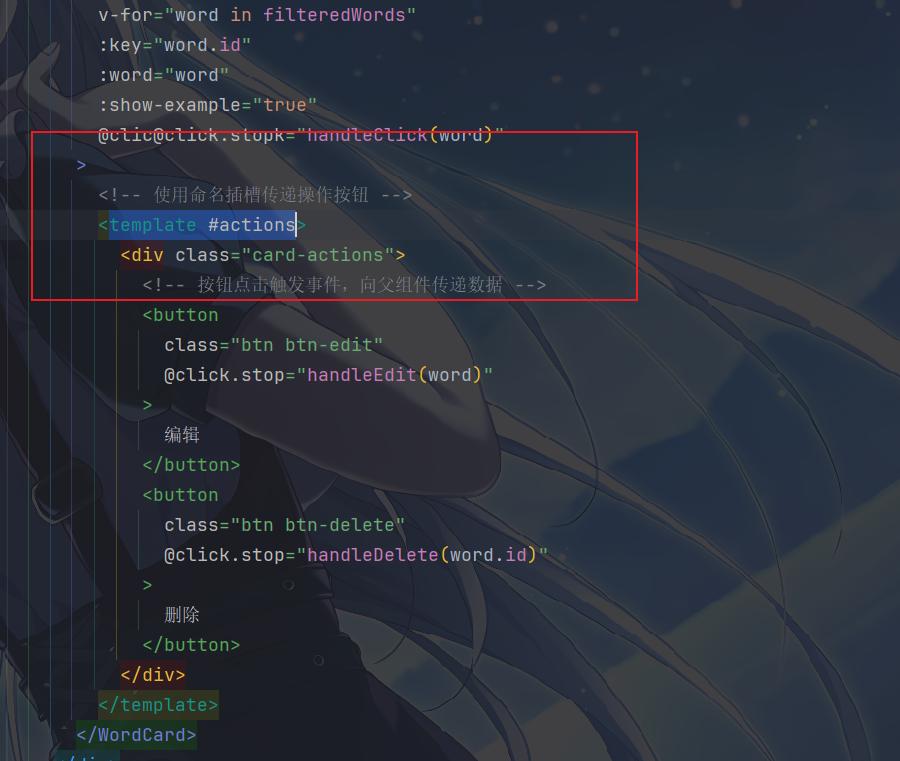
父组件根据自身需求,向子组件的 actions 插槽插入了 “编辑” 和 “删除” 按钮,子组件会将这些按钮渲染到预留位置。

父组件通过插槽向子组件插入自定义内容(如操作按钮),增强子组件的复用性。

使用 v-model 进行双向绑定

使用双向绑定有两种方式,不仅有传统的 “props + emit” 方式,也可以使用 Vue 3.4 新增的 defineModel() 简化实现。

所以来总结一下

传统方式的核心逻辑是:父组件通过 props 向子组件传递数据,子组件通过触发特定事件(默认 update:modelValue)通知父组件更新数据

子组件需要这样实现,例如我们需要一个自定义输入框

1
2
3
4
5
6
7
8
9
10
11
12
13
14
15
16
17
18
19
20
21
22
23
24
25
26
27
28
29
30
31
32
33
<!-- ChildInput.vue -->
<script setup lang="ts">
import { ref } from 'vue'

// 定义接收的 props(父组件 v-model 绑定的值)
const props = defineProps<{
modelValue: string // 固定名称,对应 v-model 的默认绑定值
}>()

// 定义触发的事件(通知父组件更新)
const emit = defineEmits<{
(e: 'update:modelValue', value: string): void // 固定事件名格式
}>()

// 子组件内部维护的响应式数据(与 props 同步)
const inputValue = ref(props.modelValue)

// 输入框变化时,同步更新并通知父组件
const handleInput = (e: Event) => {
const value = (e.target as HTMLInputElement).value
inputValue.value = value
emit('update:modelValue', value) // 触发事件通知父组件
}
</script>

<template>
<!-- 子组件内部使用 inputValue 进行绑定 -->
<input
type="text"
:value="inputValue"
@input="handleInput"
/>
</template>
  • 子组件通过 props.modelValue 接收初始值 Props,通过 emit('update:modelValue', 新值) 通知父组件更新,形成双向绑定。

父组件使用

1
2
3
4
5
6
7
8
9
10
11
12
13
14
<!-- Parent.vue -->
<script setup lang="ts">
import { ref } from 'vue'
import ChildInput from './ChildInput.vue'

// 父组件的响应式数据
const parentValue = ref('初始值')
</script>

<template>
<!-- 使用 v-model 绑定父组件数据 -->
<ChildInput v-model="parentValue" />
<p>父组件值:{{ parentValue }}</p>
</template>
  • 父组件的v-model="parentValue"等价于:<ChildInput :modelValue="parentValue" @update:modelValue="parentValue = $event" />

这个真不太好用,使用 defineModel() 是更常见的选择,内部自动处理了 propsemit 的逻辑,使代码更简洁。

还是一样的例子,来看看这次的子组件的实现

1
2
3
4
5
6
7
8
9
10
11
12
13
<!-- ChildInput.vue -->
<script setup lang="ts">
import { defineModel } from 'vue'

// 直接通过 defineModel() 创建双向绑定的响应式变量
// 类型参数指定绑定值的类型,默认会创建 modelValue props 和 update:modelValue 事件
const inputValue = defineModel<string>() // 等价于传统方式的 props + emit 逻辑
</script>

<template>
<!-- 直接使用 v-model 绑定 defineModel 创建的变量 -->
<input type="text" v-model="inputValue" />
</template>
  • defineModel()返回一个 ref 对象,该对象自动与父组件的v-model绑定:
    • 读取 inputValue.value 时,等价于读取 props.modelValue
    • 修改 inputValue.value 时,会自动触发 emit('update:modelValue', 新值)

父组件的使用没什么多说的,使用还是一样的,在使用子组件的标签中带上 v-model

当需要绑定多个值时,可以通过自定义名称区分,两种方式均支持

  • 传统方式的多值绑定

    1
    2
    3
    4
    5
    6
    7
    8
    9
    10
    11
    12
    13
    14
    15
    16
    17
    18
    19
    20
    21
    22
    23
    <!-- 子组件 -->
    <script setup lang="ts">
    const props = defineProps<{
    title: string // 自定义名称 title
    content: string // 自定义名称 content
    }>()

    const emit = defineEmits<{
    (e: 'update:title', value: string): void
    (e: 'update:content', value: string): void
    }>()
    </script>

    <template>
    <input
    :value="title"
    @input="emit('update:title', $event.target.value)"
    />
    <textarea
    :value="content"
    @input="emit('update:content', $event.target.value)"
    />
    </template>
    1
    2
    3
    4
    5
    <!-- 父组件使用 -->
    <ChildComponent
    v-model:title="formTitle"
    v-model:content="formContent"
    />
  • defineModel() 方式对多值绑定的支持很好很简单

    1
    2
    3
    4
    5
    6
    7
    8
    9
    10
    11
    <!-- 子组件 -->
    <script setup lang="ts">
    // 自定义名称,通过参数指定
    const title = defineModel<string>('title') // 对应 v-model:title
    const content = defineModel<string>('content') // 对应 v-model:content
    </script>

    <template>
    <input v-model="title" />
    <textarea v-model="content" />
    </template>
    1
    2
    3
    4
    5
    <!-- 父组件使用(与传统方式一致) -->
    <ChildComponent
    v-model:title="formTitle"
    v-model:content="formContent"
    />

计算属性

使用计算属性

计算属性(computed)的使用非常常见,主要用于派生和处理基于原始数据的状态:

  • 基于其他响应式数据计算得出
  • 具有缓存机制,只有依赖变化时才重新计算

模板中的表达式虽然方便,但仅适用于简单操作。若在模板中写入过多逻辑,会导致模板臃肿、难以维护。例如,有一个包含嵌套数组的对象:

1
2
3
4
5
6
7
8
const author = reactive({
name: 'John Doe',
books: [
'Vue 2 - Advanced Guide',
'Vue 3 - Basic Guide',
'Vue 4 - The Mystery'
]
})

若要根据 author 是否有书籍展示不同信息,直接在模板中编写逻辑如下:

1
2
<p>Has published books:</p>
<span>{{ author.books.length > 0 ? 'Yes' : 'No' }}</span>

这种写法在逻辑复杂的时候,模板内的标签会带上很长一个表达式,非常不优雅,还存在重复代码的问题

因此,推荐使用计算属性描述依赖响应式状态的复杂逻辑,重构后的示例如下:

1
2
3
4
5
6
7
8
9
10
11
12
13
14
15
16
17
18
19
20
21
22
23
<script setup>
import { reactive, computed } from 'vue'

const author = reactive({
name: 'John Doe',
books: [
'Vue 2 - Advanced Guide',
'Vue 3 - Basic Guide',
'Vue 4 - The Mystery'
]
})

// 一个计算属性 ref
const publishedBooksMessage = computed(() => {
return author.books.length > 0 ? 'Yes' : 'No'
})
</script>

<template>
<p>Has published books:</p>
<span>{{ publishedBooksMessage }}</span>
</template>

  • computed() 方法接收一个 getter 函数,返回值为计算属性 ref
  • 可通过 publishedBooksMessage.value 访问计算结果(与普通 ref 一致)。
  • 模板中会自动解包计算属性 ref,无需添加 .value
  • Vue 会自动追踪响应式依赖:当 author.books 变化时,所有依赖 publishedBooksMessage 的绑定都会同步更新

那么来以我们还是上面的例子,实际说明一下计算属性的使用

1
2
3
4
5
6
7
const stats = computed(() => {
return {
total: props.words.length,
easy: props.words.filter(w => w.difficulty === 'easy').length,
// ...其他统计
}
})
image-20251129171050660

计算属性通过 computed() 函数创建,接收一个 getter 函数,返回计算后的结果。它的核心作用是:

  • 基于已有响应式数据(这里是 props.words)派生新状态
  • 自动追踪依赖(当 props.words 变化时,计算属性会自动重新计算)
  • 结果会被缓存,只有当依赖变化时才重新计算,提升性能

计算属性还可以存在依赖关系,第二个计算属性 percentages 依赖于第一个计算属性 stats

1
2
3
4
5
6
const percentages = computed(() => {
if (stats.value.total === 0) { // 依赖 stats 计算结果
return { easy: 0, medium: 0, hard: 0 }
}
// ...计算百分比
})

这种依赖关系会形成响应式链条,当最底层的 props.words 变化时,会触发 stats 重新计算,进而触发 percentages 重新计算。

计算属性在模板中直接以属性形式使用(无需加 ()

1
2
<div class="stat-value">{{ stats.total }}</div>
<div class="stat-label">简单 ({{ percentages.easy }}%)</div>

模板会自动追踪计算属性的变化,当计算结果更新时,视图会同步刷新。

那么,计算属性缓存和方法我们比较一下

如果我们的功能不使用计算属性,通过函数调用也能实现与计算属性相同的结果,例如:

1
2
<!-- 模板 -->
<p>{{ calculateBooksMessage() }}</p>
1
2
3
4
// 组件中
function calculateBooksMessage() {
return author.books.length > 0 ? 'Yes' : 'No'
}

但两者的核心区别在于缓存机制

特性 计算属性 方法
缓存机制 基于响应式依赖缓存结果 无缓存,每次调用重新执行
执行时机 仅依赖更新时重新计算 组件重渲染时必执行
性能优化 适合复杂计算/频繁访问场景 适合无需缓存的简单逻辑

可写计算属性

计算属性默认是只读的,这是因为我们通常只定义了 getter 函数(用于计算值)。当尝试直接修改计算属性时,Vue 会抛出运行时警告。

但在某些场景下,我们需要让计算属性支持 “写入” 操作,这时可以通过同时定义 gettersetter 来实现 “可写计算属性”。

可写计算属性的定义形式如下(以 Vue 3 组合式 API 为例):

1
2
3
4
5
6
7
8
9
10
11
12
13
14
15
16
17
18
19
import { computed, ref } from 'vue'

const firstName = ref('张')
const lastName = ref('三')

// 可写计算属性:同时有 getter 和 setter
const fullName = computed({
// getter:计算并返回当前值
get() {
return `${firstName.value} ${lastName.value}`
},
// setter:接收新值并处理(更新依赖的源数据)
set(newValue) {
// 例如:将新值拆分为 firstName 和 lastName
const [newFirst, newLast] = newValue.split(' ')
firstName.value = newFirst
lastName.value = newLast || ''
}
})
  • getter:和普通计算属性一样,负责根据依赖的响应式数据(如 firstNamelastName)计算并返回当前值。
  • setter:当对计算属性赋值时(如 fullName.value = '李 四'),Vue 会自动调用 setter 函数,并将赋值的 “新值” 作为参数传入。在 setter 中,我们需要手动更新依赖的源数据(如修改 firstNamelastName),从而触发响应式更新。

假设我们上面的例子需要支持通过修改 “总数” 来批量调整单词难度(仅作示例,实际业务需谨慎),可定义如下可写计算属性:

1
2
3
4
5
6
7
8
9
10
11
12
13
14
15
16
17
18
19
20
21
22
23
24
25
26
// 在 WordStats.vue 的 <script setup> 中
const props = defineProps<Props>()
// 假设父组件通过 v-model 传入可修改的 words(实际需用 emits 通知父组件更新)
const emit = defineEmits(['update:words'])

const totalWords = computed({
// getter:返回当前单词总数(和 stats.total 一致)
get() {
return props.words.length
},
// setter:当修改 totalWords 时,调整单词数组长度
set(newTotal) {
const currentLength = props.words.length
if (newTotal > currentLength) {
// 新增单词(示例:默认设为 easy 难度)
const newWords = [...props.words]
for (let i = currentLength; i < newTotal; i++) {
newWords.push({ id: i, name: `新单词${i}`, difficulty: 'easy' })
}
emit('update:words', newWords) // 通知父组件更新
} else if (newTotal < currentLength) {
// 删减单词
emit('update:words', props.words.slice(0, newTotal))
}
}
})

在模板中使用:

1
2
3
4
5
6
<!-- 可直接赋值修改 -->
<input
type="number"
v-model="totalWords"
min="0"
/>
  1. 必须更新源数据:setter 的核心作用是将 “对计算属性的修改” 映射到 “对依赖的响应式数据的修改”。如果只修改计算属性本身而不更新源数据,会导致数据不一致(因为 getter 仍会基于旧的源数据计算)。
  2. 与 props 配合:若依赖的源数据是 props(如 WordStats.vue 中的 props.words),由于 props 是单向数据流(子组件不能直接修改),需通过 emit 通知父组件更新(如示例中的 update:words)。
  3. 适用场景:可写计算属性适用于 “需要通过一个属性同步控制多个源数据” 的场景(如示例中的 fullName 同步 firstNamelastName),避免手动编写多个同步逻辑。

对了,可写计算属性仅支持 Vue 3.4+

组件样式隔离

Scoped Styles

组件样式隔离就是确保组件内定义的样式仅对当前组件的模板元素生效,不会污染其他组件或全局样式。

它的核心目的是避免不同组件之间的 CSS 类名冲突(全局污染)

Vue 提供了几种主要的机制来实现这一点,其中最常用的是 <style scoped>,其次是 CSS Modules。

首先,使用<style scoped>进行组件样式隔离是最常用的方式

当你在 .vue 文件中给 <style> 标签加上 scoped 属性时,Vue 的编译器(配合 PostCSS)会做两件事:

  1. HTML 层面:给当前组件模板中的所有 DOM 元素添加一个独一无二的自定义属性(Attribute),通常格式为 data-v-xxxxxxx(哈希值)。
  2. CSS 层面:利用 CSS 属性选择器,将写在