了解OpenApi

首先说明,它是一个规范,我们在项目中常用的实现是 swagger 和 knife4j

OpenAPI 3.0.0 是 OpenAPI 规范的第一个正式版本,因为它是由 SmartBear Software 捐赠给 OpenAPI Initiative,并在2015年从 Swagger 规范重命名为 OpenAPI 规范。

OpenAPI 规范(OAS),是定义一个标准的、与具体编程语言无关的 RESTful API 的规范。OpenAPI 规范使得人类和计算机都能在“不接触任何程序源代码和文档、不监控网络通信”的情况下理解一个服务的作用。如果您在定义您的 API 时做的很好,那么使用 API 的人就能非常轻松地理解您提供的 API 并与之交互了。

如果您遵循 OpenAPI 规范来定义您的 API,那么您就可以用文档生成工具来展示您的 API,用代码生成工具来自动生成各种编程语言的服务器端和客户端的代码,用自动测试工具进行测试等等。

OpenAPI 本质上是一套用于描述 RESTful API 的标准化规范,它通过统一的格式(通常是 YAML 或 JSON)定义 API 的请求参数、响应结构、接口地址、认证方式等信息,让机器和人都能清晰理解 API 的功能和用法。

支持 OpenApi 的工具(如 Swagger UI、Postman)能解析 OpenAPI 文档,自动生成可视化接口文档、生成客户端代码(如 Java、Python 调用代码)、自动生成测试用例。这样前后端开发、跨团队协作时,可先定义 OpenAPI 文档约定接口规则,避免开发过程中因接口理解不一致导致的返工。

但是实际开发项目中,集中管理API文档则需要额外的人力去维护,所以 swagger 诞生了,其实 swagger 本质是一种描述接口 API 的规范, 目的是推动 API 的标准化。

OpenAPI 3.0 是对 Swagger 2.0 的重大更新,规范的名称也从 Swagger 改为 OpenAPI。它在 Swagger 2.0 的基础上引入了许多改进和新的功能。 也有人称其为 Swagger3

很多人会把 OpenAPI 和 Swagger 弄混,其实两者是 “规范” 与 “工具” 的关系:

  • OpenAPI:是 “规范”(类似 “接口设计的语法规则”),是中立的、社区维护的标准(现在由 Linux 基金会管理)。
  • Swagger:是实现 OpenAPI 规范的 “工具集”(类似 “按语法规则写文档的编辑器”),包括 Swagger UI(文档展示)、Swagger Codegen(代码生成)等。

Swagger 是 OpenAPI 最流行的实现工具,而 OpenAPI 是 Swagger 遵循的底层规范。

一份标准的 OpenAPI 文档包含以下关键模块,通过结构化描述覆盖 API 全信息:

模块 作用
openapi 指定 OpenAPI 规范版本(如 3.0.3),确保工具解析兼容性。
info 描述 API 的基本信息,如名称、版本、作者、接口用途(titleversiondescription)。
servers 定义 API 的服务地址(如开发环境 http://dev.api.com、生产环境 https://api.com)。
paths 核心模块,定义每个接口的细节:- 接口路径(如 /users)- 请求方法(GET/POST/PUT/DELETE)- 请求参数(路径参数、查询参数、请求体)- 响应结构(HTTP 状态码、响应数据格式)
components 复用模块,提取 API 中重复的定义(如通用的请求体结构、响应错误码、认证方案),避免重复编写。
security 定义 API 的认证方式(如 API Key、Bearer Token、OAuth2.0)。
tags 对接口进行分类(如 “用户管理”“订单管理”),方便文档阅读和筛选。

Knife4j 官方文档地址:https://doc.xiaominfo.com/

swagger 官方文档地址:https://swagger.io/docs/

springdoc-openapi 官方文档地址:https://springdoc.org/

一般的接口工具和所谓的swagger什么区别

以 apifox 为例子

一般的接口工具(如 Postman、Postwoman)和 Swagger 的核心区别在于定位不同:前者是 “接口调试 / 测试工具”,专注于手动发送请求、验证响应;后者是 “API 文档与生态工具”,核心是基于 OpenAPI 规范自动生成文档、代码,并联动调试,解决 API 全生命周期的管理问题。

就是你用 Postman 是 “手动测接口”,用 Swagger 是 “先定义接口规范,再自动生成文档和测试入口,最后联动调试”。

实际开发中,两者的使用场景完全互补

比如后端刚写完一个接口,还没写文档,你直接用 Postman 填 http://localhost:8080/users/1,选 GET 方法,发送请求看是否返回用户数据。这种接口测试工具不仅能测 RESTful API,还能测 GraphQL、WebSocket、SOAP 等非 REST 接口,兼容性更广。

所以一般接口的工具你得 “告诉工具接口是什么”(手动填 URL、参数),工具只负责发送请求。Swaager 是你先 “定义接口规范”(用 OpenAPI 或注解),工具自动 “理解接口”,然后生成文档、调试入口 —— 相当于 “一次定义,多处复用”。

而 Swagger 是后端用 Swagger 注解(如 @Operation @ApiParam)标记接口后,启动项目就能访问 http://xxx/doc.html 看到完整文档,无需手动写文档。

后端先定义 OpenAPI 规范(或用注解生成规范),前端直接看 Swagger 文档就能知道接口参数格式,甚至用文档里的 “Try it out” 调试,不用反复问后端 “这个接口参数怎么传”。

在 Spring Cloud 项目中,每个微服务集成 Swagger 后,通过网关聚合所有服务的文档(如 Knife4j 的 “服务发现” 功能),统一管理几十上百个接口,不用每个服务找文档。

相关注解讲解

控制器(Controller)层注解

这类注解用于标记整个控制器类或其中的方法,是生成 API 文档的骨架

注解 作用目标 说明 示例
@Tag 用于描述整个控制器(API 分组)的信息。替代了 Swagger 2 中的 @Api @Tag(name = "用户管理", description = "提供用户的增删改查 API")
@Operation 方法 用于描述一个具体的 HTTP 操作(接口)。替代了 Swagger 2 中的 @ApiOperation @Operation(summary = "创建用户", description = "根据传入的用户信息创建一个新用户")
@Parameter 方法参数 描述单个操作参数。通常用于描述非请求体(如 Query, Path, Header)的参数。 @Parameter(name = "id", description = "用户ID", required = true, in = ParameterIn.PATH)
@Parameters 方法 当有多个 @Parameter 时,可以用此注解进行包装。 @Parameters({ @Parameter(...), @Parameter(...) })

实体(Model / DTO)注解

这类注解用于标记你的数据模型(DTO、VO、Entity),用于描述 API 请求和返回的数据结构。

注解 作用目标 说明 示例
@Schema 字段方法 描述一个模型(Model)或属性。替代了 Swagger 2 中的 @ApiModel@ApiModelProperty。这是最常用的模型注解。 在类上@Schema(description = "用户信息传输对象") 在字段上@Schema(description = "用户姓名", example = "张三", requiredMode = Schema.RequiredMode.REQUIRED)
@Hidden 方法字段参数 在文档中隐藏指定的类、方法、参数或属性。

参数(Parameter)注解

除了上面提到的通用 @Parameter,Spring 本身和 Swagger 还提供了一些更具体的注解来描述特定类型的参数。

注解 作用目标 说明 示例
@RequestBody (Spring) + @Schema 参数 描述请求体。Spring 的 @RequestBody 本身就会被 Swagger 识别,再配合 @Schema 描述请求体的详细信息。 public User createUser(@RequestBody @Schema(description = "用户创建请求体") UserCreateRequest request)
@RequestPart (Spring) + @Parameter 参数 描述文件上传等 multipart/form-data 请求的 part。 public String upload(@RequestPart @Parameter(description = "上传的文件") MultipartFile file)
对于 @RequestParam@PathVariable,Swagger 通常能自动推断,但为了文档更清晰,强烈建议使用 @Parameter 进行描述。

响应(Response)注解

这类注解用于描述 API 接口可能的返回状态码和响应体结构

注解 作用目标 说明 示例
@ApiResponse 方法 描述一个具体的 HTTP 响应状态码及其含义。 @ApiResponse(responseCode = "200", description = "成功找到用户", content = @Content(schema = @Schema(implementation = User.class)))
@ApiResponses 方法 包装多个 @ApiResponse 注解。 @ApiResponses({ @ApiResponse(...), @ApiResponse(...) })
@Content (在 @ApiResponse 内) 描述响应的内容(Media Type 和 Schema)。 见上例
@ArraySchema (在 @Schema 内) 专门用于描述返回值为数组或集合的情况。 @ArraySchema(schema = @Schema(implementation = User.class))

Knife4j 的特有注解

Knife4j 在完全支持以上所有 Swagger 注解的基础上,提供了一些自己的增强注解,主要用于优化界面体验。

我是没见有人用过除了@DynamicParameters

注解 作用目标 说明
@ApiOperationSupport 方法 提供对接口的额外支持配置。
@DynamicParameters 参数 用于描述动态参数(如 Map<String, Object>JSONObject),为这些无固定结构的参数提供文档说明。
@ApiSort 方法 (推荐使用 @Order 用于对控制器或接口进行排序。

Spring Boot3 场景整合的环境准备

我们还是以之前一个galgame的表情包管理的项目为例子,因为这个例子接口比较少,比较好说明

以国内常用的 Knife4j(基于 OpenAPI 3.0,比原生 Swagger 更友好)为例

注意事项

Spring Boot 3 只支持OpenAPI3规范

Knife4j 提供的 starter 已经引用 springdoc-openapi 的jar,开发者需注意避免依赖冲突

JDK版本必须 >= 17

引入依赖

1
2
3
4
5
6
7
<!-- Knife4j - OpenAPI 文档工具 (国内常用,增强版Swagger UI) -->
<!-- Knife4j是一个增强版的Swagger UI工具,提供了更加美观和强大的API文档界面 -->
<dependency>
<groupId>com.github.xiaoymin</groupId>
<artifactId>knife4j-openapi3-jakarta-spring-boot-starter</artifactId>
<version>4.5.0</version>
</dependency>

添加配置类(开启 OpenAPI)

1
2
3
4
5
6
7
8
9
10
11
12
13
14
15
16
17
18
19
20
21
22
23
24
25
26
27
28
29
30
31
32
33
34
35
36
37
38
39
40
41
42
43
44
45
46
47
48
49
50
51
52
53
54
55
56
57
58
59
60
61
62
63
64
65
66
67
68
69
70
71
72
73
74
75
76
77
78
79
80
81
82
83
84
85
86
87
88
89
90
91
92
93
94
95
96
97
98
99
100
101
102
103
104
105
106
107
108
109
110
111
112
113
114
115
116
117
118
119
120
121
122
123
124
package hbnu.project.ergoutreegalemjstore.config;

import io.swagger.v3.oas.models.OpenAPI;
import io.swagger.v3.oas.models.info.Contact;
import io.swagger.v3.oas.models.info.Info;
import io.swagger.v3.oas.models.info.License;
import io.swagger.v3.oas.models.servers.Server;
import org.springframework.context.annotation.Bean;
import org.springframework.context.annotation.Configuration;

import java.util.List;

/**
* Knife4j(OpenAPI)配置类
*
* OpenAPI通过注解的方式,可以自动生成规范化的API文档,方便前后端开发协作。
*
* 【什么是 Knife4j?】
* Knife4j是国内开发的增强版Swagger UI工具,在原生Swagger基础上提供了:
* 1. 更美观的中文界面
* 2. 离线文档导出功能
* 3. 更强大的搜索功能
* 4. 接口排序、分组等增强功能
*
* 【访问地址】
* 启动项目后,访问以下地址查看API文档:
* - Knife4j UI: http://localhost:8080/doc.html
* - Swagger UI: http://localhost:8080/swagger-ui/index.html
* - OpenAPI JSON: http://localhost:8080/v3/api-docs
*
* @author ErgouTree
* @since 2025-10-30
*/
@Configuration
public class OpenApiConfig {

/**
* 创建 OpenAPI 配置对象,具体的下面看
*/
@Bean
public OpenAPI customOpenAPI() {
return new OpenAPI()
// 配置API文档的基本信息
.info(new Info()
// API文档标题
.title("ErgouTreeGalEmojiStore API")

// API描述信息(支持Markdown格式)
.description("""
## 项目简介
这是一个基于Spring Boot的图片管理系统,提供以下功能:

### 主要功能模块
- **图片管理**: 上传、下载、删除图片
- **搜索功能**: 根据游戏名称和标签搜索图片
- **评论系统**: 图片评论、回复、点赞功能
- **存储方案**: MinIO对象存储 + MongoDB + Elasticsearch

### 技术栈
- Spring Boot 3.5.6
- MongoDB(数据存储)
- MinIO(文件存储)
- Elasticsearch(全文检索)
- Knife4j(API文档)
""")

// API版本号
.version("v1.0.0")

// 联系人信息
.contact(new Contact()
.name("开发团队") // 联系人名称
.email("example@hbnu.edu.cn") // 联系邮箱
.url("https://github.com/yourproject")) // 项目地址

// 许可证信息
.license(new License()
.name("Apache 2.0")
.url("https://www.apache.org/licenses/LICENSE-2.0.html"))
)

// 配置服务器地址(可以配置多个环境)
.servers(List.of(
// 本地开发环境
new Server()
.url("http://localhost:8080")
.description("本地开发环境"),

// 测试环境(示例)
new Server()
.url("http://test.example.com")
.description("测试环境"),

// 生产环境(示例)
new Server()
.url("https://api.example.com")
.description("生产环境")
));
}

/**
* 【分组配置示例(可选)
*
* 如果你的API很多,可以通过分组来组织API文档。
* 例如:将图片相关API和评论相关API分成两个文档组。
*
* 取消下面的注释即可启用分组功能:
*/
@Bean
public GroupedOpenApi imageApi() {
return GroupedOpenApi.builder()
.group("图片管理") // 分组名称
.pathsToMatch("/upload/**", "/download/**", "/delete/**", "/") // 匹配的路径
.build();
}

@Bean
public GroupedOpenApi commentApi() {
return GroupedOpenApi.builder()
.group("评论管理") // 分组名称
.pathsToMatch("/api/comments/**") // 匹配的路径
.build();
}
}

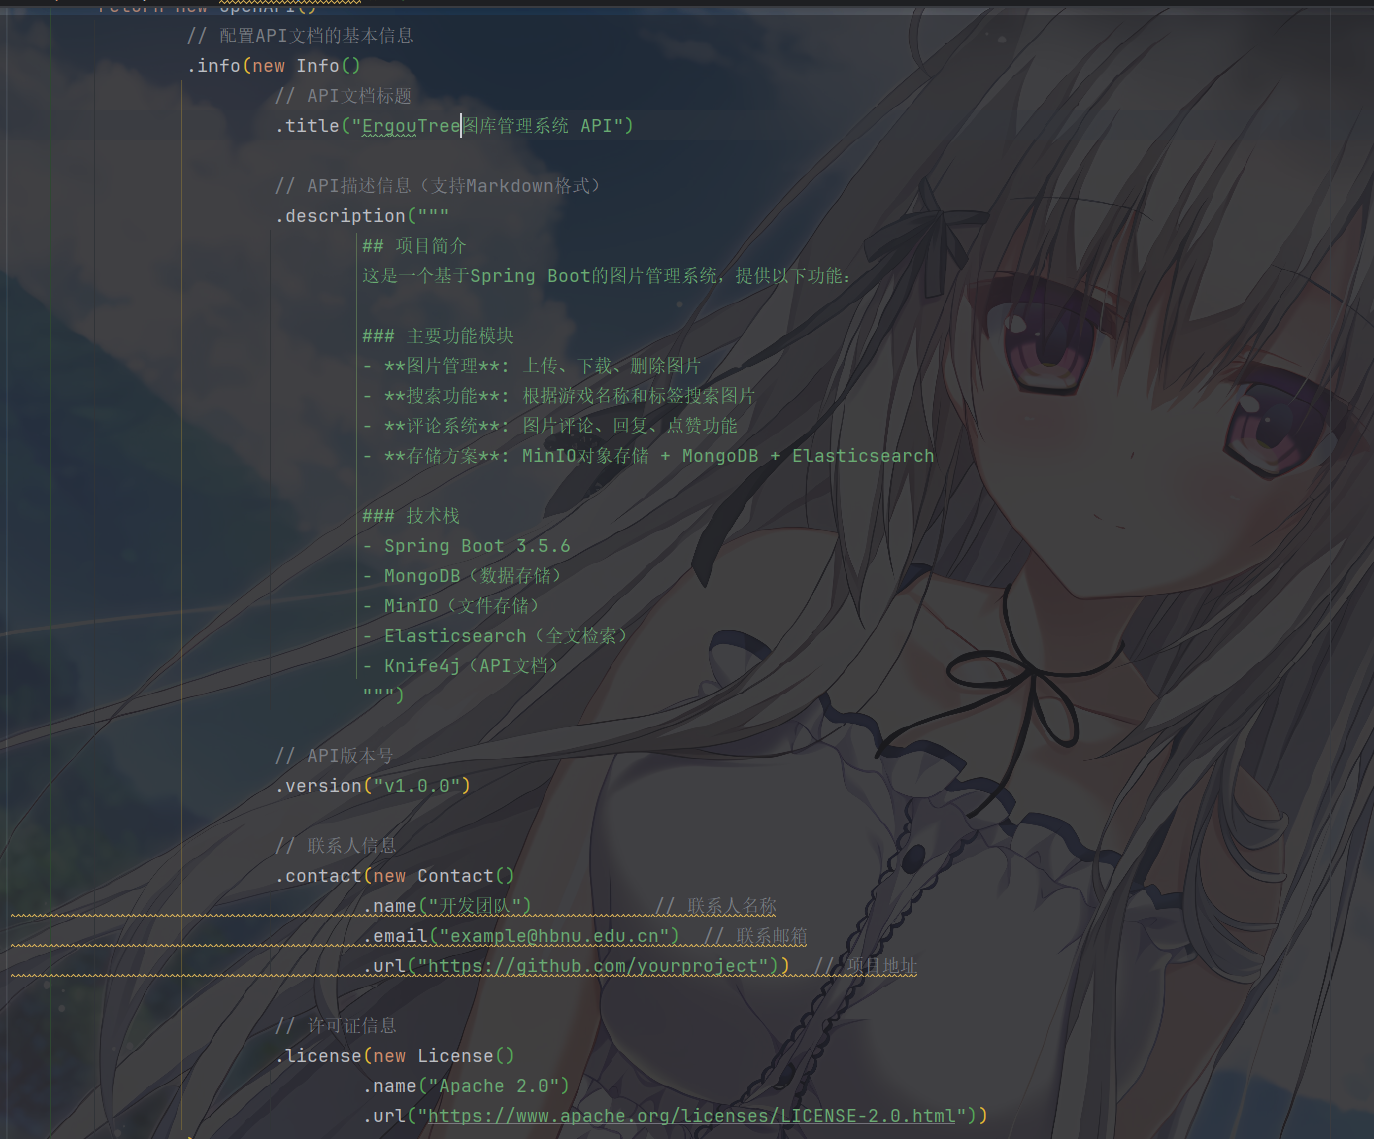
常用的OpenAPI 配置对象基本就是上面演示的内容

配置说明:

  • Info: 定义API文档的基本信息
  • Contact: 定义联系人信息
  • License: 定义许可证信息
  • Server: 定义API服务器地址(可配置多个环境)

实体类添加OpenAPI的注解

常用注解说明

@Schema用于描述数据模型和字段

  • description: 字段描述
  • example: 示例值
  • required: 是否必填
  • minimum: 最小值(数值类型)
  • maximum: 最大值(数值类型)
  • pattern: 正则表达式(字符串类型)
1
2
3
4
5
6
7
8
9
10
11
12
13
14
15
16
@Data
@Schema(description = "用户信息实体", name = "User")
public class User {

@Schema(description = "用户ID", example = "1001")
private Long id;

@Schema(description = "用户名", example = "张三", required = true)
private String name;

@Schema(description = "邮箱", example = "zhangsan@example.com")
private String email;

@Schema(description = "年龄", example = "25", minimum = "0", maximum = "150")
private Integer age;
}

当然,添加@ApiModel也是很常见的情况,他会用于 实体类上(如请求体 CreateUserDTO、响应体 UserVO),说明这个类是做什么的(如 “创建用户的请求参数”“用户详情响应”)。

  • value:实体类的简称(可选,默认是类名)。
  • description:实体类的详细描述(必填,说明类的用途)。

其中,@ApiModelProperty:描述实体类的单个字段

  • value:字段描述(必填,说明字段是做什么的)。
  • required:是否必填(布尔值,默认 false;请求体中必填的字段需设为 true)。
  • example:字段示例值(实用,前端可参考示例填值)。
  • allowableValues:字段允许的值(可选,如枚举范围 ["MALE", "FEMALE"],或数值范围 1-100)。
  • hidden:是否隐藏字段(布尔值,默认 false;若某个字段不希望在文档中显示,设为 true)。
1
2
3
4
5
6
7
8
9
10
11
12
13
14
15
16
17
18
19
20
21
22
23
24
25
26
27
28
29
30
31
32
33
34
35
36
37
38
39
40
41
42
43
44
45
// 1. 请求体实体类:创建用户的参数(前端传参用)
@ApiModel(description = "创建用户的请求参数")
public class CreateUserDTO {
@ApiModelProperty(
value = "用户名",
required = true,
example = "zhangsan",
allowableValues = "长度1-20,仅包含字母和数字"
)
private String username;

@ApiModelProperty(
value = "用户性别",
required = false,
example = "MALE",
allowableValues = "MALE(男), FEMALE(女), UNKNOWN(未知)"
)
private String gender;

@ApiModelProperty(
value = "用户年龄",
required = false,
example = "25",
allowableValues = "1-150"
)
private Integer age;

// getter/setter 省略
}

// 2. Controller 中使用该请求体
@Operation(summary = "创建用户", description = "传入用户基本信息,创建新用户(用户名不可重复)")
@ApiResponses({
@ApiResponse(code = 201, message = "创建成功", response = UserVO.class),
@ApiResponse(code = 400, message = "参数错误(如用户名重复、年龄超出范围)", response = ErrorResult.class)
})
@PostMapping
public ResponseEntity<UserVO> createUser(
// 请求体参数:用 @ApiParam 标记整体,字段细节由实体类的 @ApiModelProperty 展示
@ApiParam(value = "创建用户的请求参数", required = true)
@RequestBody CreateUserDTO createUserDTO
) {
UserVO userVO = userService.create(createUserDTO);
return ResponseEntity.status(201).body(userVO);
}

实际演示

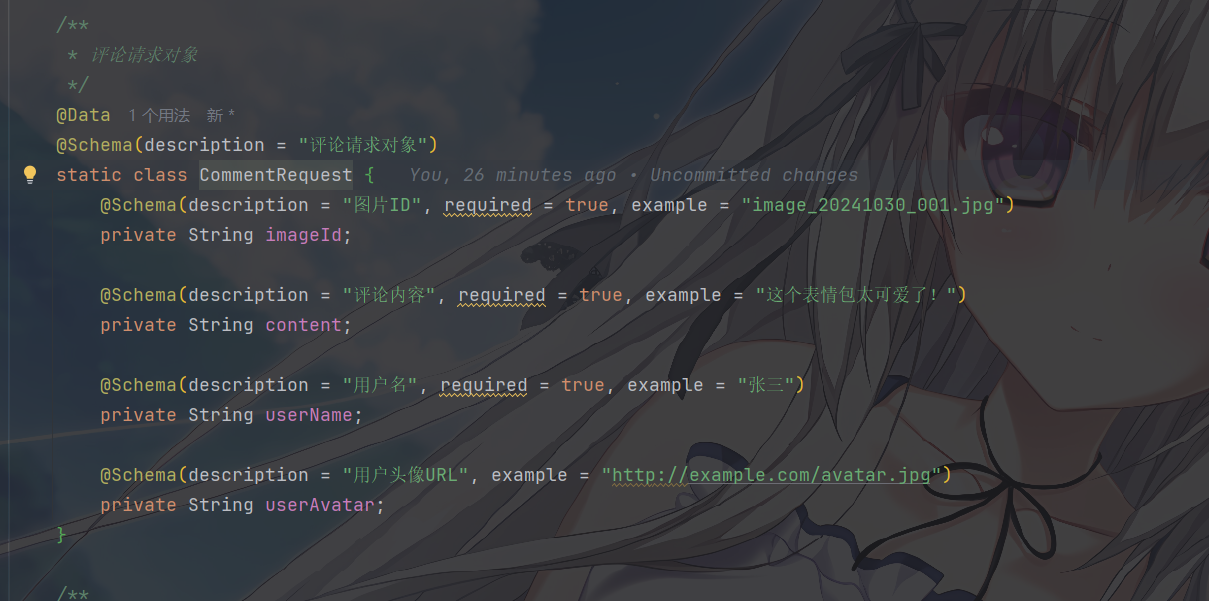
以一个简单的作为示例,一般情况下,我们描述实体类用 @Schema ,可描述类也可以描述字段

1
2
3
4
5
6
7
8
9
10
11
12
13
14
15
16
17
18
19
20
21
22
23
24
25
26
27
28
29
30
31
32
33
34
35
36
37
38
39
40
41
42
43
44
45
46
47
48
49
50
51
52
53
54
55
56
57
58
59
60
61
62
63
64
65
66
67
68
69
70
71
72
package hbnu.project.ergoutreegalemjstore.entity;

import com.fasterxml.jackson.annotation.JsonIgnoreProperties;
import io.swagger.v3.oas.annotations.media.Schema;
import lombok.AllArgsConstructor;
import lombok.Data;
import lombok.NoArgsConstructor;

import java.util.List;

/**
* 图片信息实体类
* 用于存储到 Elasticsearch 的文档
*
* 【@Schema注解说明】
* @Schema是OpenAPI规范中用来描述数据模型的注解
* 可以在API文档中显示详细的字段说明,帮助前端开发者理解数据结构
*/
@Data
@NoArgsConstructor
@AllArgsConstructor
@JsonIgnoreProperties(ignoreUnknown = true)
@Schema(description = "图片信息实体", name = "ImageInfo")
public class ImageInfo {

/**
* 文档ID(使用文件名作为唯一标识)
*
* 【@Schema参数说明】
* - description: 字段描述
* - example: 示例值,会在API文档中显示
* - required: 是否必填
*/
@Schema(description = "图片唯一标识ID", example = "image_20241030_001.jpg")
private String id;

/**
* 文件名
*/
@Schema(description = "图片文件名", example = "cute_cat.jpg", required = true)
private String fileName;

/**
* MinIO 访问URL
*/
@Schema(description = "图片访问URL地址", example = "http://localhost:9000/images/cute_cat.jpg")
private String url;

/**
* 文件大小(字节)
*/
@Schema(description = "文件大小(字节)", example = "1048576")
private Long size;

/**
* 上传时间
*/
@Schema(description = "图片上传时间", example = "2024-10-30 15:30:00")
private String uploadTime;

/**
* 游戏名称
*/
@Schema(description = "关联的游戏名称", example = "原神")
private String gameName;

/**
* 标签(多个标签用逗号分隔)
*/
@Schema(description = "图片标签列表", example = "[\"可爱\", \"表情包\", \"二次元\"]")
private List<String> tags;
}

为Controller添加OpenAPI注解

常用注解说明

其中如下注解我们经常使用

@Tag:类级别注解,用于对Controller进行分组和描述

  • name: 分组名称(必填)

  • description: 分组描述(可选)

1
2
3
4
5
6
@Tag(name = "用户管理", description = "用户相关的增删改查接口")
@RestController
@RequestMapping("/api/users")
public class UserController {
// ...
}

@Operation:用于描述单个API接口,方法级

  • summary: 接口简短描述(显示在列表中)

  • description: 接口详细说明(支持Markdown)

  • tags: 自定义标签(可选)

1
2
3
4
5
6
7
8
@Operation(
summary = "创建用户", // 简短描述
description = "创建一个新用户" // 详细说明
)
@PostMapping
public ResponseEntity<User> createUser(@RequestBody User user) {
// ...
}

@Parameter:用于描述接口参数(路径参数、查询参数)

  • description: 参数描述
  • required: 是否必填
  • example: 示例值
  • schema: 参数的数据类型
1
2
3
4
5
6
7
8
9
10
11
12
13
@GetMapping("/{id}")

public User getUser(

@Parameter(description = "用户ID", required = true, example = "1001")

@PathVariable Long id

) {

*//* *...*

}

@RequestBody:用于描述请求体参数,但是貌似很少用,因为容易导错包

1
2
3
4
5
6
7
8
9
10
@PostMapping
public User createUser(
@io.swagger.v3.oas.annotations.parameters.RequestBody(
description = "用户信息对象",
required = true
)
@RequestBody User user
) {
// ...
}

需要使用 io.swagger.v3.oas.annotations.parameters.RequestBody@RequestBody:我让1w个人导错了包

@ApiParam:单个参数的详细描述(用于方法参数上),适用于 方法形参(如路径参数、查询参数、请求体参数),直接在参数前添加,补充参数的业务含义、示例、约束等。

  • name:参数名(默认与形参名一致,可省略,但建议显式指定,避免混淆)。
  • value:参数描述(必填,说明参数是做什么的)。
  • required:是否必填(布尔值,默认 false;如果接口要求必传,必须设为 true,文档会标红提示)。
  • example:参数示例值(非常实用,前端 / 测试人员可直接参考示例填值)。
  • allowEmptyValue:是否允许空值(布尔值,默认 false,仅对字符串等类型有效)。
1
2
3
4
5
6
7
8
9
10
11
12
13
14
@Operation(summary = "根据ID查询用户", description = "传入用户唯一ID,返回用户完整信息")
@GetMapping("/{userId}") // 路径参数
public ResponseEntity<User> getUserById(
// 路径参数描述:明确ID含义、必填、示例
@ApiParam(name = "userId", value = "用户唯一ID(数据库自增ID)", required = true, example = "1001")
@PathVariable Long userId,

// 查询参数描述:非必填,指定是否返回用户的关联信息(如订单列表)
@ApiParam(name = "withOrders", value = "是否返回用户关联的订单列表", required = false, example = "true")
@RequestParam(required = false, defaultValue = "false") Boolean withOrders
) {
// 业务逻辑...
return ResponseEntity.ok(user);
}

@ApiImplicitParam / @ApiImplicitParams:隐式参数描述(用于方法上)适用于 无法直接在参数上标记 的场景(如请求头参数、Cookie 参数),或需要批量描述多个参数(避免在每个参数前加 @ApiParam 的重复代码)

  • 单个隐式参数用 @ApiImplicitParam
  • 多个隐式参数用 @ApiImplicitParams 包裹(内部包含多个 @ApiImplicitParam)。

属性与 @ApiParam 类似,额外增加定位参数的属性

  • paramType:参数类型(必填,指定参数来自哪里),可选值:
    • path:路径参数(对应 @PathVariable)。
    • query:查询参数(对应 @RequestParam)。
    • header:请求头参数(对应 @RequestHeader)。
    • cookie:Cookie 参数(对应 @CookieValue)。
    • body:请求体参数(对应 @RequestBody,但一般用 @ApiModel 描述请求体,较少用此类型)。
  • name/value/required/example:与 @ApiParam 一致。
1
2
3
4
5
6
7
8
9
10
11
12
13
14
15
16
17
18
19
20
21
22
23
24
25
26
27
28
29
30
31
32
33
34
35
36
37
38
39
40
41
42
@Operation(summary = "分页查询用户列表", description = "支持按用户名模糊搜索,返回分页结果")
// 多个隐式参数:请求头(Token)、查询参数(用户名、页码、页大小)
@ApiImplicitParams({
@ApiImplicitParam(
name = "Authorization",
value = "请求头令牌(格式:Bearer {token})",
required = true,
paramType = "header",
example = "Bearer eyJhbGciOiJIUzI1NiIsInR5cCI6IkpXVCJ9..."
),
@ApiImplicitParam(
name = "username",
value = "用户名模糊搜索(可选,如传“张”则返回所有姓张的用户)",
required = false,
paramType = "query",
example = "张"
),
@ApiImplicitParam(
name = "pageNum",
value = "页码(默认1)",
required = false,
paramType = "query",
example = "1"
),
@ApiImplicitParam(
name = "pageSize",
value = "每页条数(默认10)",
required = false,
paramType = "query",
example = "10"
)
})
@GetMapping("/list")
public ResponseEntity<PageInfo<User>> getUserList(
@RequestHeader("Authorization") String token,
@RequestParam(required = false) String username,
@RequestParam(required = false, defaultValue = "1") Integer pageNum,
@RequestParam(required = false, defaultValue = "10") Integer pageSize
) {
// 业务逻辑...
return ResponseEntity.ok(pageInfo);
}

@ApiResponses / @ApiResponse:描述响应状态与内容

  • 单个响应状态用 @ApiResponse
  • 多个响应状态用 @ApiResponses 包裹。

属性

  • code:HTTP 状态码(必填,如 200、400、401、500)。
  • message:状态码对应的描述(必填,如 “请求成功”“参数格式错误”)。
  • response:响应数据的类型(可选,如成功时返回 User.class,失败时返回 ErrorResult.class)。
  • responseContainer:响应数据的容器类型(可选,如 List 表示返回 List<User>,仅当 response 是集合时用)。
1
2
3
4
5
6
7
8
9
10
11
12
13
14
15
16
17
18
19
20
21
22
23
24
25
26
27
28
29
30
31
32
33
34
35
36
37
38
39
40
41
42
@Operation(summary = "删除用户", description = "根据用户ID删除用户,删除后不可恢复")
@ApiResponses({
@ApiResponse(
code = 200,
message = "删除成功",
response = String.class, // 成功时返回提示字符串
example = "用户1001删除成功"
),
@ApiResponse(
code = 404,
message = "用户不存在",
response = ErrorResult.class // 失败时返回错误结果对象
),
@ApiResponse(
code = 403,
message = "无权限删除(仅管理员可操作)",
response = ErrorResult.class
)
})
@DeleteMapping("/{userId}")
public ResponseEntity<String> deleteUser(
@ApiParam(name = "userId", value = "用户ID", required = true, example = "1001")
@PathVariable Long userId
) {
boolean deleted = userService.deleteById(userId);
if (deleted) {
return ResponseEntity.ok("用户" + userId + "删除成功");
} else {
return ResponseEntity.status(404).body(new ErrorResult(404, "用户不存在"));
}
}

// 错误响应实体类(需配合 @ApiModel 注解,见下文)
@ApiModel(description = "错误响应结果")
public class ErrorResult {
@ApiModelProperty(value = "错误码", example = "404")
private Integer code;
@ApiModelProperty(value = "错误信息", example = "用户不存在")
private String message;

// 构造器、getter/setter 省略
}

文档会按状态码分类展示响应,前端能清晰知道各种场景下的响应格式。
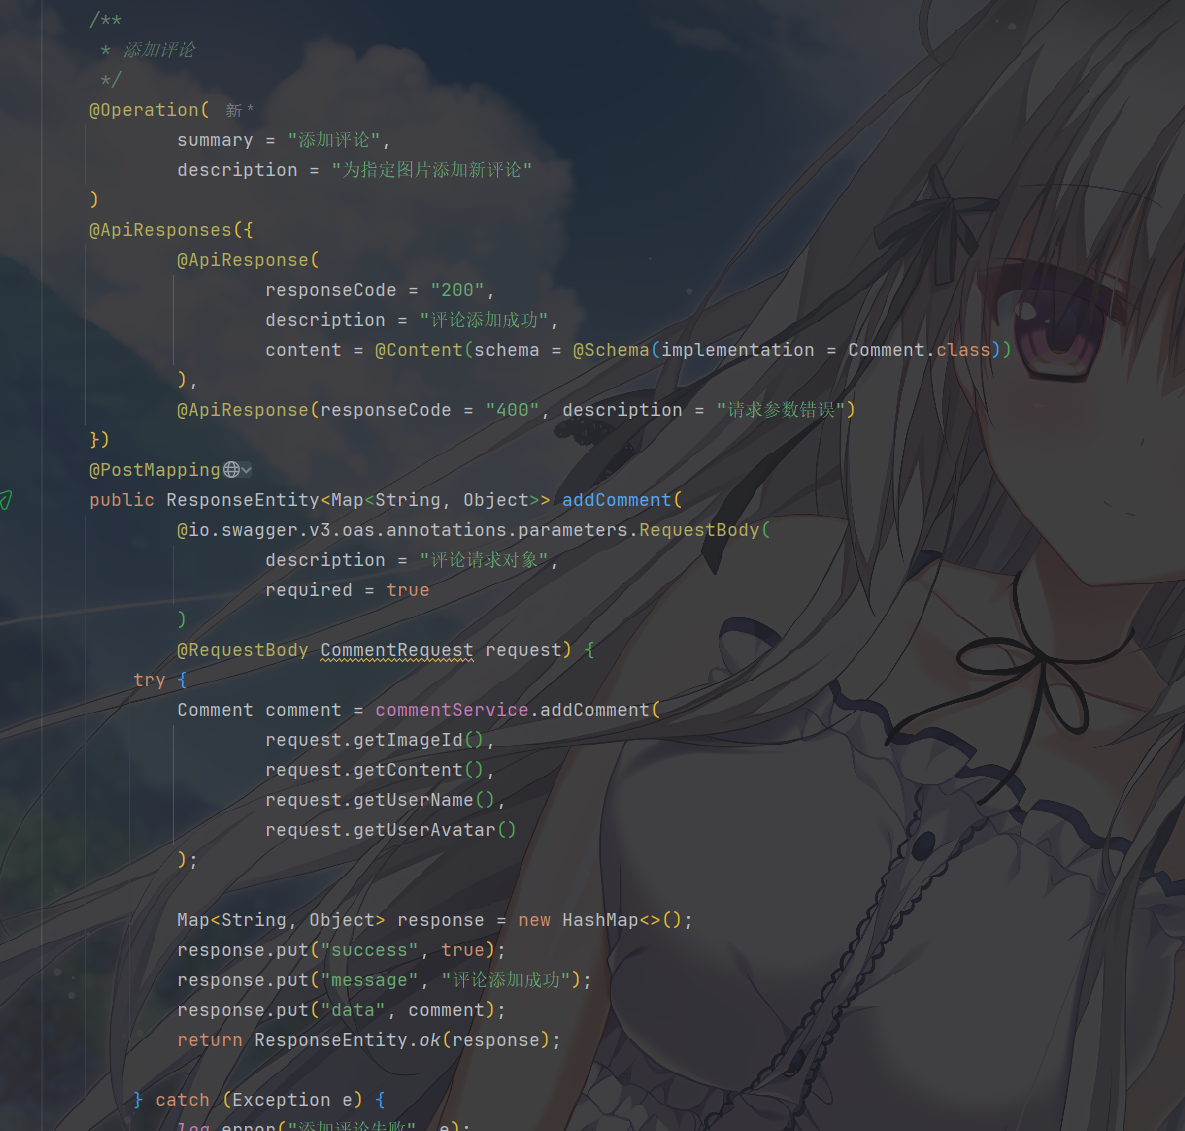
实例演示

我们把评论控制器按照openapi文档的规范进行处理,作为例子

这里只是例子才写成这样,实际开发中,我们一般只使用@Operation@Tag

1
2
3
4
5
6
7
8
9
10
11
12
13
14
15
16
17
18
19
20
21
22
23
24
25
26
27
28
29
30
31
32
33
34
35
36
37
38
39
40
41
42
43
44
45
46
47
48
49
50
51
52
53
54
55
56
57
58
59
60
61
62
63
64
65
66
67
68
69
70
71
72
73
74
75
76
77
78
79
80
81
82
83
84
85
86
87
88
89
90
91
92
93
94
95
96
97
98
99
100
101
102
103
104
105
106
107
108
109
110
111
112
113
114
115
116
117
118
119
120
121
122
123
124
125
126
127
128
129
130
131
132
133
134
135
136
137
138
139
140
141
142
143
144
145
146
147
148
149
150
151
152
153
154
155
156
157
158
159
160
161
162
163
164
165
166
167
168
169
170
171
172
173
174
175
176
177
178
179
180
181
182
183
184
185
186
187
188
189
190
191
192
193
194
195
196
197
198
199
200
201
202
203
204
205
206
207
208
209
210
211
212
213
214
215
216
217
218
219
220
221
222
223
224
225
226
227
228
229
230
231
232
233
234
235
236
237
238
239
240
241
242
243
244
245
246
247
248
249
250
251
252
253
254
255
256
257
258
259
260
261
262
263
264
265
266
267
268
269
270
271
272
273
274
275
276
277
278
279
280
281
282
283
284
285
286
287
288
289
290
291
292
293
294
295
296
297
298
299
300
301
302
303
304
305
306
307
308
309
310
311
312
313
314
315
316
317
318
319
320
321
322
323
324
325
326
327
328
329
330
331
332
333
334
335
336
337
338
339
340
341
342
343
344
345
346
347
348
349
350
351
352
353
354
355
356
357
358
359
360
361
362
363
364
365
366
367
368
369
370
371
372
373
374
375
376
377
378
379
380
381
382
383
384
385
386
/**
* 评论控制器
*
* 【OpenAPI核心注解说明】
*
* 1. @Tag - 用于对Controller进行分组和描述
* - name: 标签名称,会在文档中显示为分组标题
* - description: 标签描述,说明这个模块的功能
*
* 2. @Operation - 用于描述单个API接口
* - summary: 接口简短描述
* - description: 接口详细说明
* - tags: 接口所属标签(可以有多个)
*
* 3. @Parameter - 用于描述接口参数
* - name: 参数名称
* - description: 参数说明
* - required: 是否必填
* - example: 示例值
*
* 4. @ApiResponses & @ApiResponse - 用于描述接口响应
* - responseCode: HTTP状态码
* - description: 响应说明
* - content: 响应内容的数据结构
*/
@Slf4j
@RestController
@RequestMapping("/api/comments")
@RequiredArgsConstructor
@Tag(name = "评论管理", description = "图片评论相关接口,包括评论的增删改查、点赞、回复等功能")
public class CommentController {

private final CommentService commentService;

/**
* 添加评论
*/
@Operation(
summary = "添加评论",
description = "为指定图片添加新评论"
)
@ApiResponses({
@ApiResponse(
responseCode = "200",
description = "评论添加成功",
content = @Content(schema = @Schema(implementation = Comment.class))
),
@ApiResponse(responseCode = "400", description = "请求参数错误")
})
@PostMapping
public ResponseEntity<Map<String, Object>> addComment(
@io.swagger.v3.oas.annotations.parameters.RequestBody(
description = "评论请求对象",
required = true
)
@RequestBody CommentRequest request) {
try {
Comment comment = commentService.addComment(
request.getImageId(),
request.getContent(),
request.getUserName(),
request.getUserAvatar()
);

Map<String, Object> response = new HashMap<>();
response.put("success", true);
response.put("message", "评论添加成功");
response.put("data", comment);
return ResponseEntity.ok(response);

} catch (Exception e) {
log.error("添加评论失败", e);
Map<String, Object> response = new HashMap<>();
response.put("success", false);
response.put("message", "评论添加失败: " + e.getMessage());
return ResponseEntity.badRequest().body(response);
}
}

/**
* 添加回复
*/
@Operation(
summary = "回复评论",
description = "对指定评论进行回复"
)
@ApiResponses({
@ApiResponse(responseCode = "200", description = "回复成功"),
@ApiResponse(responseCode = "400", description = "评论不存在或参数错误")
})
@PostMapping("/{commentId}/reply")
public ResponseEntity<Map<String, Object>> addReply(
@Parameter(description = "评论ID", required = true, example = "507f1f77bcf86cd799439011")
@PathVariable String commentId,
@io.swagger.v3.oas.annotations.parameters.RequestBody(
description = "回复请求对象",
required = true
)
@RequestBody ReplyRequest request) {
try {
Comment comment = commentService.addReply(
commentId,
request.getContent(),
request.getUserName(),
request.getUserAvatar()
);

Map<String, Object> response = new HashMap<>();
response.put("success", true);
response.put("message", "回复添加成功");
response.put("data", comment);
return ResponseEntity.ok(response);

} catch (Exception e) {
log.error("添加回复失败", e);
Map<String, Object> response = new HashMap<>();
response.put("success", false);
response.put("message", "回复添加失败: " + e.getMessage());
return ResponseEntity.badRequest().body(response);
}
}

/**
* 获取图片的所有评论
*/
@Operation(
summary = "获取图片评论",
description = "获取指定图片的所有评论(不分页)"
)
@ApiResponses({
@ApiResponse(responseCode = "200", description = "获取成功"),
@ApiResponse(responseCode = "400", description = "图片ID无效")
})
@GetMapping("/image/{imageId}")
public ResponseEntity<Map<String, Object>> getComments(
@Parameter(description = "图片ID", required = true, example = "image_20241030_001.jpg")
@PathVariable String imageId) {
try {
List<Comment> comments = commentService.getCommentsByImageId(imageId);
long count = commentService.getCommentCount(imageId);

Map<String, Object> response = new HashMap<>();
response.put("success", true);
response.put("data", comments);
response.put("total", count);
return ResponseEntity.ok(response);

} catch (Exception e) {
log.error("获取评论失败", e);
Map<String, Object> response = new HashMap<>();
response.put("success", false);
response.put("message", "获取评论失败: " + e.getMessage());
return ResponseEntity.badRequest().body(response);
}
}

/**
* 分页获取评论
*/
@Operation(
summary = "分页获取评论",
description = "分页获取指定图片的评论列表,支持自定义页码和每页数量"
)
@ApiResponses({
@ApiResponse(responseCode = "200", description = "获取成功"),
@ApiResponse(responseCode = "400", description = "参数错误")
})
@GetMapping("/image/{imageId}/page")
public ResponseEntity<Map<String, Object>> getCommentsWithPage(
@Parameter(description = "图片ID", required = true, example = "image_20241030_001.jpg")
@PathVariable String imageId,
@Parameter(description = "页码(从0开始)", example = "0")
@RequestParam(defaultValue = "0") int page,
@Parameter(description = "每页数量", example = "10")
@RequestParam(defaultValue = "10") int size) {
try {
Page<Comment> commentPage = commentService.getCommentsByImageIdWithPage(imageId, page, size);

Map<String, Object> response = new HashMap<>();
response.put("success", true);
response.put("data", commentPage.getContent());
response.put("currentPage", commentPage.getNumber());
response.put("totalPages", commentPage.getTotalPages());
response.put("totalElements", commentPage.getTotalElements());
return ResponseEntity.ok(response);

} catch (Exception e) {
log.error("分页获取评论失败", e);
Map<String, Object> response = new HashMap<>();
response.put("success", false);
response.put("message", "获取评论失败: " + e.getMessage());
return ResponseEntity.badRequest().body(response);
}
}

/**
* 点赞评论
*/
@Operation(
summary = "点赞评论",
description = "为指定评论点赞,同一用户只能点赞一次"
)
@ApiResponses({
@ApiResponse(responseCode = "200", description = "点赞成功"),
@ApiResponse(responseCode = "400", description = "评论不存在或已点赞")
})
@PostMapping("/{commentId}/like")
public ResponseEntity<Map<String, Object>> likeComment(
@Parameter(description = "评论ID", required = true, example = "507f1f77bcf86cd799439011")
@PathVariable String commentId,
@io.swagger.v3.oas.annotations.parameters.RequestBody(
description = "点赞请求对象",
required = true
)
@RequestBody LikeRequest request) {
try {
Comment comment = commentService.likeComment(commentId, request.getUserName());

Map<String, Object> response = new HashMap<>();
response.put("success", true);
response.put("message", "点赞成功");
response.put("data", comment);
return ResponseEntity.ok(response);

} catch (Exception e) {
log.error("点赞失败", e);
Map<String, Object> response = new HashMap<>();
response.put("success", false);
response.put("message", "点赞失败: " + e.getMessage());
return ResponseEntity.badRequest().body(response);
}
}

/**
* 取消点赞
*/
@Operation(
summary = "取消点赞",
description = "取消对指定评论的点赞"
)
@ApiResponses({
@ApiResponse(responseCode = "200", description = "取消成功"),
@ApiResponse(responseCode = "400", description = "评论不存在或未点赞")
})
@PostMapping("/{commentId}/unlike")
public ResponseEntity<Map<String, Object>> unlikeComment(
@Parameter(description = "评论ID", required = true, example = "507f1f77bcf86cd799439011")
@PathVariable String commentId,
@io.swagger.v3.oas.annotations.parameters.RequestBody(
description = "取消点赞请求对象",
required = true
)
@RequestBody LikeRequest request) {
try {
Comment comment = commentService.unlikeComment(commentId, request.getUserName());

Map<String, Object> response = new HashMap<>();
response.put("success", true);
response.put("message", "取消点赞成功");
response.put("data", comment);
return ResponseEntity.ok(response);

} catch (Exception e) {
log.error("取消点赞失败", e);
Map<String, Object> response = new HashMap<>();
response.put("success", false);
response.put("message", "取消点赞失败: " + e.getMessage());
return ResponseEntity.badRequest().body(response);
}
}

/**
* 删除评论
*/
@Operation(
summary = "删除评论",
description = "删除指定的评论(软删除,仅修改状态)"
)
@ApiResponses({
@ApiResponse(responseCode = "200", description = "删除成功"),
@ApiResponse(responseCode = "400", description = "评论不存在")
})
@DeleteMapping("/{commentId}")
public ResponseEntity<Map<String, Object>> deleteComment(
@Parameter(description = "评论ID", required = true, example = "507f1f77bcf86cd799439011")
@PathVariable String commentId) {
try {
commentService.deleteComment(commentId);

Map<String, Object> response = new HashMap<>();
response.put("success", true);
response.put("message", "评论删除成功");
return ResponseEntity.ok(response);

} catch (Exception e) {
log.error("删除评论失败", e);
Map<String, Object> response = new HashMap<>();
response.put("success", false);
response.put("message", "删除评论失败: " + e.getMessage());
return ResponseEntity.badRequest().body(response);
}
}

/**
* 获取热门评论
*/
@Operation(
summary = "获取热门评论",
description = "获取指定图片的热门评论(根据点赞数筛选)"
)
@ApiResponses({
@ApiResponse(responseCode = "200", description = "获取成功"),
@ApiResponse(responseCode = "400", description = "参数错误")
})
@GetMapping("/image/{imageId}/hot")
public ResponseEntity<Map<String, Object>> getHotComments(
@Parameter(description = "图片ID", required = true, example = "image_20241030_001.jpg")
@PathVariable String imageId,
@Parameter(description = "最少点赞数", example = "5")
@RequestParam(defaultValue = "5") int minLikes) {
try {
List<Comment> hotComments = commentService.getHotComments(imageId, minLikes);

Map<String, Object> response = new HashMap<>();
response.put("success", true);
response.put("data", hotComments);
return ResponseEntity.ok(response);

} catch (Exception e) {
log.error("获取热门评论失败", e);
Map<String, Object> response = new HashMap<>();
response.put("success", false);
response.put("message", "获取热门评论失败: " + e.getMessage());
return ResponseEntity.badRequest().body(response);
}
}

// ============ 请求DTO ============
// 【DTO说明】DTO (Data Transfer Object) 数据传输对象,用于接收前端传来的请求参数

/**
* 评论请求对象
*/
@Data
@Schema(description = "评论请求对象")
static class CommentRequest {
@Schema(description = "图片ID", required = true, example = "image_20241030_001.jpg")
private String imageId;

@Schema(description = "评论内容", required = true, example = "这个表情包太可爱了!")
private String content;

@Schema(description = "用户名", required = true, example = "张三")
private String userName;

@Schema(description = "用户头像URL", example = "http://example.com/avatar.jpg")
private String userAvatar;
}

/**
* 回复请求对象
*/
@Data
@Schema(description = "回复请求对象")
static class ReplyRequest {
@Schema(description = "回复内容", required = true, example = "我也觉得!")
private String content;

@Schema(description = "用户名", required = true, example = "李四")
private String userName;

@Schema(description = "用户头像URL", example = "http://example.com/avatar2.jpg")
private String userAvatar;
}

/**
* 点赞请求对象
*/
@Data
@Schema(description = "点赞/取消点赞请求对象")
static class LikeRequest {
@Schema(description = "用户名", required = true, example = "王五")
private String userName;
}
}

打开项目进行测试

如何访问项目的 API 文档

一般就是加上doc.html例如我的项目就是http://localhost:8080/doc.html**

启动Spring Boot应用后,访问以下地址:

  • Knife4j UI: http://localhost:8080/doc.html
  • Swagger UI: http://localhost:8080/swagger-ui/index.html
  • OpenAPI JSO: http://localhost:8080/v3/api-docs

主页

我们先访问项目中贴合的 Knife4j

knife4j 只是对于 springdoc-openapi 做了一些增强,所有配置可以参考原项目说明 https://springdoc.org/#properties

增强配置:https://doc.xiaominfo.com/docs/features/enhance

我这里只列出基础的配置:

1
2
3
4
5
6
7
8
9
10
11
12
13
14
# knife4j的增强配置,不需要增强可以不配
knife4j:
# 开启增强配置
enable: true
# 开启生产环境屏蔽
production: false
setting:
language: zh_cn
swagger-model-name: 实体类列表
enable-version: true # 是否开启界面中对某接口的版本控制,如果开启,后端变化后Ui界面会存在小蓝点
enable-host-text: 127.0.0.1:8080
enable-footer-custom: true
footer-custom-content: Apache License 2.0 | Copyright 2024-[itshare](https://www.csyblog.cn)

进入主页

image-20251030194638474

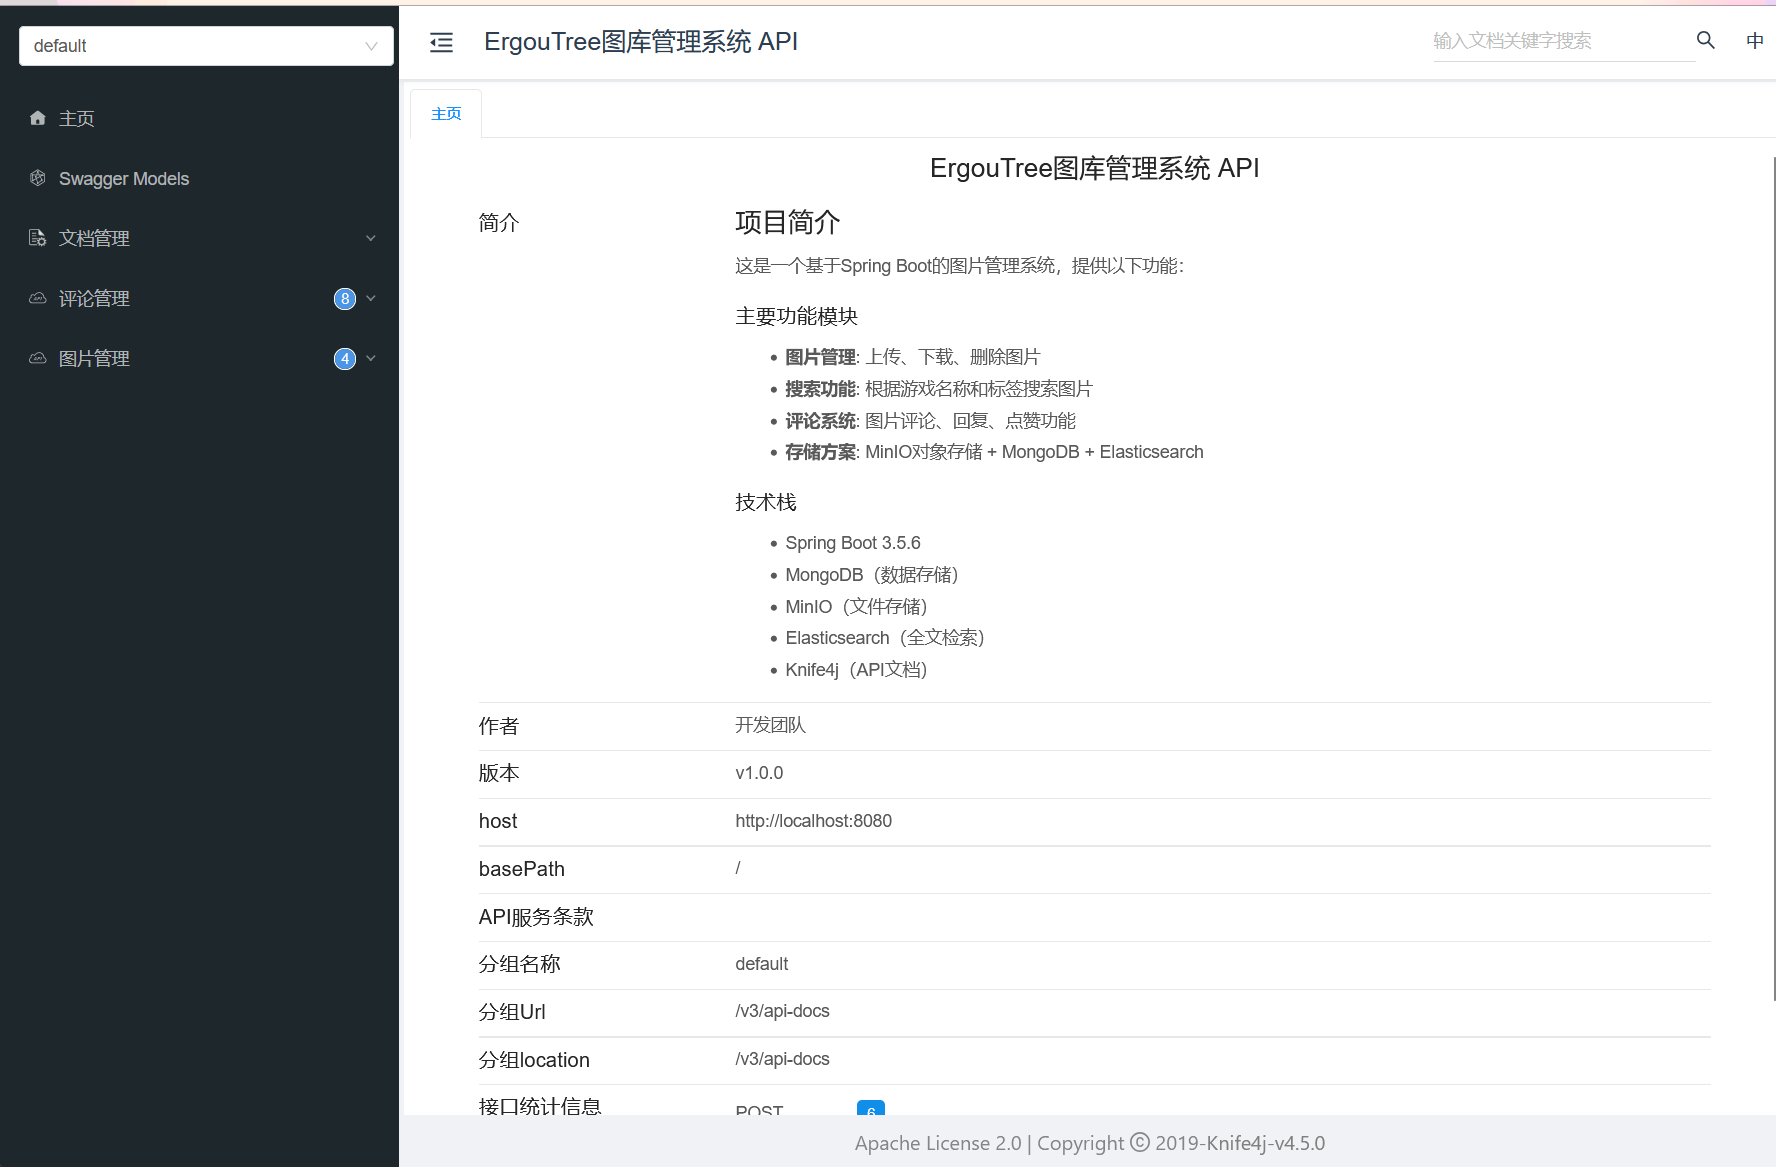
可用看到我们在配置类中的描述就到这里来了

image-20251030194547913

Swagger Models

左边是菜单栏我们进入Swagger Models ,它就是用来描述你项目中实体类(如 CommentReplyCommentRequest 等)的结构、字段含义、数据类型的模块,也包括你在控制器中标记的那些请求体和响应体的结构。

在 OpenAPI 文档中,这些 Models 对应你代码里的在实体类上标记的注解,用于清晰展示接口请求体、响应体的字段细节(比如字段是否必填、示例值、数据约束等),让前端或其他调用方一眼就能明白 “这个接口需要传什么格式的参数,会返回什么结构的数据”。

例如, CommentRequest 是 “提交评论的请求参数类”
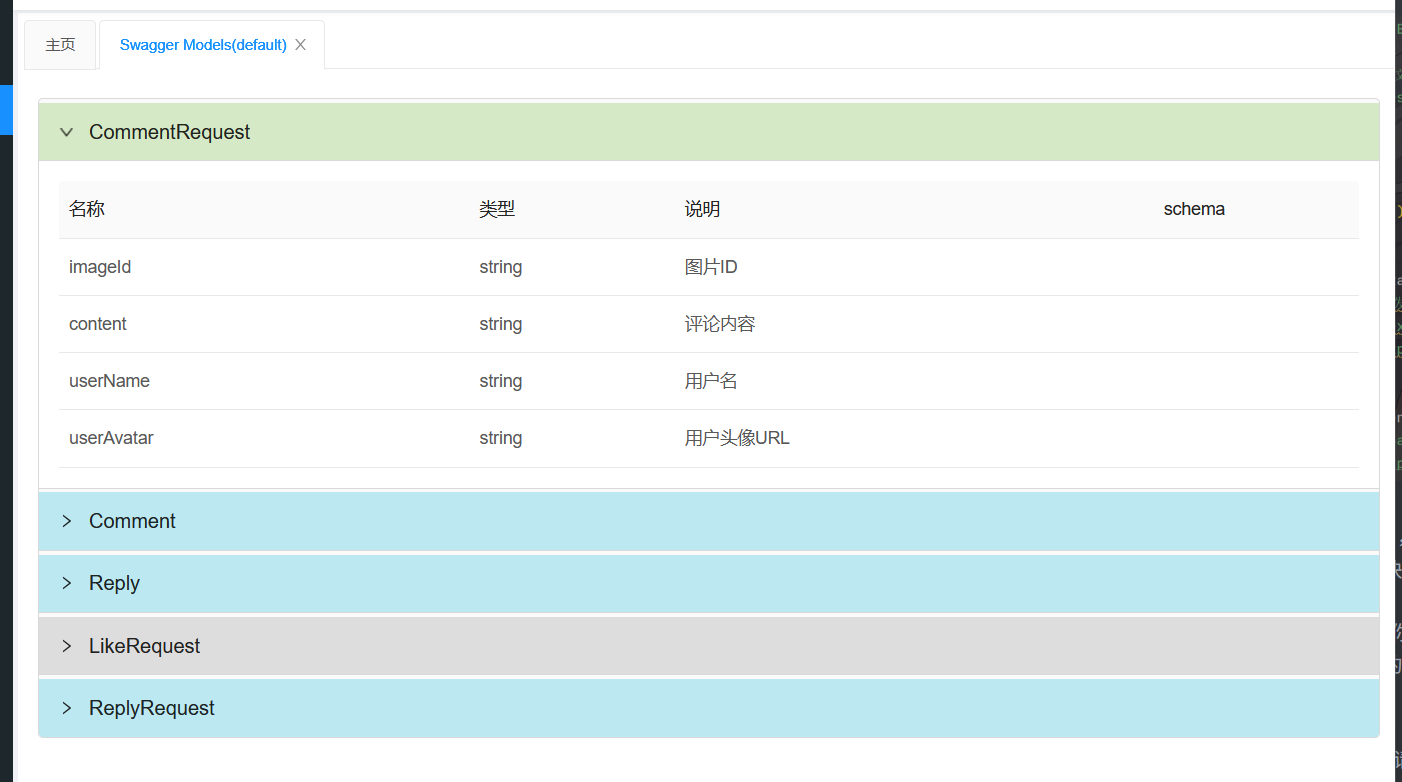
image-20251030194922624
image-20251030195135918

Comment 是 “评论实体类

image-20251030195051482
image-20251030195101195

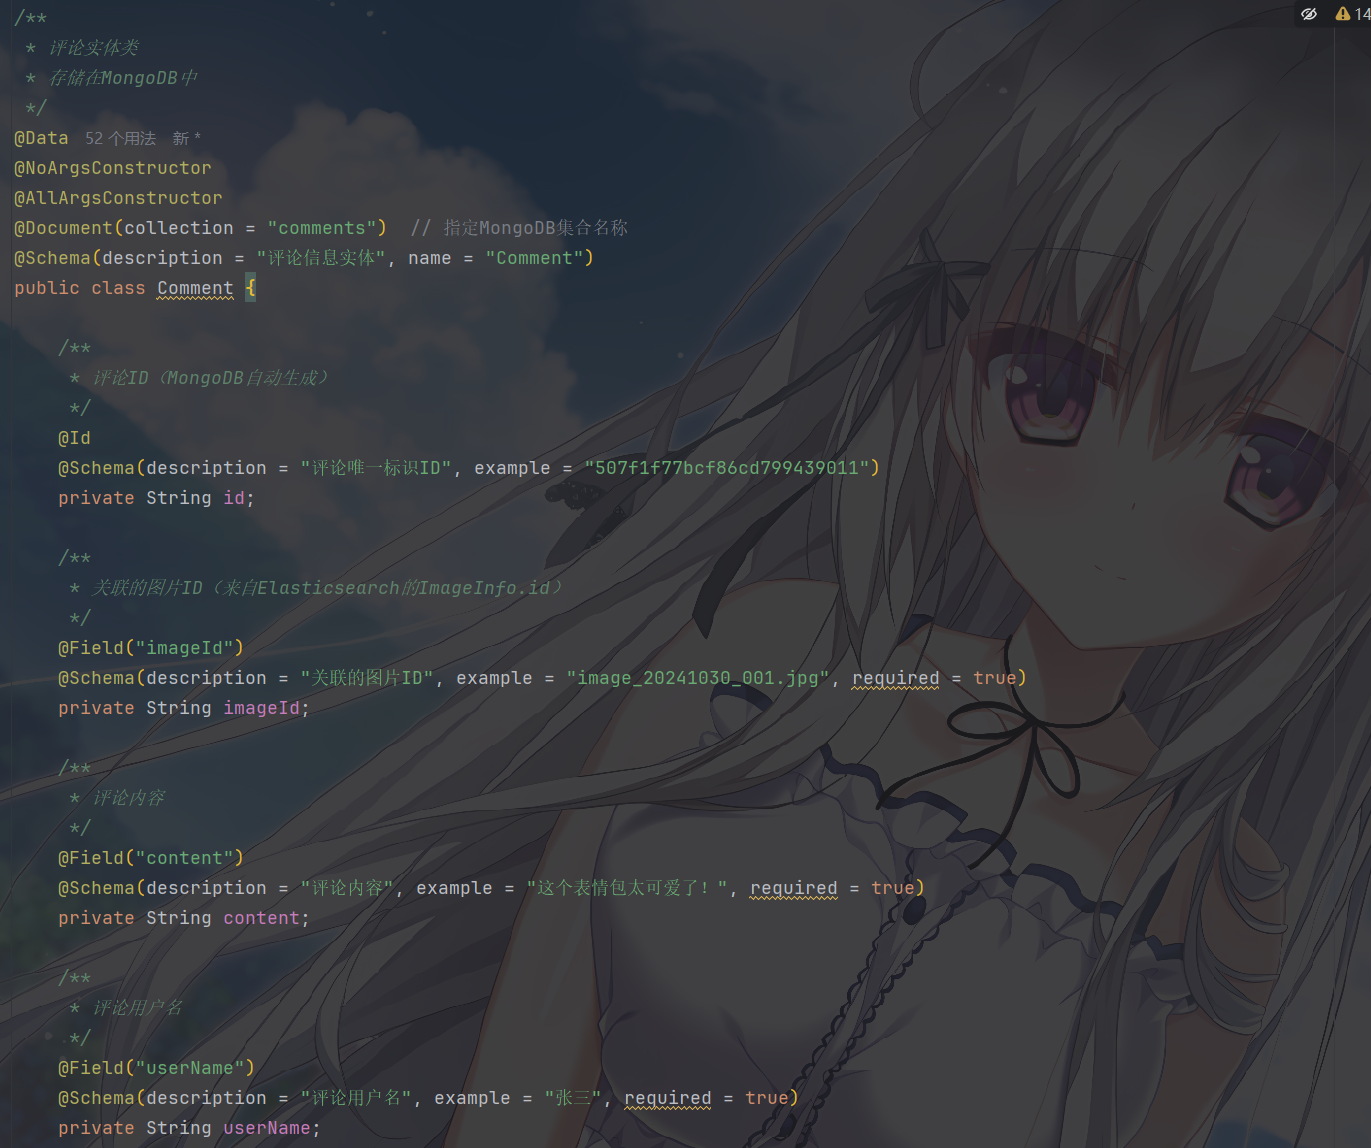
这些 Models 把实体类的结构可视化了,相当于给实体类做了一份 “结构说明书”

文档管理

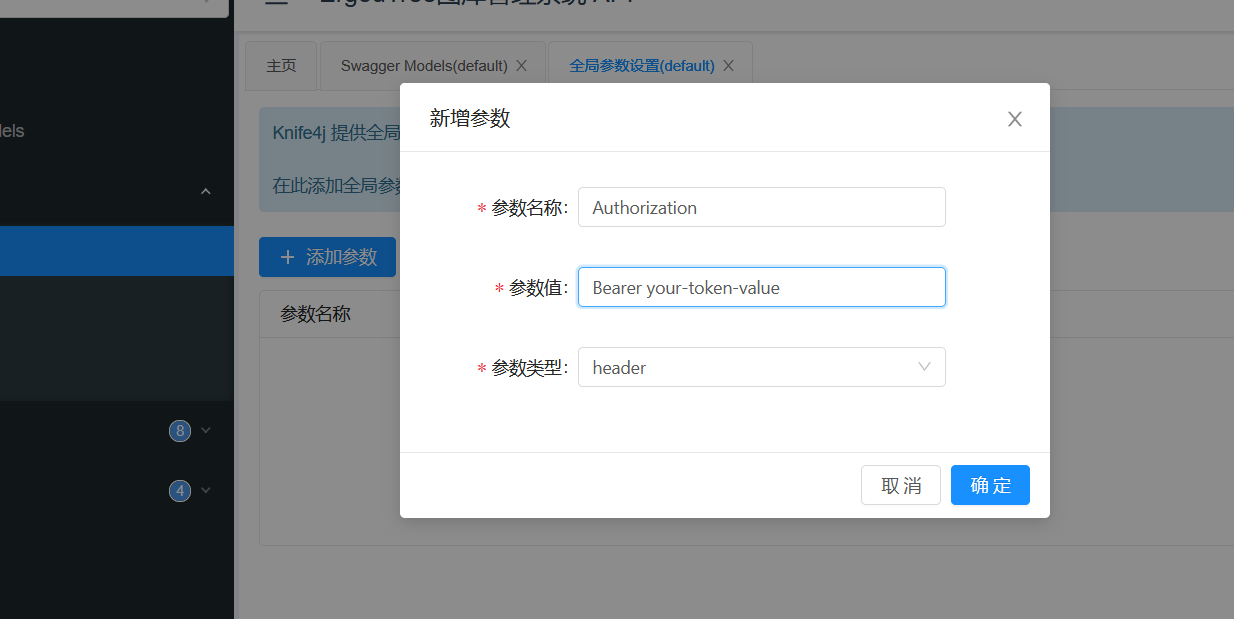
文档管理中有个全局参数设置,用于给所有接口统一添加 “请求头参数” 或 “查询参数”,避免每次调试接口时重复手动输入

使用最多的就是,Authorization 令牌头,因为在登陆情况下,我们的 token 是必须要一直流转在各个请求的请求头中的,这里就可以设置所有请求都要带的 Authorization 令牌头,之后所有接口的调试请求都会自动带上这些参数,减少重复操作。

假设你的接口需要在请求头中携带 Authorization: Bearer xxxxx 才能访问,操作如下

image-20251030195515279

然后打开任意一个接口的 “调试” 标签,点击 “发送请求”,此时请求头中会自动带上你配置的 Authorization 参数,无需手动输入。

支持环境隔离,比如配置 env=devenv=prod 来区分开发 / 生产环境,同样通过全局参数设置后,调试时自动携带。
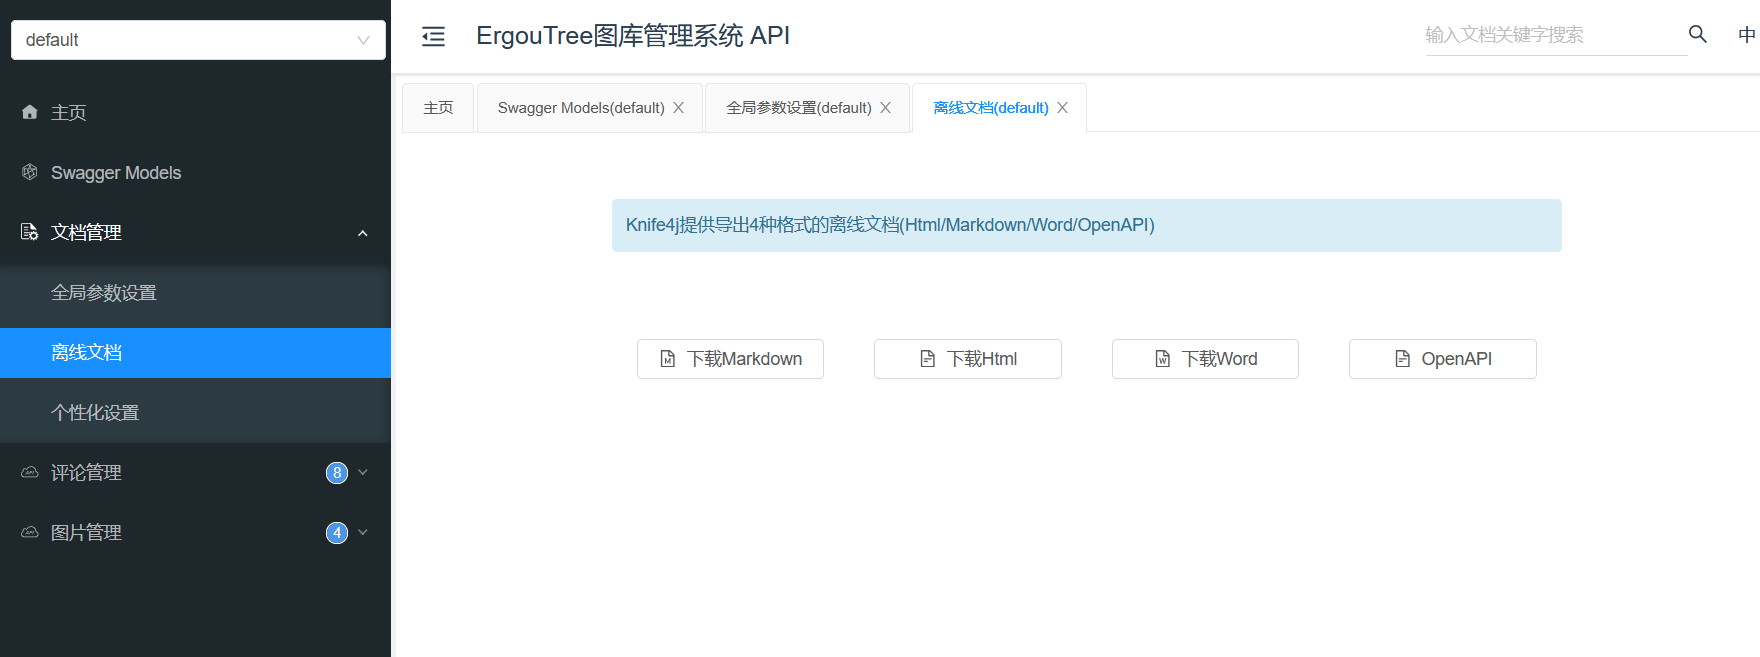
离线文档没啥好说的

image-20251030195603141

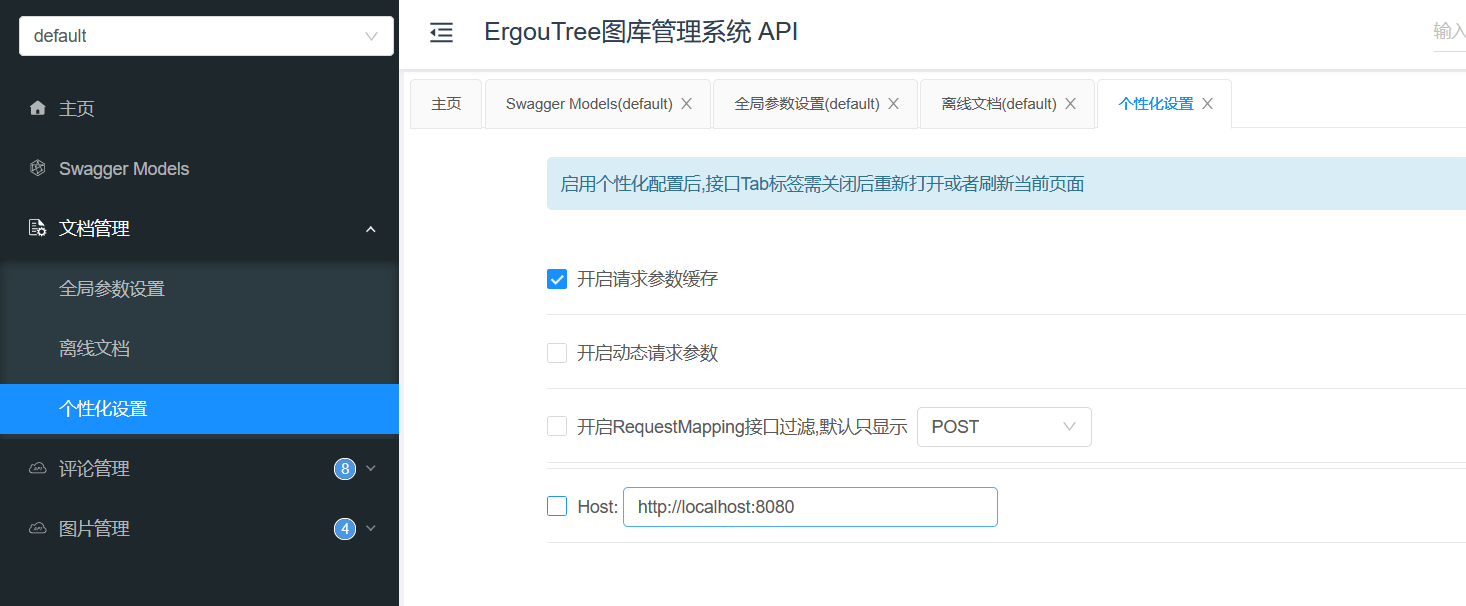
在设置里设置你请求的 host,一般是跟随项目,因为你是在项目的端口后处理的路径

image-20251030195624582

接口管理

这个就是一般的接口工具都带的了,大伙一看肯定都明白

image-20251030195704754

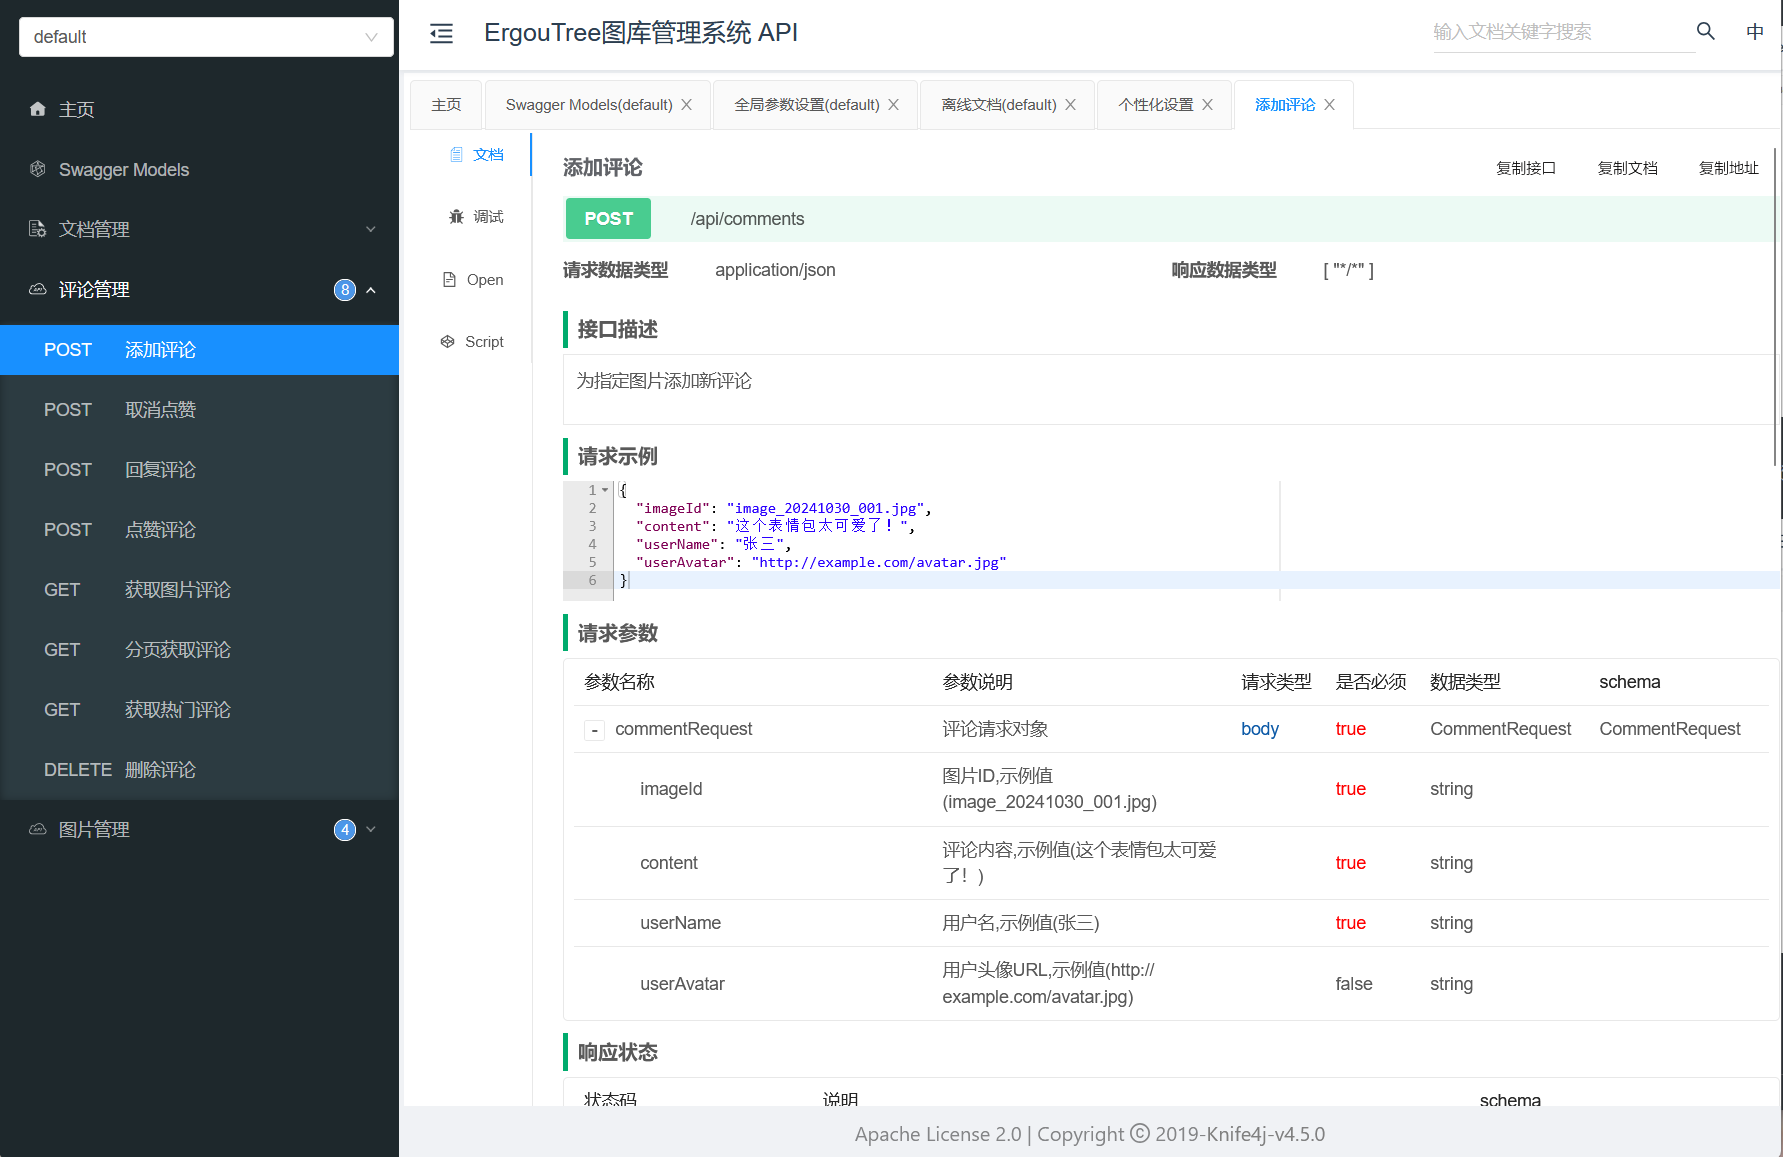
这里对应的就是我们在控制器中写的那些注解内容

image-20251030195750529
image-20251030195803839

那么会有人问,这个请求示例和响应示例是如何生成的,例如其中的请求示例(如 imageIdcontent 等字段)对应代码中的请求实体类(比如 CommentRequest)。这个类通过 @ApiModel@ApiModelProperty 注解描述字段细节

image-20251030200039595

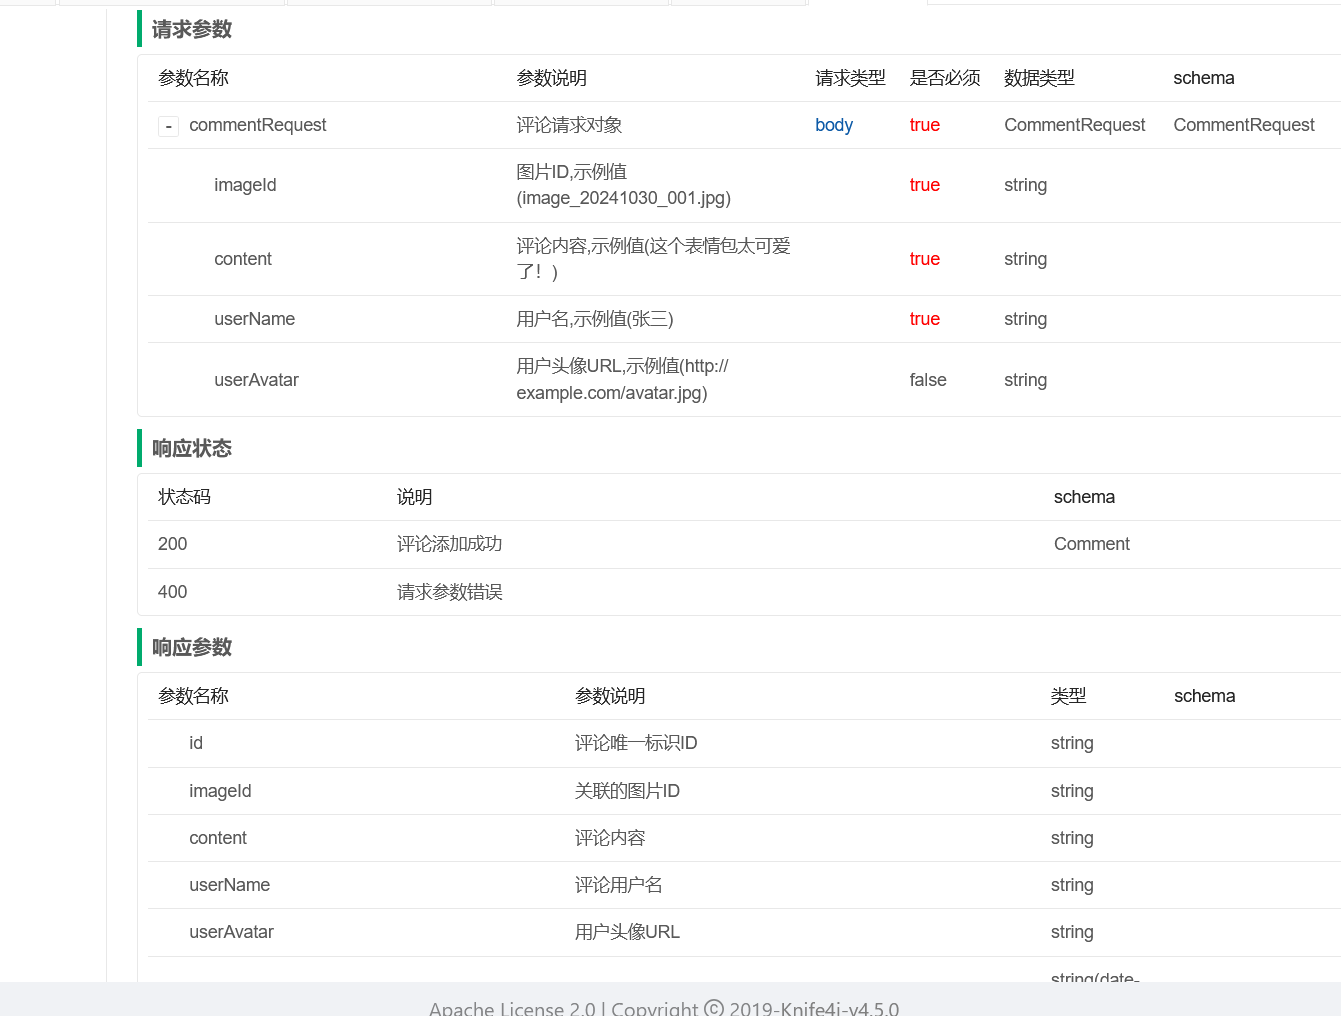
在 Controller 的接口方法中,通过 @RequestBody 关联这个实体类,并结合 @Operation 等注解说明接口用途:

1
2
3
4
5
6
7
8
9
10
11
12
13
@Operation(
summary = "添加评论",
description = "为指定图片添加新评论"
)
@ApiResponses({
@ApiResponse(
responseCode = "200",
description = "评论添加成功",
content = @Content(schema = @Schema(implementation = Comment.class))
),
@ApiResponse(responseCode = "400", description = "请求参数错误")
})
@PostMapping

Swagger/Knife4j 会扫描这些注解和实体类,自动提取字段的名称、示例值、是否必填等信息,最终在文档中生成结构化的请求示例 JSON。

响应体也是一样的