自定义内存用户验证的配置
用户验证方式
基于内存的用户认证虽然用的比较少,但是这东西简单而且便捷
而 Spring Security 进行用户验证的方式有如下几种,特点也如下
基于内存的验证(In-Memory Authentication)
特点 :用户信息直接配置在内存中,无需数据库或其他存储介质适用场景 :快速原型开发、测试环境或简单应用优势 :配置简单,无需额外依赖局限 :用户信息无法动态修改,重启应用后变更会丢失 基于数据库的验证(JDBC Authentication)
特点 :通过 JDBC
连接数据库,从数据库表中读取用户信息适用场景 :需要持久化存储用户信息的应用优势 :用户信息可动态管理,支持大量用户配置 :需定义用户表和权限表结构,通过
JdbcUserDetailsManager 实现 基于自定义 UserDetailsService 的验证
特点 :通过实现 UserDetailsService
接口自定义用户加载逻辑适用场景 :复杂的用户信息获取逻辑,如多数据源、特殊权限计算等优势 :灵活性高,可完全控制用户信息的加载过程核心 :实现 loadUserByUsername
方法,返回包含用户信息和权限的 UserDetails 对象 基于 LDAP 的验证
特点 :集成
LDAP(轻量级目录访问协议)服务器进行用户验证适用场景 :企业内部系统,已有 LDAP 身份认证体系优势 :集中式身份管理,支持单点登录场景配置 :需指定 LDAP 服务器地址、用户查询规则等 基于 OAuth2/OpenID Connect 的验证
特点 :支持第三方登录(如
Google、Facebook、微信等)适用场景 :需要社交登录或单点登录的互联网应用优势 :无需管理用户密码,提升用户体验,符合开放标准实现 :通过 OAuth2 客户端、资源服务器等组件实现 基于表单的身份验证
特点 :使用自定义登录表单进行用户名 / 密码验证适用场景 :大多数 Web 应用的标准验证方式优势 :可定制登录页面,提供更好的用户体验核心 :配置登录页面 URL、成功 / 失败处理逻辑 基于 HTTP 基本认证(HTTP Basic Authentication)
特点 :通过 HTTP
协议自带的基本认证机制,在请求头中传递用户名密码适用场景 :API 接口、简单的内部服务优势 :实现简单,无需复杂配置局限 :安全性较低(密码仅 Base64
编码),用户体验一般 基于 Remember-Me 的验证
特点 :允许用户选择
“记住我”,在会话过期后仍保持登录状态适用场景 :需要持久化登录状态的应用实现方式 :基于令牌的机制,令牌可存储在数据库或加密的
Cookie 中
这些验证方式可以单独使用,也可以根据需求组合使用,Spring Security
的灵活性使其能够适应从简单到复杂的各种身份验证场景。实际开发中,最常用的是基于数据库的验证和自定义
UserDetailsService 的验证方式。
核心配置实践
接下来直接进行配置实践
我们需要编写一个这样的配置类
1
2
3
4
5
6
7
8
9
10
11
12
13
14
15
16
17
18
19
20
21
22
23
24
25
26
27
28
29
30
31
32
33
34
35
36
37
38
39
@Configuration @EnableWebSecurity public class SecurityConfig { @Bean public SecurityFilterChain filterChain (HttpSecurity http) throws Exception { http. authorizeHttpRequests(authorize -> authorize .requestMatchers("/admin/**" ).hasRole("ADMIN" ) .anyRequest().authenticated() ) .formLogin(withDefaults()) .logout(withDefaults()) ; return http.build(); } @Bean public UserDetailsService userDetailsService () { UserDetails user = User.withDefaultPasswordEncoder() .username("user" ) .password("password" ) .roles("USER" ) .build(); UserDetails admin = User.withDefaultPasswordEncoder() .username("admin" ) .password("admin" ) .roles("ADMIN" , "USER" ) .build(); return new InMemoryUserDetailsManager (user, admin); } }
在这里,我们构建的 SecurityConfig 类主要就做两件事情
SecurityFilterChain安全过滤器链 ,决定了哪些请求需要被保护,以及如何保护。UserDetailsService用户数据源 ,告诉 Security
系统有哪些用户,他们的密码和角色是什么
其中,authorizeHttpRequests()
.requestMatchers("/admin/**").hasRole("ADMIN")
匹配规则 : 所有路径以 /admin/
开头的请求。授权策略 : hasRole("ADMIN")
表示只有拥有 ADMIN
角色的用户才能访问。注意 :hasRole
会自动为角色名加上 ROLE_ 前缀。 .anyRequest().authenticated()
匹配规则 :
除了上面已匹配的请求外,所有其他请求。授权策略 : authenticated()
表示只要是已登录的用户(无论角色)都可以访问。 顺序很重要 : Spring Security
会按照配置的顺序来匹配请求,一旦匹配成功就不再继续向下匹配。所以更具体的规则应该放在更前面 。
而formLogin(withDefaults())默认登录页面 。默认地址
/login,而logout(withDefaults())/logout。
简单讲解完安全过滤器链的配置,接下来就讲内存用户配置,上面说了,这部分配置了系统的用户信息,相当于一个临时的
“用户数据库”
UserDetailsService任何用户数据源(数据库、LDAP、内存)都需要实现这个接口。 InMemoryUserDetailsManagerUserDetailsService
的一个内存实现,用来管理基于内存的用户信息,非常适合快速原型开发和测试。User.withDefaultPasswordEncoder()
这是一个仅用于演示 的便捷方法。它会使用一个前缀编码器 (DelegatingPasswordEncoder),将密码以明文形式存储在内存中,但在认证时会进行编码匹配。
绝对不要在生产环境中使用它!
它会在控制台打印出安全警告,因为它将密码以明文形式暴露,存在严重的安全风险。
接下来我们创建用以测试的Controller
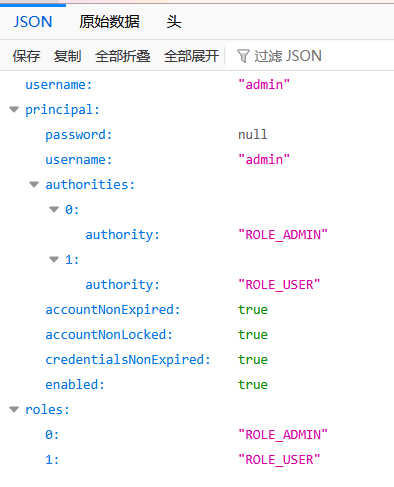
1
2
3
4
5
6
7
8
9
10
11
12
13
14
15
16
17
18
19
20
21
22
23
24
25
26
@Controller public class HomeController { @GetMapping("/") public ResponseEntity<Map<String, Object>> index (Authentication authentication) { String username = authentication.getName(); Object principal = authentication.getPrincipal(); List<String> roles = authentication.getAuthorities().stream() .map(GrantedAuthority::getAuthority) .collect(Collectors.toList()); return ResponseEntity.ok(Map.of( "username" , username, "principal" , principal, "roles" , roles)); } @GetMapping("/admin/view") public ResponseEntity<String> admin () { return ResponseEntity.ok("管理员ADMIN角色访问ok" ); } }
启动项目访问,登陆页中分别测试两个用户登陆查看信息,如 admin
用户:
image-20250921134353591
接下来尝试使用user用户访问
image-20250921134530801
访问/admin/view,可以发现是 403 ,被拒绝了
密码编码器
这部分只是简单讲解怎么用,后面会有专门的密码编码的各种讲解
密码编码器说明
在上述代码中,我们使用了 .password("admin")
声明了密码明文存储,如果我们需要对密码加密,如何操作? 实际上
Spring Security 为我们提供了非常方便的密码编码器
而在手动配置用户信息的时候,我们也.withDefaultPasswordEncoder()使用了这个方法来明文处理密码,这虽然方便但仅适合演示环境。在实际项目中,我们必须对密码进行加密存储
1
2
3
4
5
UserDetails admin = User.withDefaultPasswordEncoder() .username("admin" ) .password("admin" ) .roles("ADMIN" , "USER" ) .build();
Spring Security PasswordEncoder 是 Spring Security
处理密码加密与验证的核心接口,定义了两个关键方法:
1
2
3
4
5
6
7
public interface PasswordEncoder { String encode (CharSequence rawPassword) ; boolean matches (CharSequence rawPassword, String encodedPassword) ; }
Spring Security 内置了多种密码编码器,适合不同场景:
BCryptPasswordEncoder(推荐)
基于 BCrypt 强哈希算法,自动生成随机盐值,是目前最推荐的实现:
1
2
3
4
5
@Bean public PasswordEncoder passwordEncoder () { return new BCryptPasswordEncoder (12 ); }
Argon2PasswordEncoder
更现代的加密算法,专门设计抵御 GPU 破解,适合高安全性要求:
1
2
3
4
5
6
7
8
9
10
@Bean public PasswordEncoder passwordEncoder () { return new Argon2PasswordEncoder ( 16 , 32 , 8 , 65536 , 10 ); }
Pbkdf2PasswordEncoder
基于 PBKDF2 算法,适合需要 FIPS 认证的场景:
1
2
3
4
5
6
7
8
9
@Bean public PasswordEncoder passwordEncoder () { return new Pbkdf2PasswordEncoder ( "secret" , 16 , 32 , 185000 ); }
添加密码编码器
然后我们就可以集成密码编码器到我们的配置
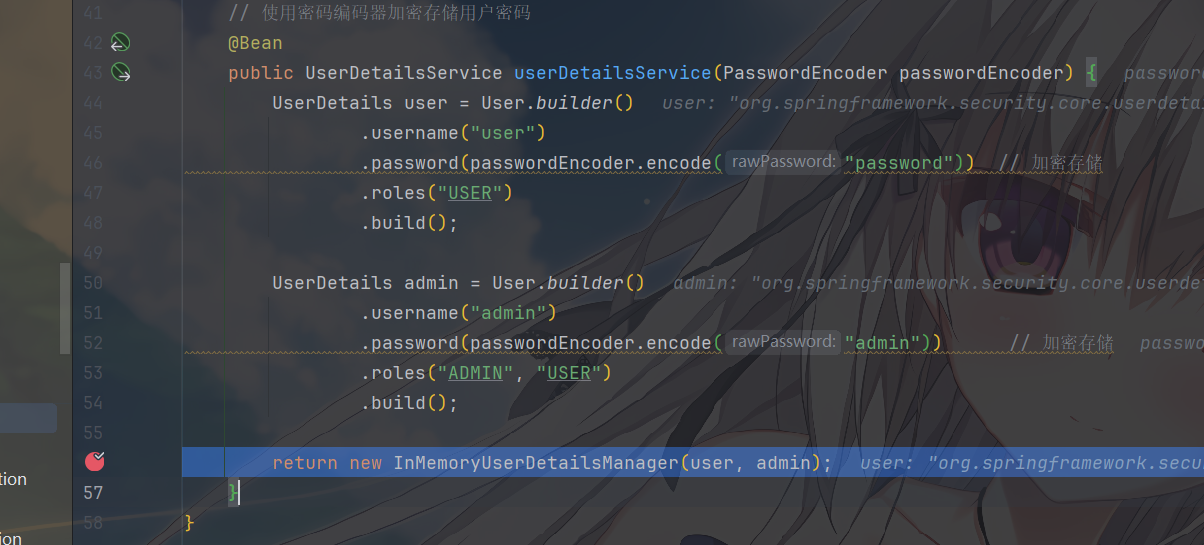
修改SecurityConfig,完整实现加密存储:
1
2
3
4
5
6
7
8
9
10
11
12
13
14
15
16
17
18
19
20
21
22
23
24
25
26
27
28
29
30
31
32
33
34
35
36
37
38
39
40
41
42
@Configuration @EnableWebSecurity public class SecurityConfig { @Bean public PasswordEncoder passwordEncoder () { return new BCryptPasswordEncoder (); } @Bean public SecurityFilterChain filterChain (HttpSecurity http) throws Exception { http .authorizeHttpRequests(authorize -> authorize .requestMatchers("/admin/**" ).hasRole("ADMIN" ) .anyRequest().authenticated() ) .formLogin(withDefaults()) .logout(withDefaults()); return http.build(); } @Bean public UserDetailsService userDetailsService (PasswordEncoder passwordEncoder) { UserDetails user = User.builder() .username("user" ) .password(passwordEncoder.encode("password" )) .roles("USER" ) .build(); UserDetails admin = User.builder() .username("admin" ) .password(passwordEncoder.encode("admin" )) .roles("ADMIN" , "USER" ) .build(); return new InMemoryUserDetailsManager (user, admin); } }
在进行编码器配置的时候,我们也可以这样进行编辑
1
2
3
4
UserDetails admin = User.withUsername("admin" ) .password("{noop}admin" ) .roles("ADMIN" ) .build();
可以看到.password内在密码的前面有个前缀,那么这个前缀实际上就代表编码器的配置
1
2
3
4
5
6
# 不同前缀对应不同编码器 {noop} → NoOpPasswordEncoder (明文) {bcrypt} → BCryptPasswordEncoder {pbkdf2} → Pbkdf2PasswordEncoder {scrypt} → SCryptPasswordEncoder {sha256} → StandardPasswordEncoder
用户验证的源码分析
Spring Security的自动配置
为什么Spring Boot
中,@EnableWebSecurity这个注解是可以不用写的,这就涉及到
Spring Boot 的自动配置的相关内容了
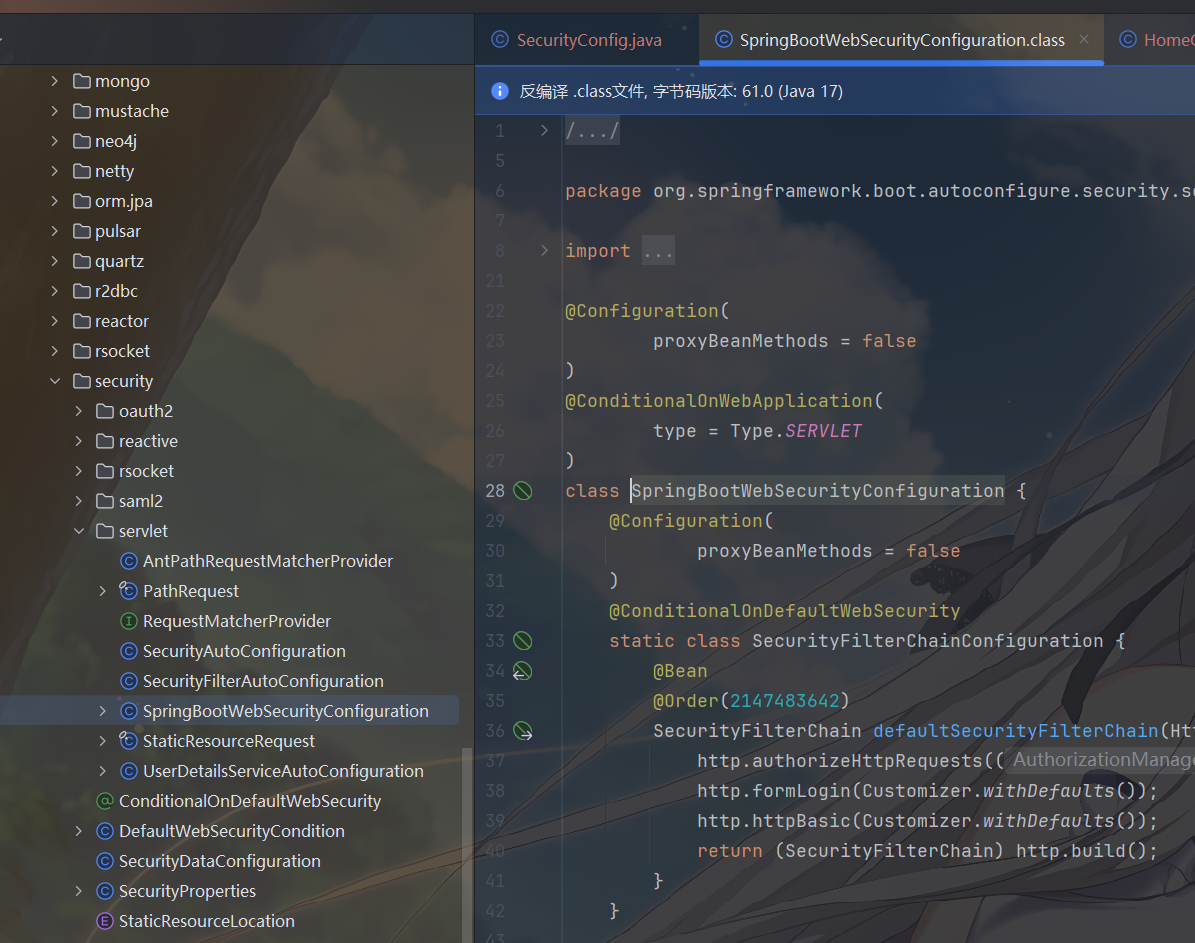
老地方,还是来到我们Spring Boot关于自动配置的地方
image-20250921142011657
找到其中预定义 Security 的相关配置,找到security包,其中的 servlet
包就是了,找到这个类,就是 Spring Boot 针对于 Spring Security
相关的配置了。
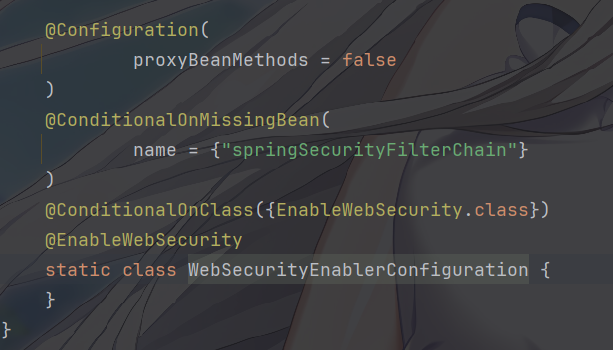
其中,只要EnableWebSecurity这个类被加载进来了,那么这个@EnableWebSecurity就会生效
image-20250921142224589
在创建了项目的时候,添加了Security相关的 starter
,那么这个类就会被加载,@EnableWebSecurity就会自动生效
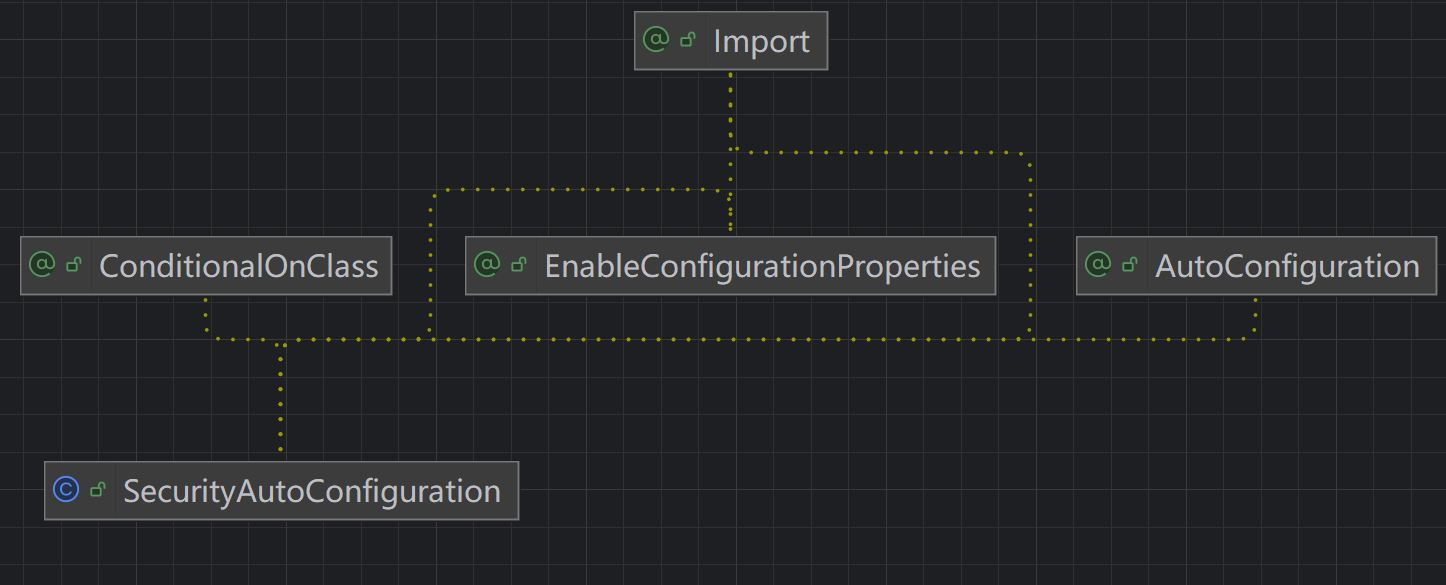
来都来了,顺便看一下SecurityAutoConfiguration这个自动配置类,是
Spring Boot 对 Spring Security 进行自动配置的关键类之一
类的关系还是比较简单的
image-20250921142525726
1
2
3
4
5
6
7
8
9
10
11
12
13
14
15
16
17
18
19
20
21
22
23
24
25
26
27
package org.springframework.boot.autoconfigure.security.servlet;import org.springframework.boot.autoconfigure.AutoConfiguration;import org.springframework.boot.autoconfigure.condition.ConditionalOnClass;import org.springframework.boot.autoconfigure.condition.ConditionalOnMissingBean;import org.springframework.boot.autoconfigure.security.SecurityDataConfiguration;import org.springframework.boot.autoconfigure.security.SecurityProperties;import org.springframework.boot.context.properties.EnableConfigurationProperties;import org.springframework.context.ApplicationEventPublisher;import org.springframework.context.annotation.Bean;import org.springframework.context.annotation.Import;import org.springframework.security.authentication.AuthenticationEventPublisher;import org.springframework.security.authentication.DefaultAuthenticationEventPublisher;@AutoConfiguration( before = {UserDetailsServiceAutoConfiguration.class} ) @ConditionalOnClass({DefaultAuthenticationEventPublisher.class}) @EnableConfigurationProperties({SecurityProperties.class}) @Import({SpringBootWebSecurityConfiguration.class, SecurityDataConfiguration.class}) public class SecurityAutoConfiguration { @Bean @ConditionalOnMissingBean({AuthenticationEventPublisher.class}) public DefaultAuthenticationEventPublisher authenticationEventPublisher (ApplicationEventPublisher publisher) { return new DefaultAuthenticationEventPublisher (publisher); } }
@AutoConfiguration(before = {UserDetailsServiceAutoConfiguration.class})SecurityAutoConfiguration
中相关的认证事件发布等基础功能,再去配置用户详情服务相关的自动配置。
@ConditionalOnClass({DefaultAuthenticationEventPublisher.class})DefaultAuthenticationEventPublisher.class
时,这个自动配置类才会生效。DefaultAuthenticationEventPublisher
是 Spring Security
中用于发布认证相关事件(如用户登录成功、登录失败等)的类,该注解保证了只有在引入了
Spring Security 相关依赖,且这个类存在的情况下,才会进行
SecurityAutoConfiguration 相关的自动配置。
@EnableConfigurationProperties({SecurityProperties.class})
@Import({SpringBootWebSecurityConfiguration.class, SecurityDataConfiguration.class})SpringBootWebSecurityConfiguration
负责 Web 应用中 Spring Security
的核心配置,比如过滤器链的配置等;SecurityDataConfiguration
涉及到与安全数据相关的配置,比如数据源用于加载用户信息等。
而方法 public class SecurityAutoConfiguration 中的
public DefaultAuthenticationEventPublisher authenticationEventPublisher(ApplicationEventPublisher publisher)是Spring
Security
自动配置中负责认证事件发布机制 的核心方法,之后会说的。其实它就是向
Spring
容器中注册一个默认的认证事件发布器(DefaultAuthenticationEventPublisher) ,用于在用户认证过程中(登录成功
/
失败、注销等)发布特定事件,方便系统其他组件(如日志组件、审计组件)监听并处理这些事件。
InMemoryUserDetailsManager源码分析
UserDetailsService在上面说了,他是 Spring Security
加载用户信息的接口
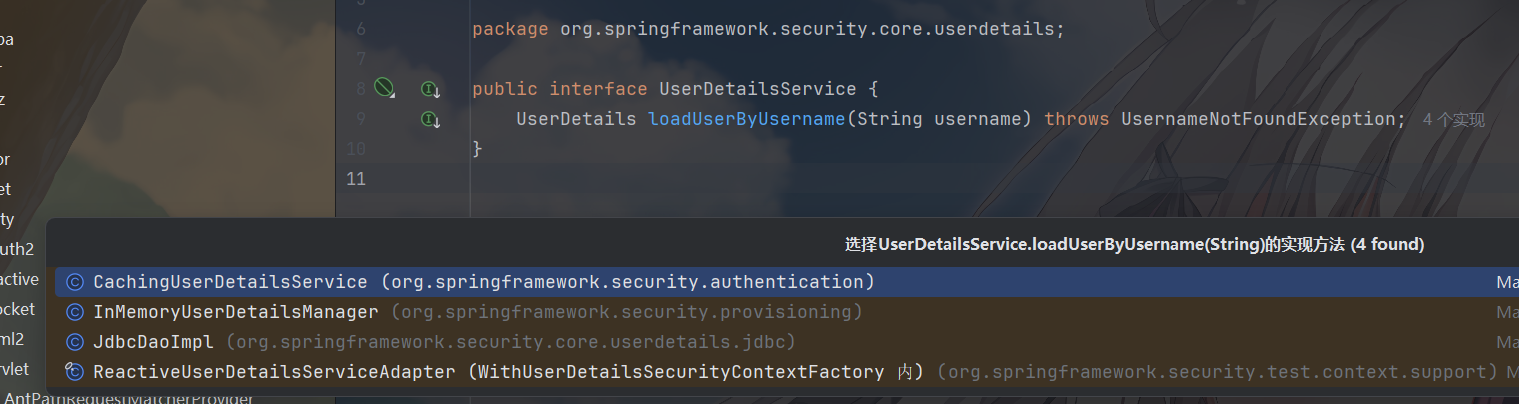
1
2
3
4
5
package org.springframework.security.core.userdetails;public interface UserDetailsService { UserDetails loadUserByUsername (String username) throws UsernameNotFoundException; }
他有很多实现
image-20250921143436211
其中,InMemoryUserDetailsManager 是 Spring Security
提供的基于内存的用户详情管理器 ,实现了
UserDetailsManager 和
UserDetailsPasswordService
接口,负责在内存中存储、管理用户信息(用户名、密码、角色、权限等),并提供用户认证所需的基础功能。
这个类很长很大,我们只挑重要的说
首先来看它的属性
1
2
3
4
5
6
7
8
9
10
public class InMemoryUserDetailsManager implements UserDetailsManager , UserDetailsPasswordService{ protected final Log logger = LogFactory.getLog(this .getClass()); private final Map<String, MutableUserDetails> users = new HashMap (); private SecurityContextHolderStrategy securityContextHolderStrategy = SecurityContextHolder.getContextHolderStrategy(); private AuthenticationManager authenticationManager; }
其中,SecurityContextHolderStrategy
它提供了多种构造方法,支持通过不同方式初始化内存用户
1 2 3 4 5 6 7 8 9 10 11 12 13 14 15 16 17 18 19 public InMemoryUserDetailsManager () {}public InMemoryUserDetailsManager (Collection<UserDetails> users) { for (UserDetails user : users) { this .createUser(user); } } public InMemoryUserDetailsManager (UserDetails... users) { for (UserDetails user : users) { this .createUser(user); } } public InMemoryUserDetailsManager (Properties users) { ... }
上面我们的写法就是调用了数组参数的构造方法 ,将创建的
user 和 admin 两个用户存入内存容器,内部会调用
createUser 方法,而构建这两个用户使用的是构建
UserDetails 对象 ,User 是
UserDetails 的默认实现。
而且他也有用户的管理方法,实现了 UserDetailsManager
接口的核心方法,提供用户的创建、删除、更新等功能:
1 2 3 4 5 6 7 8 9 10 11 12 13 14 15 16 17 18 19 20 21 public void createUser (UserDetails user) { Assert.isTrue(!this .userExists(user.getUsername()), "user should not exist" ); this .users.put(user.getUsername().toLowerCase(), new MutableUser (user)); } public void deleteUser (String username) { this .users.remove(username.toLowerCase()); } public void updateUser (UserDetails user) { Assert.isTrue(this .userExists(user.getUsername()), "user should exist" ); this .users.put(user.getUsername().toLowerCase(), new MutableUser (user)); } public boolean userExists (String username) { return this .users.containsKey(username.toLowerCase()); }
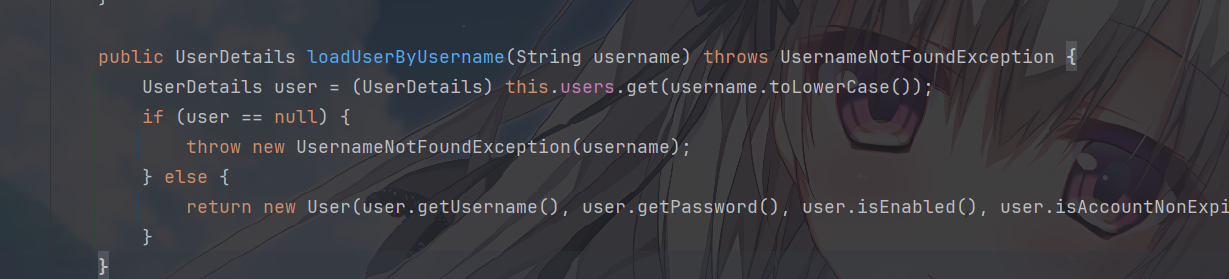
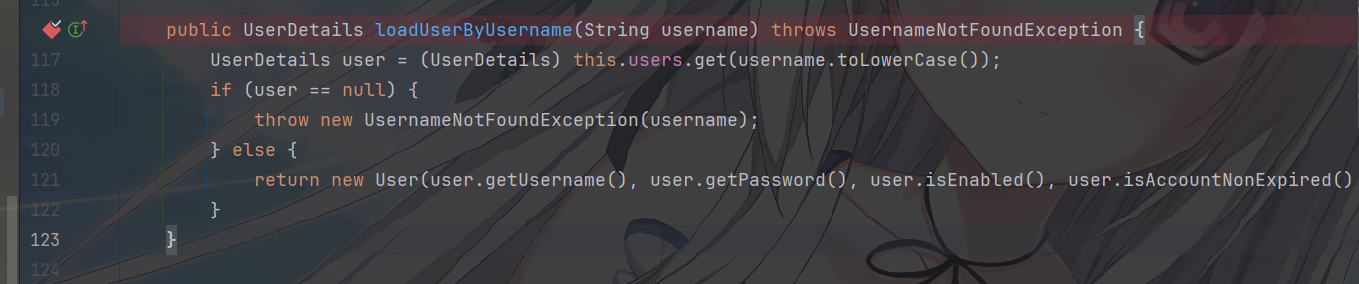
那么内存的用户是怎么进行认证的呢?实现
UserDetailsService 接口的 loadUserByUsername
方法,是认证过程的关键:
1
2
3
4
5
6
7
8
9
10
11
12
13
public UserDetails loadUserByUsername (String username) throws UsernameNotFoundException { UserDetails user = (UserDetails)this .users.get(username.toLowerCase()); if (user == null ) { throw new UsernameNotFoundException (username); } else { return new User (user.getUsername(), user.getPassword(), user.isEnabled(), user.isAccountNonExpired(), user.isCredentialsNonExpired(), user.isAccountNonLocked(), user.getAuthorities()); } }
当用户登录时,Spring Security
会调用此方法根据用户名查询用户信息(密码、权限等),用于验证登录凭证。
基于内存的用户认证流程源码分析
我们在这里打一个断点
image-20250921144631878
可以发现两个内存用户已经被创建,通过InMemoryUserDetailsManager
的数组的构造方法放入内存了,由于上面我配置了密码编码器,可以看到这次密码不是明文存储了
image-20250921144612999
继续运行,我们打开了主页,输入账号密码,首先 Spring Security
会自动使用InMemoryUserDetailsManager中的loadUserByUsername方法从内存中获取
User 对象
image-20250921145036716
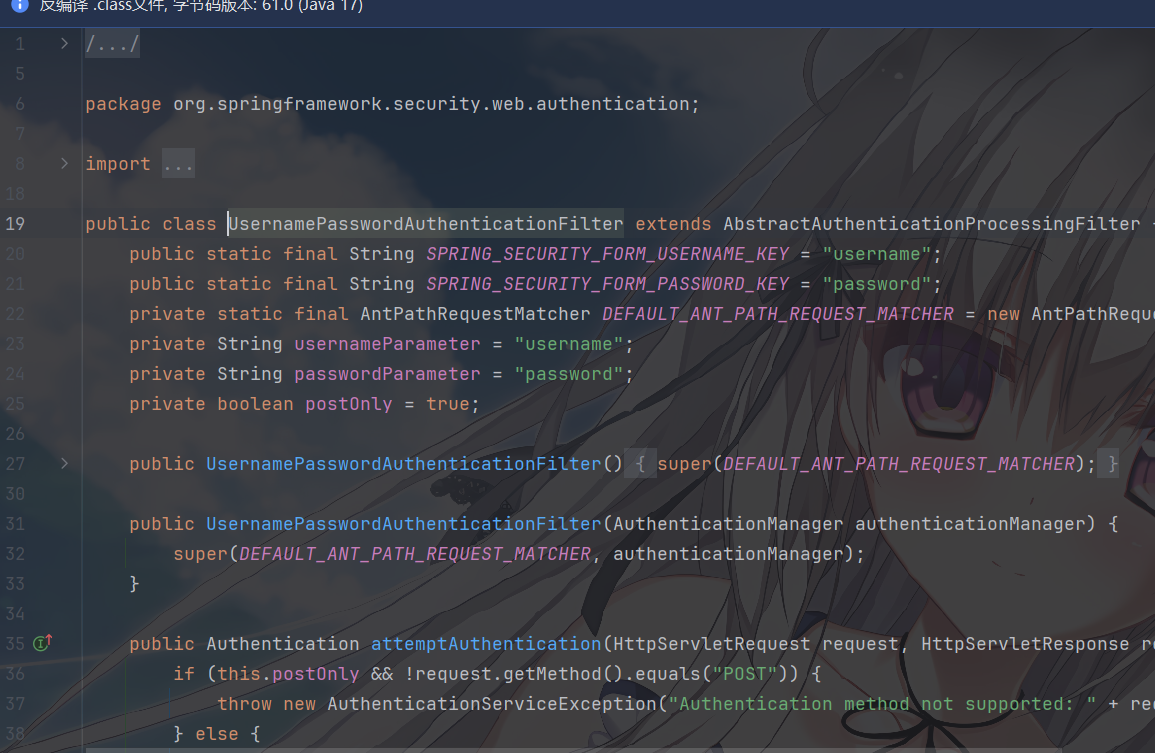
之后如果继续运行,就会来到密码验证这一块,也就是UsernamePasswordAuthenticationFilter过滤器,这个或氯气主要就是进行用户认证,它会把我们存在
user 列表中的用户信息拿出来,然后和我们输入的密码进行比较
image-20250921145140947
其中方法attemptAuthentication就是从 HTTP
请求中提取用户输入的用户名和密码,构建认证令牌(Token),并提交给认证管理器进行验证。
1
2
3
4
5
6
7
8
9
10
11
12
13
14
15
16
17
18
19
public Authentication attemptAuthentication (HttpServletRequest request, HttpServletResponse response) throws AuthenticationException { if (this .postOnly && !request.getMethod().equals("POST" )) { throw new AuthenticationServiceException ("Authentication method not supported: " + request.getMethod()); } else { String username = this .obtainUsername(request); username = username != null ? username.trim() : "" ; String password = this .obtainPassword(request); password = password != null ? password : "" ; UsernamePasswordAuthenticationToken authRequest = UsernamePasswordAuthenticationToken.unauthenticated(username, password); this .setDetails(request, authRequest); return this .getAuthenticationManager().authenticate(authRequest); } }
那么它是如何与前端登录表单对应?
前端登录表单的设计必须与 obtainUsername 和
obtainPassword 的参数名匹配,才能被正确提取。
1 2 3 4 5 6 7 8 9 <form action ="/login" method ="post" > <input type ="text" name ="username" placeholder ="用户名" > <input type ="password" name ="password" placeholder ="密码" > <button type ="submit" > 登录</button > </form >
表单的 method 必须是 POST(与
postOnly=true 匹配)。
输入框的 name 属性必须是 username 和
password(与
obtainUsername/obtainPassword
的默认参数名匹配)。
如果前端登录表单的参数名不同(例如用 userName 或
pwd),可以通过重写 obtainUsername 和
obtainPassword 方法自定义提取逻辑
接下来,未认证的令牌就会被提交到这里,由AbstractUserDetailsAuthenticationProvider类中的authenticate方法进行分析
详细的流程还是挺复杂的,UsernamePasswordAuthenticationFilter
中构建的未认证
UsernamePasswordAuthenticationToken,会被提交到
AuthenticationManager,而
AuthenticationManager 通常会委托给
ProviderManager,ProviderManager
又会找到对应的 AuthenticationProvider(这里就是
AbstractUserDetailsAuthenticationProvider 及其子类,比如
DaoAuthenticationProvider)来执行具体的认证逻辑,也就是我贴出的
AbstractUserDetailsAuthenticationProvider 的
authenticate 方法。
这个方法是用户名密码认证的核心逻辑 ,负责从用户详情服务加载用户、验证账户状态、验证密码等关键步骤。
1
2
3
4
5
6
7
8
9
10
11
12
13
14
15
16
17
18
19
20
21
22
23
24
25
26
27
28
29
30
31
32
33
34
35
36
37
38
39
40
41
42
43
44
45
46
47
48
49
50
51
52
53
54
55
56
public Authentication authenticate (Authentication authentication) throws AuthenticationException { Assert.isInstanceOf(UsernamePasswordAuthenticationToken.class, authentication, () -> this .messages.getMessage("AbstractUserDetailsAuthenticationProvider.onlySupports" , "Only UsernamePasswordAuthenticationToken is supported" )); String username = this .determineUsername(authentication); boolean cacheWasUsed = true ; UserDetails user = this .userCache.getUserFromCache(username); if (user == null ) { cacheWasUsed = false ; try { user = this .retrieveUser(username, (UsernamePasswordAuthenticationToken)authentication); } catch (UsernameNotFoundException ex) { this .logger.debug("Failed to find user '" + username + "'" ); if (!this .hideUserNotFoundExceptions) { throw ex; } throw new BadCredentialsException (this .messages.getMessage("AbstractUserDetailsAuthenticationProvider.badCredentials" , "Bad credentials" )); } Assert.notNull(user, "retrieveUser returned null - a violation of the interface contract" ); } try { this .preAuthenticationChecks.check(user); this .additionalAuthenticationChecks(user, (UsernamePasswordAuthenticationToken)authentication); } catch (AuthenticationException ex) { if (!cacheWasUsed) { throw ex; } cacheWasUsed = false ; user = this .retrieveUser(username, (UsernamePasswordAuthenticationToken)authentication); this .preAuthenticationChecks.check(user); this .additionalAuthenticationChecks(user, (UsernamePasswordAuthenticationToken)authentication); } this .postAuthenticationChecks.check(user); if (!cacheWasUsed) { this .userCache.putUserInCache(user); } Object principalToReturn = user; if (this .forcePrincipalAsString) { principalToReturn = user.getUsername(); } return this .createSuccessAuthentication(principalToReturn, authentication, user); }
继续进入这个方法
image-20250921151207977
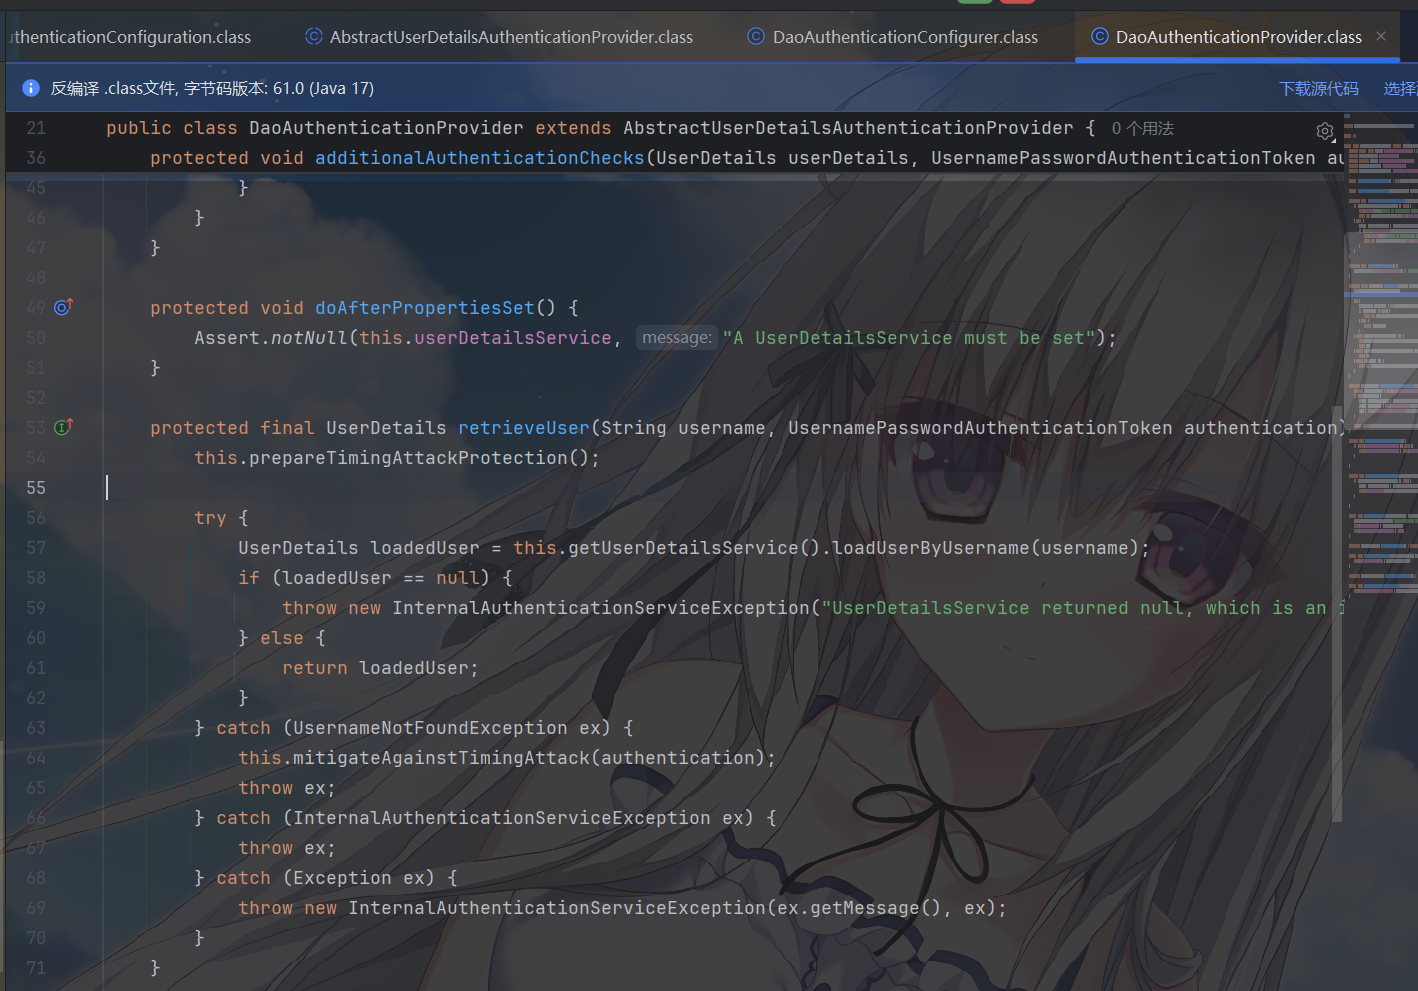
来到了DaoAuthenticationProvider下的retrieveUser方法
image-20250921151441632
其中通过,UserDetails loadedUser = this.getUserDetailsService().loadUserByUsername(username);,这行代码获取实际的对象就是我们在代码中创建的内存的InMemoryUserDetailsManager用户对象,不信你就再进入
loadUserByUsername,接下来发现我去我回来了,这是我们通过InMemoryUserDetailsManager一开始我们存入到内存的用户信息
image-20250921151711315
而在DaoAuthenticationProvider的retrieveUser方法中,主要是通过比对传入的UsernamePasswordAuthenticationToken authentication,也就是包装了我们输入的用户信息的令牌,和我们在内存中存储的用loadUserByUsername拿到的UserDetails,下面的工作就是比对看看密码是不是一样
还记得我们在上面说的密码通过如下方法this.additionalAuthenticationChecks(user, (UsernamePasswordAuthenticationToken)authentication);进行传递,然后在内部进行比对,我们进入到这个方法的内部,就来到了DaoAuthenticationProvider方法的additionalAuthenticationChecks方法
1 2 3 4 5 6 7 8 9 10 11 12 13 14 15 16 17 18 19 20 21 22 23 24 25 26 27 28 29 30 31 32 33 34 35 36 37 38 39 40 41 42 43 protected void additionalAuthenticationChecks ( UserDetails userDetails, // 1. 从 UserDetailsService 加载的「系统存储用户」 UsernamePasswordAuthenticationToken authentication // 2. 登录时构建的「未认证令牌」 ) throws AuthenticationException { if (authentication.getCredentials() == null ) { this .logger.debug("Failed to authenticate since no credentials provided" ); throw new BadCredentialsException ( this .messages.getMessage( "AbstractUserDetailsAuthenticationProvider.badCredentials" , "Bad credentials" ) ); } String presentedPassword = authentication.getCredentials().toString(); if (!this .passwordEncoder.matches(presentedPassword, userDetails.getPassword())) { this .logger.debug("Failed to authenticate since password does not match stored value" ); throw new BadCredentialsException ( this .messages.getMessage( "AbstractUserDetailsAuthenticationProvider.badCredentials" , "Bad credentials" ) ); } }
如果在这里比较成功了,那么登录就真的成功了,整个登录的内存用户认证的全部流程就是这样